| 2.8. Scissors Select | ||
|---|---|---|

|
2. Nástroje pro výběr |  |
| 2.8. Scissors Select | ||
|---|---|---|
|
|
2. Nástroje pro výběr | |
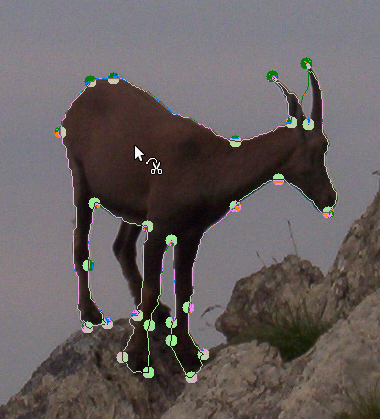
The Scissors Select tool is an interesting piece of equipment: it has some features in common with Free Select, some features in common with the Path tool, and some features all its own. It is useful when you are trying to select a region defined by strong color-changes at the edges. To use the Scissors, you click to create a set of "control nodes", also referred to as anchors or control points, at the edges of the region you are trying to select. The tool produces a continuous curve passing through these control nodes, following any high-contrast edges it can find. If you are lucky, the path that the tool finds will correspond to the contour you are trying to select.
Unfortunately, there seem to be some problems with the edge-following logic for this tool, with the result that the selections it creates tend to be pretty crude in a lot of cases. A good way to clean them up is to switch to Quick Mask mode, and use paint tools to paint in the problematic parts. On the whole, most people find the Path tool to be more useful than the Scissors, because, even though it does not have the intelligent edge-finding capability, the paths it produces persist until you delete them, and can be altered at any time.
There are different possibilities to activate the tool:
From the main menu: → → .
By clicking the tool icon
![]() in the Toolbox.
in the Toolbox.
By pressing the I keyboard shortcut.
The default behavior of the Shift, Ctrl, and Alt keys is described in 2.1.1 – „Key modifiers (Defaults)“ for all selection tools.
There is, however, one key modifier that has a special behavior if you use it while editing a selection, that is after you have added the first node:
By default, the auto-edge snap feature is enabled: whenever you click and drag the mouse pointer, the Scissors tool finds the point of the maximal gradient (where the color change is maximal) for placing a new control node or moving an existing node.
Holding down this key while clicking and dragging disables this feature, and the control node will be placed at the position of the mouse pointer.
Backspace removes last segment drawn, Escape cancels all selection segments.
Při každém kliknutí levým tlačítkem myši se vytvoří nový kontrolní bod spojený s předchozím křivkou, která se snaží sledovat hrany v obrázku. Chcete-li výběr ukončit, klikněte na první kontrolní bod (kurzor se změní, pokud jste na správném místě). Křivku můžete upravit tažením kontrolních bodů nebo vytvářením nových. Když jste s tvarem křivky spokojeni, klikněte kamkoliv dovnitř, křivka se tak změní na klasický výběr.
As said above when you click with this tool you drop points. The
selection boundary is driven by these control points. During creation you
can move each one by clicking and dragging, except the first and the last
one. The selection is closed when you are clicking the last point over
the first one. When the selection is closed the pointer shape
changes according to its position: inside
 ,
on the boundary
,
on the boundary
 ,
and outside
,
and outside
 .
You can adjust the selection creating new points by clicking on the
boundary or by moving each control points (merged first and last
point). The selection is validated when you click inside.
.
You can adjust the selection creating new points by clicking on the
boundary or by moving each control points (merged first and last
point). The selection is validated when you click inside.
You have to notice that you can get only one selection; if you create a second selection, the first one is erased when you validate the second one.
![[Varování]](images/warning.png)
|
Varování |
|---|---|
|
Be sure not to click inside the curve until you are completely done adjusting it. Once you have converted it into a selection, undoing takes you back to zero, and you will have to start constructing the curve again from scratch if you need to change it. Also be sure not to switch to a different tool, or again all of your carefully created control nodes will be lost. (But you still can transform your selection into a path and work it with the Path tool.) |
To move the selection, see Moving selections.
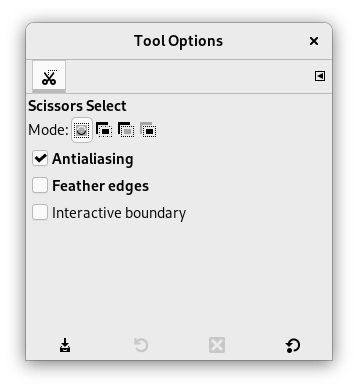
Normally, tool options are displayed in a window attached under the Toolbox as soon as you activate a tool. If they are not, you can access them from the main menu through → → which opens the option window of the selected tool.
![[Poznámka]](images/note.png)
|
Poznámka |
|---|---|
|
See Selection Tools Options for help with options that are common to all these tools. Only options that are specific to this tool are explained here. |
Pokud je tato volba povolena, zobrazuje se při umisťování nového kontrolního bodu křivka interaktivně. Pokud je zakázána, je kontrolní bod s předchozím bodem spojen úsečkou a výslednou křivku uvidíte až po uvolnění tlačítka myši. Na pomalých počítačích, pokud jsou body daleko od sebe, to může znamenat znatelné urychlení. (Tato volba nefunguje při přesouvání již existujících kontrolních bodů.)