| 13.14. Verformen | ||
|---|---|---|

|
13. Abbilden |  |
| 13.14. Verformen | ||
|---|---|---|
|
|
13. Abbilden | |
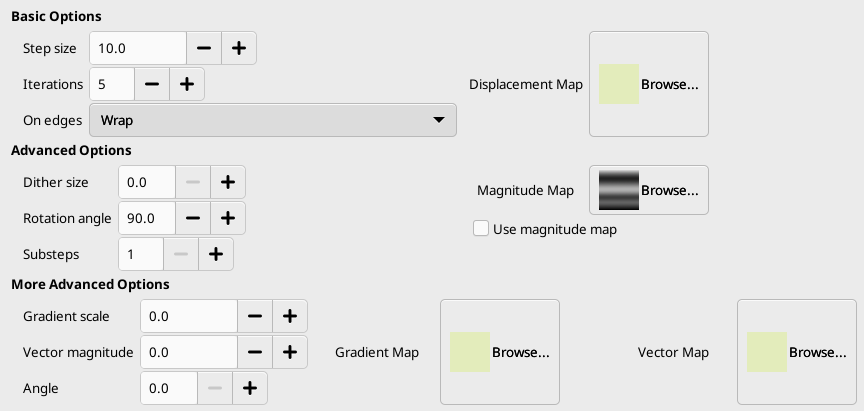
This filter displaces pixels of active layer or selection according to the gray levels of a Displacement map. Pixels are displaced according to the gradient slope in the displacement map. Pixels corresponding to solid areas are not displaced; the higher the slope, the higher the displacement.
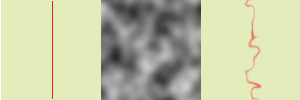
Abbildung 17.315. From left to right: original image, displacement map, displaced image
Die einfarbigen Bereiche der Karte führen im Bild zu keinerlei Veränderung. Eine starke Veränderung der Helligkeit in der Karte hingegen führt zu einer sehr starken Wirkung des Filters. Die Richtung der Verschiebung ist dabei rechtwinklig zur Richtung des Verlaufes in der Karte.
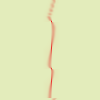
Abbildung 17.316. Anwendung einer Karte mit einem nicht-linearen Verlauf
Ein nicht-linearer Verlauf führt zu Wirbeln.
Abbildung 17.317. Anwendung einer Karte mit einem komplexen Verlauf
And a complex gradient, such as the Solid Noise filter can create, gives a swirl effect.
Mit diesem Filter haben Sie die Möglichkeit, einen Teil des Bildes zu maskieren und damit gegen die Veränderung durch das Filter zu schützen.
Grundlegende Eigenschaften
Mit dieser Eigenschaft stellen die die Weite der Verschiebung ein, welche bei jedem Filterdurchgang angewendet wird. Ein Wert von 10.0 ist dabei notwendig, um eine Verschiebung von 1 Pixel zu erhalten. Sie können den Wert mit Hilfe eines Eingabefeldes mit zugeordnetem Spinnrad einstellen und dabei durchaus auch negative Werte vergeben. Diese führen dann zu einer Umkehr der Verschiebungsrichtung.
Mit dieser Eigenschaft können Sie die Anzahl der Wiederholungen einstellen, die ausgeführt werden, wenn das Filter auf ein Bild angewendet wird.
Because of displacement, a part of pixels are driven over the borders of layer or selection, and, on the opposite side, pixels places are emptying. The four following options allow you to fix this issue:
Die Bildbereiche, die an einer Seite des Bildes hinaus geschoben werden, werden auf der gegenüberliegenden Bildseite wieder eingefügt. Das ist die Voreinstellung.
Emptying places are filled with a spreading of the neighboring image line.
Bildbereiche, an denen keine Inhalte zur Verfügung stehen, werden geschwärzt.
Bildbereiche, an denen keine Inhalte zur Verfügung stehen, werden mit der aktuellen Vordergrundfarbe gefüllt.
To be listed in this file picker, the displacement map, which should be a grayscale image, must be present on your screen when you call this filter and must have the same size as the original image.
Erweiterte Einstellungen
Once all pixels are displaced, this option scatters them randomly, giving grain to the image. The higher this value (0.00-100.00), the thinner the grain.
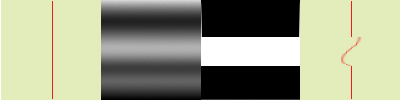
This option sets the displacement angle of pixels according to the slope direction of the gradient. Previous examples have been created with a vertical gradient and a 90° angle: so, pixels were displaced horizontally and nothing went out of the image borders. Here is an example with a 10° angle and 6 iterations:
Abbildung 17.320. Mit einem 10°-Winkel und 6 Iterationen:
Displacement is made according to a 10° angle against vertical. Pixels going out the lower border on every iteration are going in through the upper border (Wrap option checked), giving a dotted line.
Wenn Sie hier einen Wert > 1 angeben, wird der Verschiebungsvektor in mehreren Unterschritten berechnet, was eine größe Kontrolle über den Verschiebungsprozess ermöglicht.
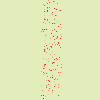
In addition to displacement map, you can add a Magnitude map. This map should also be a grayscale image, with the same size as the source image and which must be present on your screen when you call the filter. This map gives more or less strength to the filter on some parts of the image, according to the gray levels of this magnitude map. Image areas corresponding to white parts of this map will undergo all the strength of the filter. Image areas corresponding to black parts of the map will be spared by the filter. Intermediate gray levels will lessen the filter action on corresponding areas of the image. Use magnitude map must be checked for that.
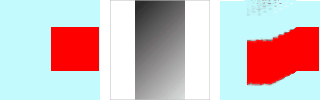
Abbildung 17.321. Beispiel mit Betrags-Karte:
From left to right: original image, displacement map, magnitude map, after applying „Warp“ filter. You can see that the black areas of the magnitude map prevent the filter from taking action.
Erweiterte Optionen
Mit diesen zusätzlichen Optionen können Sie ein oder zwei weitere Karten verwenden, eine Farbverlaufskarte oder eine Vektorkarte.
![[Anmerkung]](images/note.png)
|
Anmerkung |
|---|---|
|
Um diese Karten allein auszuprobieren, müssen die anderen Karten einfarbig sein. |
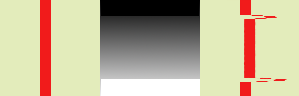
Using a gradient map, (this map should also be a grayscale image), the displacement of pixels depends on the direction of grayscale transitions. The Gradient scale option lets you set how much the grayscale variations will influence the displacement of pixels. On every iteration, the filter works on the whole image, not only on the red object: this explains blurredness.
Abbildung 17.322. Beispiel mit Verlaufs-Map
Links: Originalbild. Mitte: Verlaufs-Map. Rechts: Bild nach Anwendung des Filters.
In the example above, „Warp“ filter is applied with a gradient map (Gradient scale = 10.0). The gradient is oblique, from top left to right bottom. The part of the image corresponding to the gradient is moved obliquely, 90° rotated (Rotation angle 90° in Advanced Options).
Mit dieser Karte hängt die Verschiebung vom Winkel ab, den Sie im Eingabefeld darunter festlegen. 0° entspricht aufwärts, positive Werte entsprechen einer Drehung gegen den Uhrzeigersinn. Die Vektorvergrößerung legt fest, um wieviel Pixel sich das Bild bei jeder Iteration verschiebt.
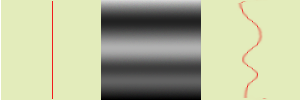
Abbildung 17.323. Vector magnitude example

Links: Originalbild. Mitte: Verlagerungs-Map. Rechts: Bild nach Anwendung des Filters.
In the above example, „Warp“ filter is applied with a Vector magnitude. Gradient is vertical, from top to bottom. Vector angle is 45°. The image is moved obliquely, 45° to the top left corner. The image is blurred because every iteration works on the whole image, and not only on the red bar.
Der Winkel bei einer festen Vektor-Karte (s.o.).