| 4. Fenêtres de dialogue relatives à la gestion de l’image | ||
|---|---|---|

|
Chapitre 15. Dialogues |  |
| 4. Fenêtres de dialogue relatives à la gestion de l’image | ||
|---|---|---|
|
|
Chapitre 15. Dialogues | |
Buffers are a kind of temporary storage for image data, created when you cut or copy part of a drawable (a layer, layer mask, etc.). The following commands are available from the menu to save an image to a buffer:
→ → This command cuts the selected part from the current drawable (usually a layer) and places it in a buffer. If there is no selection the whole drawable will be used. You will be asked to give the buffer a name. The image will be removed from the selection after this is done.
→ → This command copies the selected part from the current drawable (usually a layer) and places it in a buffer. If there is no selection the whole drawable will be used. You will be asked to give the buffer a name.
→ → This command copies the selected part from all the visible drawables and places it in a buffer. If there is no selection the whole image will be used. You will be asked to give the buffer a name.
→ → This menu command opens the Buffers Dialog. To actually paste a buffer, choose one of the buttons from this dialog, or the context menu. Both of which will be explained below.
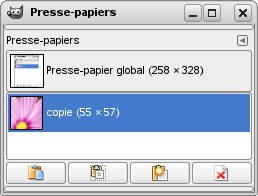
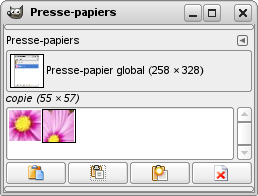
The « Buffers » dialog shows you the contents of all existing named buffers, and allows you to operate on them in several ways. It also shows you, at the top, the contents of the Global Buffer (the contents of the clipboard). This Global Buffer is merely a display: you can't do anything with it. There is no hard limit on the number of named buffers you can create, except that it will consume a share of your available computer memory.
![[Attention]](images/caution.png)
|
Attention |
|---|---|
|
Named buffers are not saved across sessions: they will be gone when you close GIMP. The only way to save their contents is to paste them into images. |
La fenêtre du Presse-papiers est une fenêtre ancrable, voyez la section Dialogues, fenêtres et onglets sur l’utilisation des ancrages.
Vous pouvez y accéder :
from the main menu: → → ;
from the main menu: → → ;
from the Tab menu in any dockable dialog by clicking on
![]() and selecting
→ .
and selecting
→ .
In the menu, there is a list of detached windows which exists only if at least one dialog remains open. In this case, you can raise the « Buffers » dialog from the main menu: → .
Clicking on a buffer in the display area makes it the active buffer, i.e., the one that will be used for paste commands executed from the Buffers context menu, or the buttons at the bottom of the dialog. Double-clicking on a buffer causes its contents to be pasted to the active image as a floating selection; this is a quick way of executing the « Paste Buffer » command.
At the bottom of the dialog are five buttons. The operations they perform can also be accessed from the Buffers Menu that you get by right clicking on the active buffer.
Dans le menu d’onglet de la fenêtre Presse-papiers, vous pouvez choisir entre et . En mode Grille, les tampons sont disposés dans un tableau rectangulaire. En mode Liste, chaque rang est occupé par une miniature du contenu du tampon, avec son nom et ses dimensions en pixels.
![[Astuce]](images/tip.png)
|
Astuce |
|---|---|
|
Ctrl+F ouvre un champ de recherche. Voir View as List |
Vous pouvez changer la taille d’aperçu des images en utilisant le sous-menu Taille des aperçus dans le menu d’onglet.
The button bar at the bottom offers the following functionality:
Cette commande colle le contenu du tampon sélectionné dans l’image active comme une sélection flottante. La seule différence avec la commande Coller classique est qu’elle utilise le tampon sélectionné dans le Presse-papiers nommé au lieu du contenu du presse-papiers général de GIMP.
With the Shift key pressed, it pastes the buffer at its original location.
Cette commande colle le contenu du tampon sélectionné dans la sélection de l’image active, en tant que sélection flottante. La seule différence avec la commande Coller dans la sélection classique est qu’elle utilise le tampon sélectionné dans le Presse-papiers nommé au lieu du contenu du presse-papiers général de GIMP.
With the Shift key pressed, it pastes the buffer into the active selection at its original location.
This command creates a new layer in the active image out of the contents of the selected buffer. The only difference between this and the ordinary Paste as New Image command is that it uses the selected buffer rather than the content of the global clipboard buffer.
With the Shift key pressed, it creates the layer at the original location of the buffer.
Cette commande crée une nouvelle image possédant un calque unique avec le contenu du tampon sélectionné. La seule différence de cette commande avec la commande Coller en tant que nouvelle image classique est qu’elle utilise le tampon sélectionné du Presse-papier-nommé au lieu du contenu du presse-papiers de GIMP.
Cette commande supprime le tampon sélectionné, sans aucune demande de confirmation. Vous ne pouvez pas effacer le tampon global.