| 4.2. Align and Distribute | ||
|---|---|---|

|
4. Outils de transformation |  |
| 4.2. Align and Distribute | ||
|---|---|---|
|
|
4. Outils de transformation | |
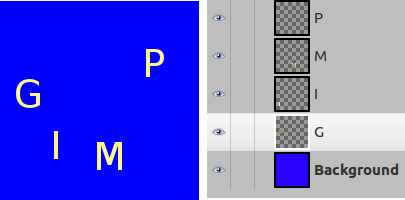
The Align and Distribute tool is useful to align the image layers with various image objects. When this tool is selected, the mouse pointer turns to a small hand. By clicking on an element of a layer in the image, you choose the layer which will be moved (with Shift + click, you can choose several layers to be aligned); this focused layer has small squares in corners and is called source. Then buttons in the dialog become active (they remain active during all the GIMP session): they allow you to select the target, i.e other layer, selection, path, the source will be aligned with.
Il existe plusieurs possibilités pour accéder à l’outil :
From the main menu: → → .
By clicking the tool icon
![]() in the Toolbox.
in the Toolbox.
By pressing the Q keyboard shortcut.
Vous pouvez sélectionner plusieurs objets en appuyant sur la touche Maj (Shift) lorsque vous cliquez sur un objet.
![[Astuce]](images/tip.png)
|
Astuce |
|---|---|
|
Il peut être plus facile de choisir plusieurs calques en utilisant la sélection élastique : cliquez-glissez pour dessiner un rectangle englobant les calques voulus et relâchez le bouton de la souris. Tous les calques entièrement inclus dans le rectangle sont sélectionnés. Notez qu’il n’y a plus maintenant de « Premier objet » sur lequel aligner les calques. |
Normally, tool options are displayed in a window attached under the Toolbox as soon as you activate a tool. If they are not, you can access them from the main menu through → → which opens the option window of the selected tool.
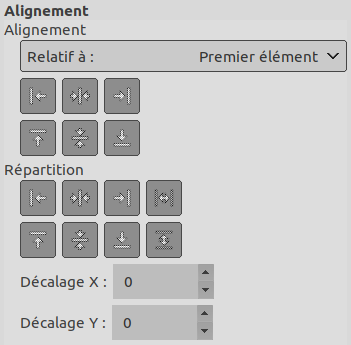
In this drop-down list, you select the target, the image object the layer will be aligned with.
Image : l’image est la cible.
Sélection : la sélection est la cible.
Picked reference object: The selected object (layer, path, guide) on the canvas.
Ces boutons deviennent actifs quand un une cible est sélectionnée.
![]() : to
align left edge of source with left edge of target.
: to
align left edge of source with left edge of target.
![]() : to
align center of source on the
vertical middle line of target.
: to
align center of source on the
vertical middle line of target.
![]() : to
align right edge of source with right edge of target.
: to
align right edge of source with right edge of target.
![]() : to
align top edge of source with top edge of target.
: to
align top edge of source with top edge of target.
![]() : to
align center of source on the
horizontal middle line of target.
: to
align center of source on the
horizontal middle line of target.
![]() : to
align bottom edge of source with bottom edge of target.
: to
align bottom edge of source with bottom edge of target.
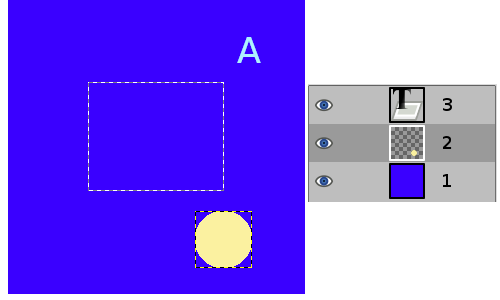
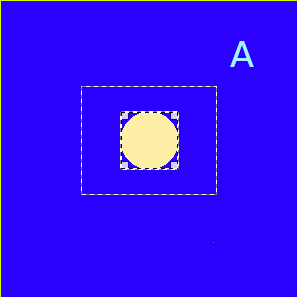
Une image avec une sélection, le calque n°1 (arrière-plan) est actif, le calque n°2 est rogné selon le contenu, le calque n°3 est un calque de texte.
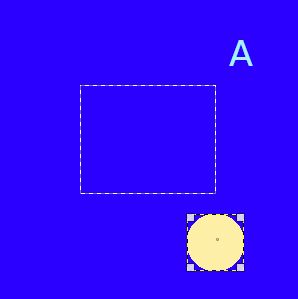
Nous cliquons sur le cercle jaune : le calque n°2 devient la source. Nous voulons envoyer cette source au milieu de la sélection ; l’option Relatif à est fixée sur « Sélection ».

est cliqué.
est cliqué.
These options are used when you have several targets and want to arrange them. Here, layers selected with Shift + Click are called « targets ». But they are actually sources. « Relative to » options are active to set the target. These transformations are usually relative to « Image ».
These options work as Align options, but you can distribute sources evenly.
![]() : to distribute sources evenly
horizontally.
: to distribute sources evenly
horizontally.
![]() : to distribute centers of sources
with center of the target horizontally.
: to distribute centers of sources
with center of the target horizontally.
![]() : to distribute sources evenly
vertically.
: to distribute sources evenly
vertically.
![]() : to distribute centers of sources
with center of target.
: to distribute centers of sources
with center of target.
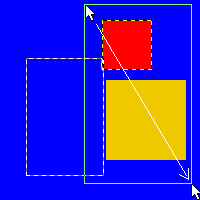
Figure 14.93. Exemple pour les commandes « Répartir »
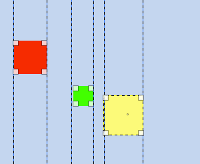
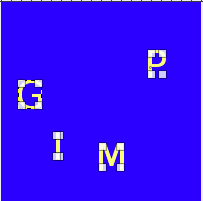
Base image: three layers.
![]() (Distribute right edges of targets) will be used.
(Distribute right edges of targets) will be used.
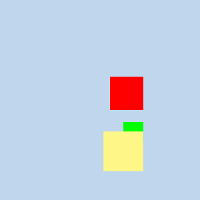
Figure 14.94. Image d’origine
Nous les sélectionnons comme sources avec Maj + clic.

The default target (Relative to) is
« Image ». We used the
![]() (Distribute vertical centers of targets) command.
(Distribute vertical centers of targets) command.

After using the
![]() (Distribute targets
evenly in the horizontal).
(Distribute targets
evenly in the horizontal).