| 第8章 画像の組み合わせ | ||
|---|---|---|

|
パート II. GIMP の達人になるには |  |
| 第8章 画像の組み合わせ | ||
|---|---|---|
|
|
パート II. GIMP の達人になるには | |
目次
You can think of layers as a stack of slides. Using layers, you can construct an image of several conceptual parts, each of which can be manipulated without affecting any other part of the image. Layers are stacked on top of each other. The bottom layer is the background of the image, and the components in the foreground of the image come above it.
There is no limit to the number of layers an image can have, only the amount of memory available on the system. It is not uncommon for advanced users to work with images containing dozens of layers. You can group layers to make your work easier, and there are many commands to handle layers.
The organization of layers in an image is shown in the Layers dialog. How it works is described in detail in the Layers Dialog section, but we will touch some aspects of it here, in relation to the layer properties that they display.
Each open image has at any time a single active drawable. A 「drawable」 is a GIMP concept that includes layers, but also several other items, such as channels, layer masks, and the selection mask. Basically, a 「drawable」 is anything that can be drawn on with painting tools. If a layer is currently active, it is shown highlighted in the Layers dialog, and its name is shown in the status area of the image window. If not, you can activate it by clicking on it. If none of the layers are highlighted, it means the active drawable is something else than a layer.
In the menu bar, you can find a menu called , containing a number of commands that affect the active layer of the image. The same menu can be accessed by right-clicking in the Layers dialog.
画像上のレイヤーはそれぞれが数々の重要な属性を有しています。
Every layer has a name. This is assigned automatically when the layer is created, but you can change it. You can change the name of a layer either by double-clicking on it in the Layers dialog, or by right-clicking there, and then selecting the top entry in the menu that appears, .
An alpha channel encodes information about how transparent a layer is at each pixel. It is visible in the Channel Dialog: white is complete opacity, black is complete transparency and gray levels are partial transparencies.
The background layer is special. If you have just created a new image, it only has one layer, which is the background layer. If the image has been created with an opaque Fill type, this one layer has no Alpha channel. To get a background layer with transparency, either create your new image with a transparent Fill type, or you use the Add an Alpha Channel command.
If you add a new layer, even with an opaque Fill type, an Alpha channel is automatically added to the layer.
Every layer other than the bottom layer of an image automatically has an Alpha channel, but you can't see a grayscale representation of the alpha values. See Alpha in Glossary for more information.
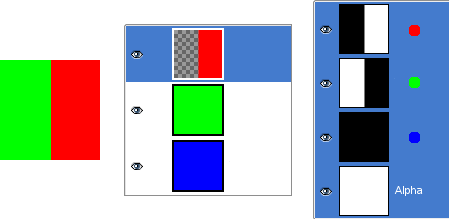
図8.2 アルファチャンネルの例: 基本の画像
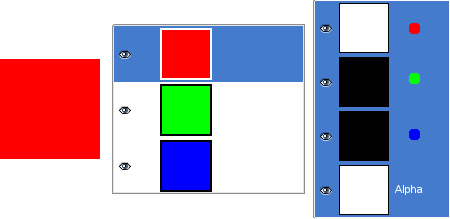
This image has three layers painted with pure 100% opaque Red, Green, and Blue. In the Channel Dialog, you can see that an alpha Channel has been added. It is white because the image is not transparent since there is at least one 100% opaque layer. The current layer is the red one: since it is painted with pure red, there is no green and no blue and the corresponding channels are black.
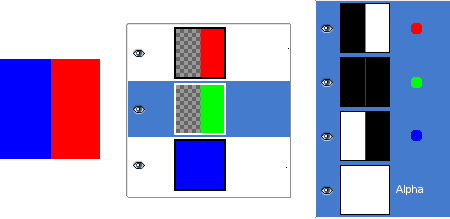
図8.3 アルファチャンネルの例: 透過レイヤーが 1 層
The left part of the first layer has been made transparent (Rectangular selection, → ). The second layer, green, is visible. The Alpha channel is still white, since there is an opaque layer in this part of the image.
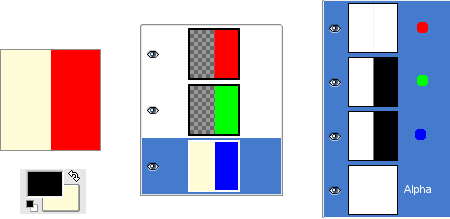
図8.4 アルファチャンネルの例: 透過レイヤーが 2 層
第 2 のレイヤーの左側を透過させた。 第 3 のレイヤーの青が第 1 と第 2 のレイヤーを通して見えている。 アルファチャンネルがいまだ白いのは、 画像にはこの区画で不透明なレイヤーがあるためである。
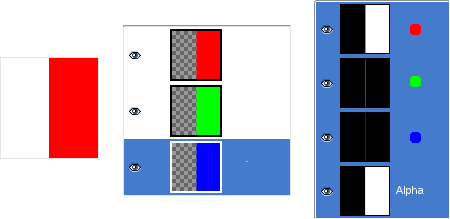
図8.5 アルファチャンネルの例: 透過レイヤーが 3 層
The left part of the third layer has been cleared. The Alpha channel is still white and the left part of the layer is opaque, because the background layer has no Alpha channel. In this case, the Clear command works like the Eraser and uses the Background color of Toolbox.
図8.6 アルファチャンネルの例: 背景レイヤーにアルファチャンネルを追加
We used the → → command, on the Background layer. Now, the left part of the image is fully transparent and has the color of the page where the image is shown. The left part of the Alpha Channel thumbnail is black (transparent) in the Channel Dialog.
The layer type is determined by the image type (see previous section), and the presence or absence of an alpha channel. These are the possible layer types:
赤・緑・青 (RGB)
赤・緑・青・アルファつき (RGBA)
グレースケール (Gray)
アルファつきグレースケール (GrayA)
インデックス化カラー (Indexed)
アルファつきインデックス化カラー (IndexedA)
The main reason this matters is that some filters (in the menu) only accept a subset of layer types, and appear disabled in the menu if the active layer does not have a supported type. Often you can rectify this either by changing the mode of the image, or by adding or removing an alpha channel.
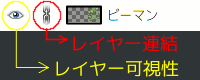
レイヤーを破棄せずに画像から除外したいときは、 レイヤーダイアログ上で「目」のしるしをクリックします。 これをレイヤーの「可視性の切り替え」といいます。 画像に対する操作のほとんどは不可視にされたレイヤーをまるで存在しないかのように扱います。 不透明度が一様でない複数のレイヤーを有する画像を扱うとき、 他のレイヤーをいくつか隠せば作業対象のレイヤーの内容がよく見えます。
![[ヒント]](images/tip.png)
|
ヒント |
|---|---|
|
Shift キーを押しながら目のしるしをクリックするとクリックしたレイヤー 以外の すべてのレイヤーが不可視になります。 再び同じ操作をするとすべてのレイヤーが可視性有りに切り替わります。 |
Usually, you activate a layer, to work on it, clicking it in the layer list. When you have a lot of layers, finding which layer an element of the image belongs to is not easy: then, press Alt and click with Mouse wheel on this element to activate its layer. The available layers will be looped through (starting from the upper one) while the Alt is held and the picked layer will be temporarily displayed in the status bar.
レイヤーの見本と目のしるしの間をクリックすると、 複数のレイヤーを纏める鎖のアイコンが表示されます。 こうして連結されたレイヤーはたとえば移動ツールをはじめとする変形ツールで一斉に操作できます。 連結は パスダイアログ にもあって、 連結されたレイヤーとともに操作できます。
In GIMP, the boundaries of a layer do not necessarily match the boundaries of the image that contains it. When you create text, for example, each text item belongs to its own separate layer, and the layer size is automatically adjusted to contain the text and nothing more. Also, when you create a new layer using cut-and-paste, the new layer is sized just large enough to contain the pasted item. In the image window, the boundaries of the currently active layer are shown outlined with a black-and-yellow dashed line.
レイヤーの境界線に気を付けなければならない理由は、 領域外では何も操作ができないからです。 何もないところでは作業できません。 これでは困るときはレイヤーの大きさを変更しても構いません。 メニューの下のほうにいくつか関係するコマンドがあります。
![[注記]](images/note.png)
|
注記 |
|---|---|
|
レイヤーが消費するメモリー量はそこに描かれた内容を問わずただその大きさで決まります。 ですから多数のレイヤーを有する画像や巨大な画像を扱うときには、 それぞれのレイヤーの大きさをできるだけ小さくするとメモリーの消費を節約できます。 |
レイヤーの不透明度は積み重なったレイヤーを上から見て下層のレイヤーの色がどの程度見えるかを定めます。 不透明度の範囲は 0 から 100 にあり、 0 は完全透過を、 100 は完全不透明を表します。
レイヤーのモードはこのレイヤーの色が背面側のレイヤーの色とどのように合成され視覚的効果を及ぼすかを定めます。 とても複雑ですがとても重要ですので、 その件だけの節を設けるのに十分な内容があります。 次節 「レイヤーのモード」 をお読みください。
アルファチャンネルとは別に、 レイヤーに透過効果をかけるもう一つの方法があります。 レイヤーマスク はレイヤーに追加するとそのレイヤーに対してグレースケールの描画対象が付加されます。 レイヤーは作られた当初はレイヤーマスクがありませんので、 必要なときに追加することになります。 レイヤーマスクとその操作方法については レイヤーマスク でさらに踏み込んで説明しています。