| 4.2. 이미지의 크기 바꾸기 (화면용) | ||
|---|---|---|

|
4. 자주 하는 편집 작업 |  |
| 4.2. 이미지의 크기 바꾸기 (화면용) | ||
|---|---|---|
|
|
4. 자주 하는 편집 작업 | |
디지털 카메라 등으로 찍은 큰 이미지를 웹페이지에 표시하거나 게시판, 전자메일 등으로 보내려면 크기를 조정하는 것이 좋습니다.
The first thing that you might notice after opening the image, is that GIMP opens the image at a logical size for viewing. If your image is very large, like the sample image, GIMP sets the zoom so that it displays nicely on the screen. The zoom level is shown in the status bar at the bottom of the image window. This does not change the actual image.
The other thing to look at in the title bar is the mode. If the mode shows as RGB in the title bar, you are fine. If the mode says Indexed or Grayscale, read the 4.7절. “모드 바꾸기”.
Select → . You can right click on the image to open the menu, or use the menu along the top of the Image window.
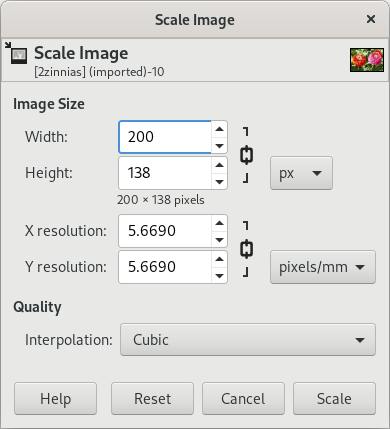
대화 상자의 상단에 너비와 높이 항목이 있습니다. 화면에 표시된 단위는 픽셀이며, 단위 항목에서 원하는 단위로 변경할 수 있습니다. 참고로 각각의 장치들(스마트폰, 모니터, TV 등)은 서로 다른 픽셀 사이즈를 가지기 때문에, 같은 이미지라도 약간씩 다른 크기로 보일 수 있습니다. 그 밑에 있는 해상도 부분은 모니터나 모바일 기기에서 이미지를 보는데는 영향을 미치지 않고, 인쇄와 관계된 항목이므로 무시하셔도 됩니다.
If you know the desired width, enter it in the dialog at the top where it says Width. This is shown in the figure above. If you don't have such a number in mind, choose an appropriate width for the desired use. Common screen sizes range between 600 pixels for simpler phones and 1920 pixels for an HD screen.
이미지의 너비나 높이를 바꾸면, 이미지의 원래 배율에 맞춰 다른 부분이 자동으로 바뀝니다. 예를 들어 너비를 바꾸면 높이도 같이 바뀝니다. 원래 배율을 무시하고 각각 바꾸려면 4.5절. “이미지 잘라내기” 를 참고하세요. 다만 원래 이미지의 배율을 무시하면 이미지가 이상하게 변형될 수 있습니다.