| 4.2. Innrettingsverktøyet | ||
|---|---|---|

|
4. Transformeringsverktøya |  |
| 4.2. Innrettingsverktøyet | ||
|---|---|---|
|
|
4. Transformeringsverktøya | |
«Innrettingsverktøyet» er nyttig for å justera biletlaga i høve til ulike biletobjekt. Når dette verktøyet er vald, får musepeikaren form av ei lita hand. Du vel laget som skal flyttast (med Shift + klikk kan du velja fleire lag som skal justerast) ved å trykkja på eit element i eit lag i biletet. Dette fokuserte laget har små firkantar i hjørna og vert kalla kjelde. Deretter vert knappar i dialogvindauget slått på og vert påslåtte gjennom heile GIMP-økta: med desse kan du velja målet, det vil seia eit anna lag, utval eller bane som kjelda skal justerast etter.
Du kan slå på verktøyet på mange måtar:
Frå hovudmenyen via → → .
Ved å klikka på verktøysymbolet
![]() i verktøykassen.
i verktøykassen.
Ved å trykkja på tasten Q.
Du kan markere fleire lag samstundes ved å halde nede Shift-tasten når du klikkar på laga.
![[Tips]](images/tip.png)
|
Tips |
|---|---|
|
Ofte vil det vere enklare å velje fleire lag ved hjelp av «strikkmetoden»: Klikk ein eller annan stad utanfor eit tenkt rektangulært område som inneheld dei laga du vil markere. Dra ut regionen med musepeikaren medan du held museknappen nede. Når du slepp musepeikaren, vert alle laga som er innføre rektangelet markerte. Legg merkje til at det no ikkje er noko «første element» å innretta laga etter. |
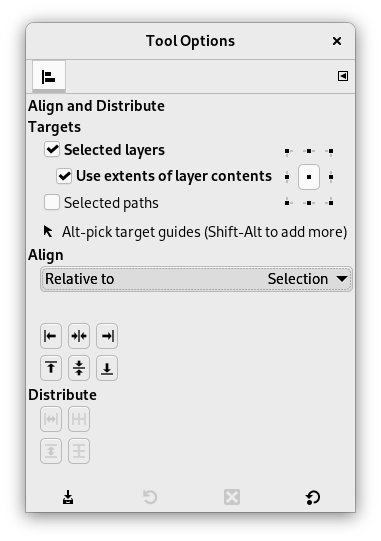
Normalt vert innstillingane for det valde verktøyet vist under verktøykassa så snart som du slår på verktøyet. Dersom dette ikkje er tilfelle, kan du få tilgang til dei frå biletmenyen via → → som vil opna verktøyinnstillingane for det valde verktøyet.
I denne nedtrekkslista vel du målet, biletobjektet som laget vert justert i høve til.
Bilete: Biletet vert brukt som mål.
Utval: Utvalet vert brukt som mål.
Plukka referanseobjekt: Det merkte objektet (lag, bane, hjelpelinje) på lerretet.
Desse knappane vert slått på når eit mål er vald.
![]() : for å innretta den venstre kanten av kjelda mot venstre kanten av målet.
: for å innretta den venstre kanten av kjelda mot venstre kanten av målet.
![]() : Innrett midten av målet not loddrett midtpunkt i målet.
: Innrett midten av målet not loddrett midtpunkt i målet.
![]() : for å innretta den høgre kanten av kjelda mot høgre kanten av målet.
: for å innretta den høgre kanten av kjelda mot høgre kanten av målet.
![]() : for å innretta den øvre kanten av kjelda mot øvre kanten av målet.
: for å innretta den øvre kanten av kjelda mot øvre kanten av målet.
![]() : for å innretta midten av kjelda mot den vassrett midten av målet.
: for å innretta midten av kjelda mot den vassrett midten av målet.
![]() : for å innretta den nedre kanten av kjelda mot nedre kanten av målet.
: for å innretta den nedre kanten av kjelda mot nedre kanten av målet.
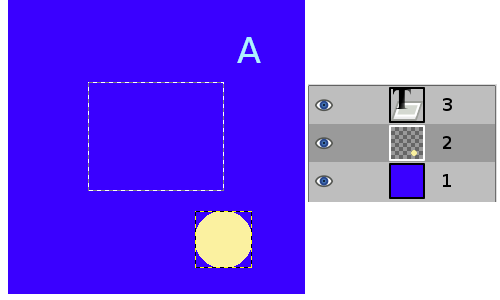
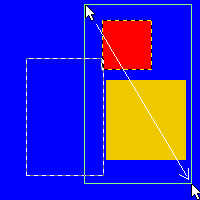
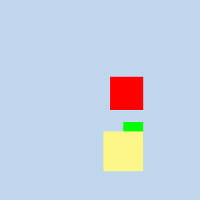
Eit bilete med eit utval, lag 1 (bakgrunn) er det gjeldande laget, 2 er klipt til innhaldet,, lag 3 er eit tekstlag.
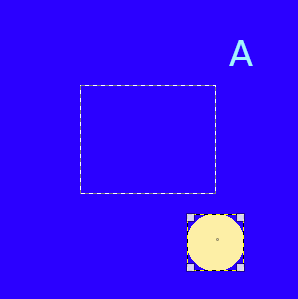
Me klikkar på den gule sirkelen: lag #2 vert kjelda. Me vil senda denne kjelda til midten av utvalet: valet «Relativ» er sett til «Utval».
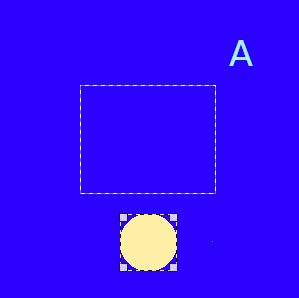
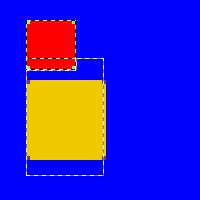
Det er trykt på
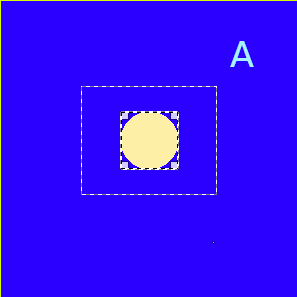
Det er trykt på
Desse innstillingane er brukte når du har fleire mål og ønskjer å stilla dei opp. Her er laga merkte med Shift + Klikk er kalla «mål». Men dei er eigentleg kjelder. Valet «Relativ til» er sett for å bestemma målet. Desse transformeringane er som oftast relative til «bilete».
Desse alternativa arbeidar som innrettingsvala, men du kan fordela kjeldene jamt.
![]() : fordeler kjeldene jamt vassrett.
: fordeler kjeldene jamt vassrett.
![]() : fordeler midten av kjeldene jamt vassrett.
: fordeler midten av kjeldene jamt vassrett.
![]() : fordeler kjeldene jamt vassrett.
: fordeler kjeldene jamt vassrett.
![]() : fordeler midten av kjeldene jamt med midten av målet.
: fordeler midten av kjeldene jamt med midten av målet.
Figur 14.93. Eksempel på bruk av «Fordel»-kommandoane
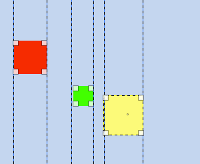
Basisbilete: tre lag.
![]() (Fordel høgresida av målet) vil verta brukt.
(Fordel høgresida av målet) vil verta brukt.
Figur 14.94. Opphav
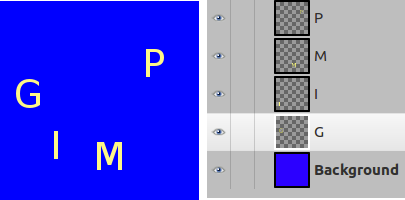
Me merkte dei som kjelder med Shift + Klikk.

Standardlaget (Relativt til) er «bilete». Me brukte
![]() kommandoen (Fordel midten av målet loddrett).
kommandoen (Fordel midten av målet loddrett).

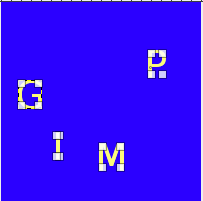
Etter bruk av
![]() (Fordel måla jamt vassrett).
(Fordel måla jamt vassrett).