| 13.2. Mapa de relevo | ||
|---|---|---|

|
13. Filtros de mapeamento |  |
| 13.2. Mapa de relevo | ||
|---|---|---|
|
|
13. Filtros de mapeamento | |
Figura 17.276. Exemplo de “Mapa de relevo”

On the left, the original image that we want to emboss: a solid blue. In the middle, the bump map: a grayscale image, where black pixels will emboss backwards and white pixels will emboss forwards. On the right, the bump-mapped image. The filter adds a shadow effect.
This filter creates a 3D effect by embossing an image (the card) and then mapping it to another image. Bump height depends on pixel luminosity and you can set light direction. See Emboss for more information about embossing. You can bump map any type of image, unlike the Emboss filter.
![[Nota]](images/note.png)
|
Nota |
|---|---|
|
These options are described in Seção 2, “Common Features”. |
Clicking on this button opens a small file browser with two panels. On the left panel, images present on your screen are listed: the active image is selected. On the right panel, you see the layers list of the active image: double click on the layer you want to use as a map for bump-mapping; the file browser is closed and a layer thumbnail appears in the Aux Input button.
The right panel has a Channels tab: TODO
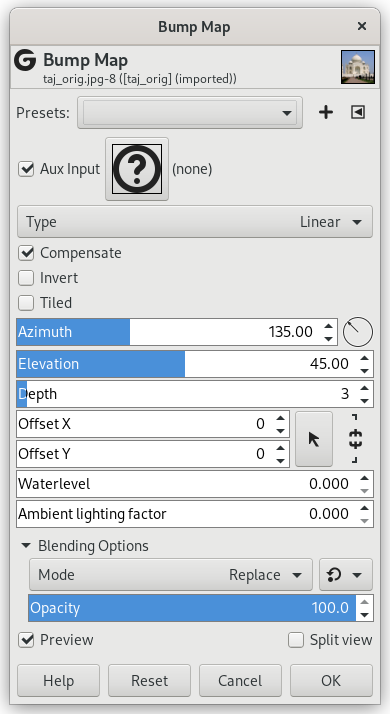
Esta opção permite selecionar o método que será usado ao criar a imagem mapeada:
A altura das ondulações é uma função direta da luminosidade.
Bump height is a spherical function of luminosity.
A altura das ondulações é uma função sinusoidal (aplicação do seno) à luminosidade.
O mapeamento de relevo tende a escurecer a imagem. Você pode compensar o escurecimento marcando esta opção.
Por padrão, pixels claros são partes altas do relevo, e pixels escuros são partes fundas. Você pode inverter esse comportamento marcando esta opção.
Se você marcar esta opção, caso a imagem de mapa de relevo seja menor que a imagem alvo, será considerado como se houvesse várias cópias dela colocadaslado a lado, para criar o relevo. Caso contrário, o efeito de relevo será centralizado na imagem de destino, e as partes que ficarem para fora do mapa de relevo permanecerão inalteradas.
Este valor configura a direção da iluminação, como se fosse a direção dada por uma bússola (0° até 360°). Leste (0°) é à esquerda, e aumentar o valor faz a direção girar no sentido anti-horário.
Essa é a altura do horizonte (0,5°) até o zênite (90°). Quanto menor o ângulo, maior o contraste entre luz e sombra na imagem resultante.
Com esse controle, você pode variar a altura e profundidade das ondulações do relevo. Quanto maior o valor, maior a diferença entre ambos. Os valores vão de 1 até 65.
Com esses controles você pode ajustar a posição da imagem de mapa em relação com a imagem de origem, tanto na horizontal(X) quanto na vertical(Y).
Se sua imagem de mapa tem áreas transparentes, elas serão tratadas como áreas escuras, e vão aparecer como áreas afundadas depois do mapeamento. Com esse controle, você pode reduzir o efeito dessas partes baixas, como se o nível do mar estivesse subindo. O afundamento para as áreas transparentes desaparecerá quando esse valor for 255. Se a opção de inverter o relevo estiver marcada, a áreas transparentes serão tratadas como se fossem áreas claras, e então o controle de nível d'água as deixará mais baixas.
Esse controle afeta a intensidade da luz ambiente: a luz que não sofre interferência do relevo. Com valores altos, as sombras e pontos claros do mapa de relevo ficarão menos intensas.
We shall emboss an image with a text.
Open your main image.
Create the map: here a white text on black background.

The image and the map
→ the map. Activate the image and → → . Right click on the new layer and select to make the layer the same size as the image.
The map layer being active, apply a Gaussian Blur. Here, the default 1.5 pixels is used.
Make the map layer invisible and activate the image layer.
Open the “Bump Map” filter. Click on the button and double-click on the text layer in the right panel.

Bump Map filter applied. Depth = 3. Ambient lighting factor = 0.326.