| 2. 主窗口 | ||
|---|---|---|

|
第 3 章 开始使用GIMP的第一步 |  |
| 2. 主窗口 | ||
|---|---|---|
|
|
第 3 章 开始使用GIMP的第一步 | |
The GIMP user interface is available in two modes:
多窗口模式,
单窗口模式。
When you open GIMP for the first time, it opens in single-window mode by default. You can enable multi-window mode by unchecking the → option in the main menu. After quitting GIMP, GIMP will start in the mode you have selected next time.
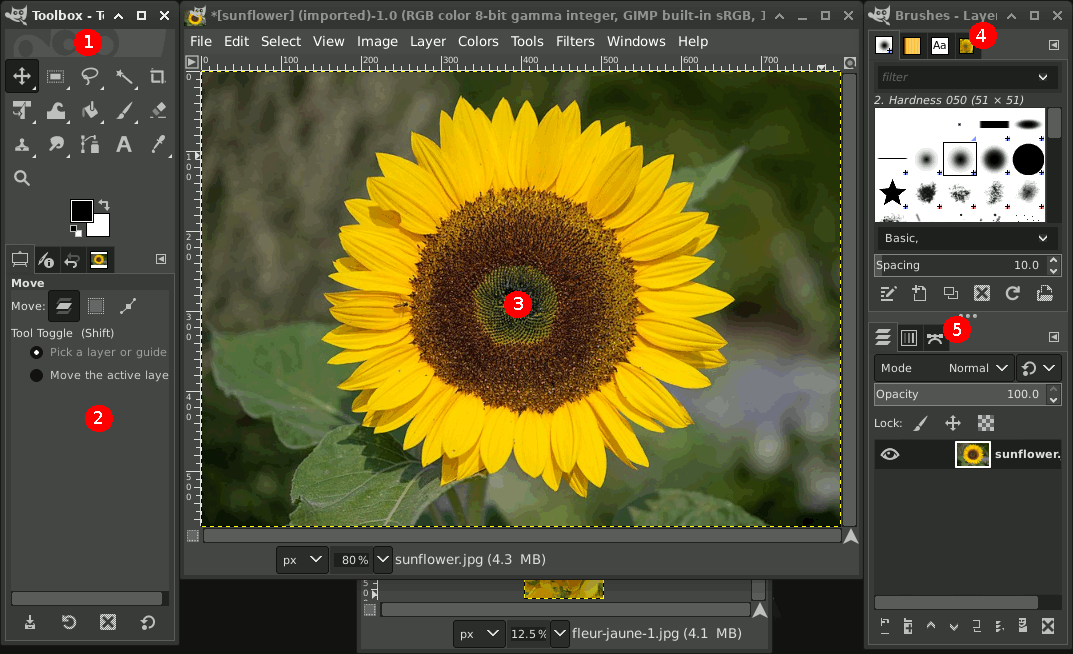
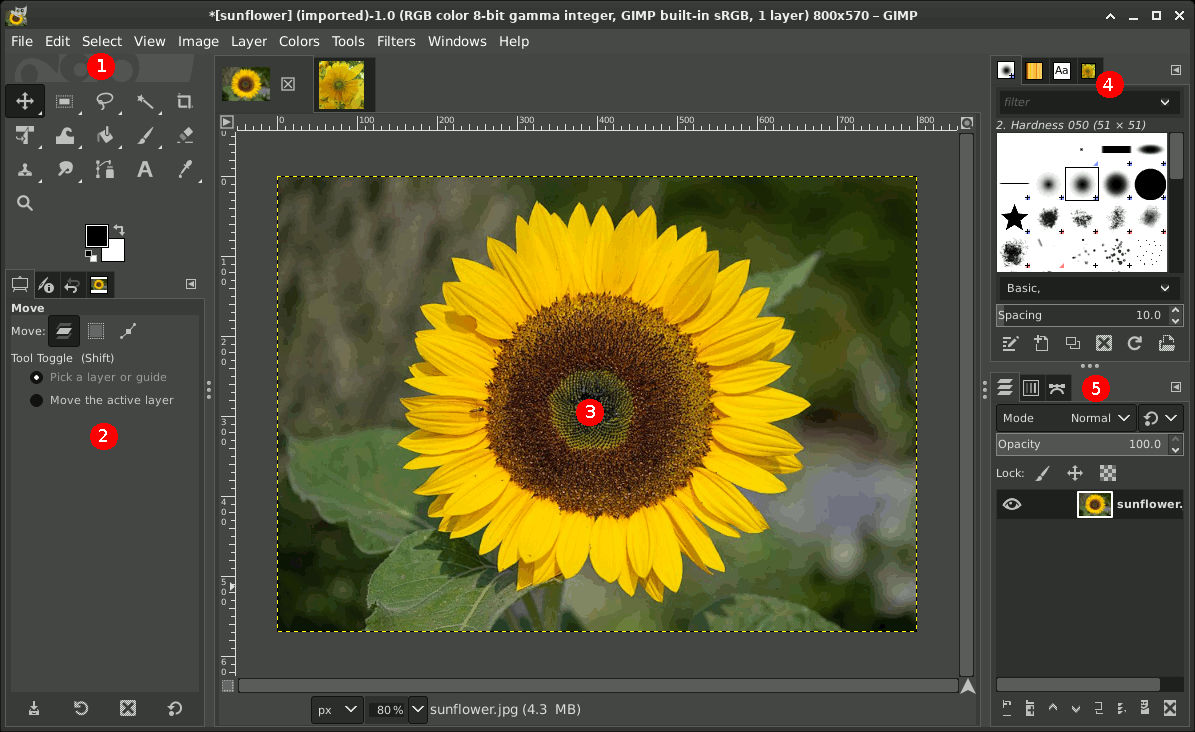
The screenshot above shows the most basic multi-window arrangement for GIMP that can be used effectively.
You will see two panels, left and right, and an image window in the middle. A second image is partially masked. The left panel contains the Toolbox as well as Tool Options, Device Status, Undo History and Images dialogs together. The right panel contains Brushes, Patterns, Fonts and Document History dialogs together in a multi-tab dock, and Layers, Channels and Paths dialogs together in another multi-tab dock.
The Toolbox: Contains a set of icon buttons used to select tools. By default, it also contains the foreground and background colors. You can add brush, pattern, gradient and active image icons. Use → → to enable, or disable the extra items.
Tool options: Docked below the Toolbox is a Tool Options dialog, showing options for the currently selected tool (in this case, the Move tool).
Image windows: Each image open in GIMP is displayed in a separate window. Many images can be open at the same time, limited by only the system resources. Before you can do anything useful in GIMP, you need to have at least one image window open. The image window holds the Menu of the main commands of GIMP (File, Edit, Select, etc.), which you can also get by right-clicking on the window.
图像可以大于图像窗口。在这种情况下,GIMP以缩小的缩放级别显示图像,从而允许在图像窗口中查看完整图像。如果您切换到 100% 缩放级别,则会出现滚动条,允许您平移图像。
The Brushes, Patterns, Fonts, Document History dock — note that the dialogs in the dock are tabs. The Brushes tab is open: it shows the type of brush used by paint tools.
Layers, Channels, Paths: The docked dialog below the brushes dialog shows the dialogs (tabs) for managing layers, channels and paths. The Layers tab is open: it shows the layer structure of the currently active image, and allows it to be manipulated in a variety of ways. It is possible to do a few very basic things without using the Layers dialog, but even moderately sophisticated GIMP users find it indispensable to have the Layers dialog available at all times.
对话框和停靠栏管理在第 2.3 节 “对话框和停靠”中说明。
您会发现相同的元素,但在管理上有所不同:
Left and right panels are fixed; you can't move them. But you can decrease or increase their width by dragging the moving pointer that appears when the mouse pointer overflies the right border of the left pane. If you want to keep the left pane narrow, please use the scroll bar at the bottom of the tool options to pan across the options display.
If you reduce the width of a multi-tab dock, there may be not
enough room for all tabs; then arrow-heads
![]() ,
,
![]() appear allowing you
to scroll through tabs.
appear allowing you
to scroll through tabs.
在多窗口模式下,您可以使用Tab键屏蔽这些面板。
图像窗口占据了两个面板之间的所有空间。
当多个图像打开时,图像窗口上方会出现一个新栏,每个图像都是一个选项卡。您可以通过单击选项卡,或使用Ctrl+Page Up 或 Page Down 或 Alt+Number在图像之间导航 。“Number”是选项卡数字;您必须使用键盘上一行的数字键,而不是小键盘的数字键(某些国家/地区的键盘需要 Alt-shift)。
这是一个最小的设置。GIMP有十多种其他用于各种目的的类型的对话框,但用户通常在需要时打开它们并在完成时关闭它们。老练的用户通常始终保持工具箱(带有工具选项)和图层对话框处于打开状态。工具箱对于许多GIMP 操作是必不可少的。工具选项部分实际上是一个单独的对话框,在屏幕截图中显示在主工具箱中。老练的用户几乎总是这样设置:如果无法看到他们的选项是如何设置的,就很难有效地使用工具。当您处理具有多个图层的图像时,图层对话框就会发挥作用:在您超越GIMP专业知识的最基本阶段之后,这意味着几乎总是如此。当然,它有助于在屏幕上显示您正在编辑的图像;如果您在保存工作之前关闭图像窗口,GIMP会询问您是否要关闭文件。
![[注意]](images/note.png)
|
注意 |
|---|---|
|
如果您的GIMP布局丢失,您可以使用 → 轻松恢复您的布局 ;窗口菜单命令仅在图像打开时可用。要在停靠栏中添加、关闭或分离选项卡,请单击对话框右上角的
|
以下部分将引导您浏览屏幕截图中显示的每个窗口的组件,解释它们是什么以及它们如何工作。一旦您阅读了它们,加上描述GIMP图像基本结构的部分,您应该已经学会了足够的知识,可以使用GIMP进行各种基本的图像操作。然后,您可以在闲暇时浏览手册的其余部分(或只是进行实验),以了解几乎无限数量的更微妙和可能的特殊事物。玩得开心!
工具箱是GIMP的核心。这是您将在那里找到的内容的快速浏览。
![[提示]](images/tip.png)
|
提示 |
|---|---|
|
在工具箱中,就像在GIMP的大多数部分一样,将鼠标移到某物上并让它休息片刻,通常会显示一个描述该事物的“工具提示”。工具提示中也经常显示快捷键。在许多情况下,您可以将鼠标悬停在某个项目上,并按F1键以获取有关鼠标下方事物的帮助。 |
By default, only the Foreground/Background Colors area is visible. You can add the Brush/Pattern/Gradient area and Active Image area through → → : Tools configuration.
The GIMP logo: At the top of the toolbox, you can click-drag-and-drop images from a file browser into this area or into the tool icons to open the images. You can hide this logo by unchecking the Show GIMP logo option in the Toolbox Preferences.
工具图标:这些图标是为多种用途激活工具的按钮:选择图像的一部分、绘制图像、变换图像等。第 1 节 “The Toolbox”概述了如何使用工具,而在工具一章中系统地描述了每个工具 。
Foreground/Background colors:
The color area shows GIMP's current foreground and background colors, which are used for painting, filling, and many other operations. Clicking on either one of them brings up a color selector dialog that allows you to change to a different color.
Clicking on the small symbol in the lower left corner resets the foreground and background colors to black and white. Pressing the D key has the same effect.
Clicking on the double-headed arrow symbol swaps the foreground and background colors. Pressing the X key has the same effect.
画笔/图案/渐变:这里的符号显示了GIMP的当前选择,用于:绘画笔刷,由所有允许您在图像上绘画的工具使用(顺便说一下,“绘画”包括擦除和涂抹等操作)时;对于图案,用于填充图像的选定区域时;对于渐变,每当操作需要平滑变化的颜色范围时,它就会发挥作用。单击这些符号中的任何一个都会打开一个对话框窗口,您可以在其中更改它。
活动图像:在GIMP中,您可以同时处理许多图像,但在任何给定时刻,只有一个图像是“活动图像”。在这里,您可以找到活动图像的小图标表示。单击该图标可显示一个包含当前打开图像列表的对话框,单击对话框中的图像使其处于活动状态。通常,单击多窗口模式下的图像窗口,或单窗口模式下的图像选项卡,使其成为活动图像。
If you use GIMP on a Unix-like operating system with the X Window System, you can also drag and drop the thumbnail to an enabled XDS file manager to directly save the corresponding image.
|
|
注意 |
|---|---|
|
At every start, GIMP selects the brush, color, pattern you used when quitting your previous session because the Save input device settings on exit in Preferences/Input Devices, is checked by default. If you uncheck it, GIMP will use a color, a brush and a pattern by default, always the same. |