| 3.4. Painting Tools (Pencil, Paintbrush, Airbrush) | ||
|---|---|---|
 |
3. Brush Tools |  |
| 3.4. Painting Tools (Pencil, Paintbrush, Airbrush) | ||
|---|---|---|
| |
3. Brush Tools | |
Figure 12.22. Painting example
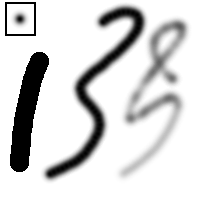
Three strokes painted with the same round fuzzy brush (outline shown in upper left), using the Pencil (left), Paintbrush (middle), and Airbrush (right).
The tools in this group are GIMP's basic painting tools, and they have enough features in common to be worth discussing together in this section. Features common to all brush tools are described in the Common Features section. Features specific to an individual tool are described in the section devoted to that tool.
The Pencil is the crudest of the tools in this group: it makes hard, non-anti-aliased brushstrokes. The Paintbrush is intermediate: it is probably the most commonly used of the group. The Airbrush is the most flexible and controllable: it is the only one for which the amount of paint applied depends on the speed of brush movement. This flexibility also makes it a bit more difficult to use than the Paintbrush, however.
All of these tools share the same brushes, and the same options for choosing colors, either from the basic palette or from a gradient. All are capable of painting in a wide variety of modes.
Holding down the Ctrl key changes each of these tools to a Color Picker: clicking on any pixel of any layer sets the foreground color (as displayed in the Toolbox Color Area) to the color of the pixel.
The Mode dropdown list provides a selection of paint application modes. This setting appears in the Tool Options for all brush tools, but it is grayed out for all except the tools in this group, the Ink tool, and the Clone tool. A list of possible modes can be found in Section 2, “ Layer Modes ”. For the most part these modes are the same as the layer combination modes available in the Layers dialog, and you can understand their effects by imagining that the paint is applied to a separate layer above the target layer, with the mode for the layer set as specified. Three of the modes are special, though:
Color Erase. This mode erases the foreground color, replacing it with partial transparency. It acts like the Color to Alpha filter, applied to the area under the brushstroke. Note that this only works on layers that possess an alpha channel; otherwise, this mode is identical to Normal.
Behind. This mode applies paint only to non-opaque areas of the layer: the lower the opacity, the more paint is applied. Thus, painting opaque areas has no effect; painting transparent areas has the same effect as normal mode. The result is always an increase in opacity. Of course none of this is meaningful for layers that lack an alpha channel.
Figure 12.23. Dissolve mode example
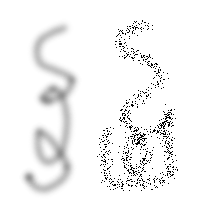
Two brushstrokes made with the Airbrush, using the same fuzzy circular brush. Left: Normal mode. Right: Dissolve mode.
Dissolve. In this very useful mode, for fuzzy brushes the gray level of the brush determines not the paint density, but rather the probability of applying paint. This gives a nice way of creating rough-looking paintstrokes.
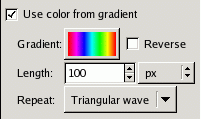
Instead of using the foreground color (as shown in the Color Area of the Toolbox), by checking the "Use color from gradient" option you can choose to paint with a gradient, giving colors that change gradually along the brush trajectory. For basic information on gradients, see the Gradients section.
You have several options to control what gradient is used and how it is laid out:
Gradient. Here you see a display of the current gradient. Clicking on it brings up a Gradient Selector, which will allow you to choose a different gradient.
Reverse. Normally a brushstroke starts with colors from the left side of the gradient, and progresses rightward. If "Reverse" is checked, the stroke starts with colors from the right side, and progresses leftward.
Length. This option sets the distance corresponding to one complete cycle through the gradient colors. The default units are pixels, but you can choose a different unit from the adjoining Units menu.
Table 12.1. Illustration of the effects of the three gradient-repeat options, for the “Abstract 2” gradient.
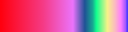 |
Abstract2 Gradient |
 |
None |
 |
Sawtooth |
 |
Triangular |
Repeat. This option determines what happens if a brushstroke extends farther than the Length specified above. There are three possibilities: "None" means that the color from the end of the gradient will be used throughout the remainder of the stroke; "Sawtooth wave" means that the gradient will be restarted from the beginning, which will often produce a color discontinuity; "Triangular wave" means that the gradient will be traversed in reverse, afterwards bouncing back and forth until the end of the brushstroke.