| 3.10. Channel Mixer | ||
|---|---|---|
 |
3. Color filters |  |
| 3.10. Channel Mixer | ||
|---|---|---|
| |
3. Color filters | |
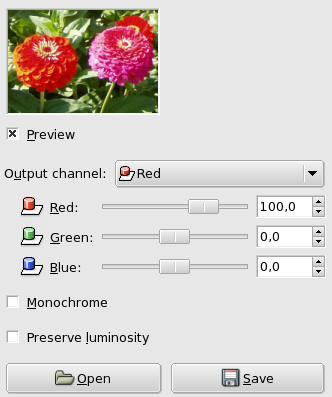
You can find this filter through → → .
This filter combines values of the RGB channels. It works with images with or without an alpha channel. It has monochrome mode and a preview.
From this menu you select the channel to mix to. Choices are Red, Green, or Blue. It is insensitive when Monochrome option is checked.
These three sliders set the contribution of red, green or blue channel to output. Can be negative. These sliders are graduated from -200 to 200. They represent the percentage which will be attributed to the output channel. 100% corresponds to the value of the channel of the studied pixel in the image.
This option converts the RGB image into a gray-scale RGB image. The Channel Mixer filter is often used with this aim in view, because it often provides a better result than the other ways (see Grayscale in Glossary). Makes the Output Channel menu insensitive.
Calculations may result in too high values and an image too much clear. This option lessens luminosities while keeping a good visual ratio between them.
In this mode, you have to select an Output Channel . This channel is the one which will be modified. In the dialog window, its default value is 100%, corresponding to the value of the channel in the original image. It can be increased or decreased. That's why slider ends are -200 and 200.
Three RGB sliders let you give a percentage to every channel. For every pixel in the image, the sum of the calculated values for every channel from these percentages will be given to the Output Channel. Here is an example:
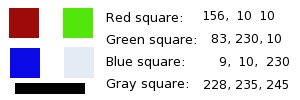
Figure 15.41. The original image and its channels
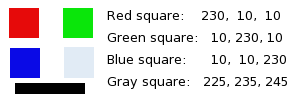
RGB values of the pixels in red, green, blue, gray squares are displayed. The black rectangle is special, because black (0;0;0) is not concerned by filter (0 multiplied by any percentage always gives 0). The result can't exceed 255 nor be negative.
Figure 15.42. Output channel is red. Green Channel +50

In the red square, the pixel values are 230;10;10. Percentages are 1;0.5;0. The claculation result is 230*1 + 10*0,5 + 10*0 =235. The same reasoning is valid for the green and the blue squares.
In the gray square, which contains red color, the calculation result is above 255. It is reduced to 255. A negative value would be reduced to 0.
Figure 15.43. Output channel is red. Green Channel +50%. The Preserve Luminosity option is checked.
The values attributed to the Red Output channel are lower, preventing a too much clear image.
When this option is checked, the image preview turns to grayscale, but the image is still a RGB image with three channels, until the filter action is validated.
Figure 15.44. Monochrome option checked. Red:100% Green: 50% Blue: 0%. Preserve Luminosity unchecked.

In every square, pixels have been converted into a gray level equal to the value of the Red channel in the original image (The background has been painted with pink afterwards to make white squares visible).
Here is how the Preserve Luminosity works in the monochrome mode: “ For example, suppose the sliders were Red:75%, Green:75%, Blue:0%. With Monochrome on and the Preserve Luminosity option off, the resulting picture would be at 75%+75%+0% =150%, very bright indeed. A pixel with a value of, say, R,G,B=127,100,80 would map to 127*0.75+100*0.75+80*0=170 for each channel. With the Preserve Luminosity option on, the sliders will be scaled so they always add up to 100%. In this example, that scale value is 1/(75%+75%+0%) or 0.667. So the pixel values would be about 113. The Preserve Luminosity option just assures that the scale values from the sliders always adds up to 100%. Of course, strange things happen when any of the sliders have large negative values ” (from the plug-in author himself).
![[Note]](../images/note.png)
|
Note |
|---|---|
|
Which channel will you modify? : This depends on what you want to do. In principle, the Red channel suits contrast modifications well. The Green channel is well adapted to details changes and the Blue channel to noise, grain changes. You can use the Decompose filter. |
|
|
Note |
|---|---|
|
The 30%, 59%, 11% gives you the same gray levels as the Grayscale command in Image/Mode. This wil no longer be valid with GIMP-2.4. |