| 4.5. Find Info About Your Image | ||
|---|---|---|
 |
4. GIMPLite Quickies |  |
| 4.5. Find Info About Your Image | ||
|---|---|---|
| |
4. GIMPLite Quickies | |
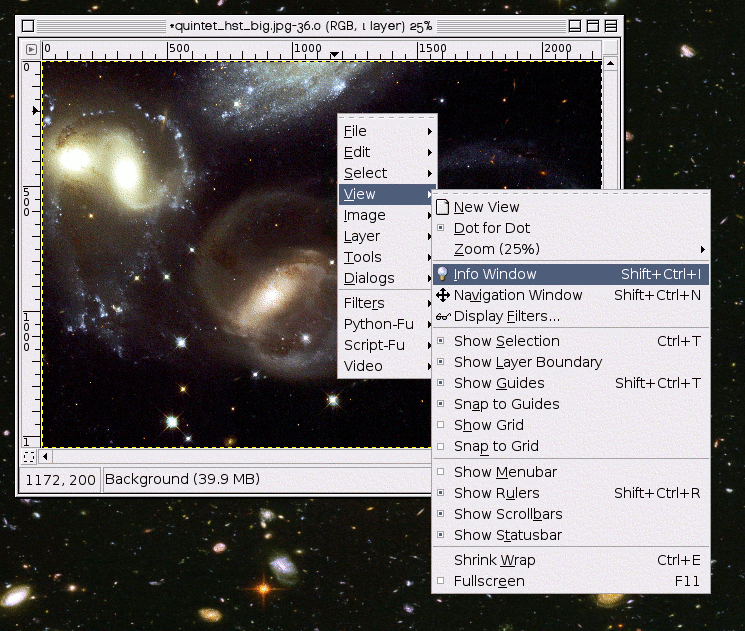
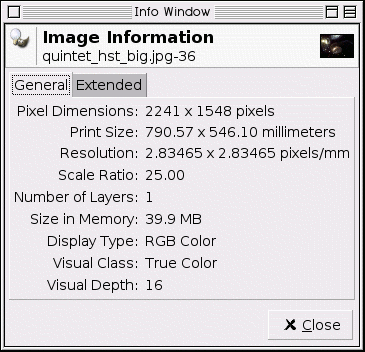
This window will tell you the pixel lengths. Right click on the image and follow → [3] from the image window. I got another image from APOD [APOD06]. It is pretty big. (Not as big as Saturn though) You can see in the dialog below, it is 2241 x 1548 pixels.
If you are just making a square out of a rectangle, like in the Section 4.4, “ Crop An Image ”, you need only to open the dialog and find the lesser length and use that as described. Since this is very little information, and definitely not enough to fill the space between the menu thumbnail and the dialog screenshot in my layout, I thought I would run through some calculator exercises that might help you to meet your image needs.
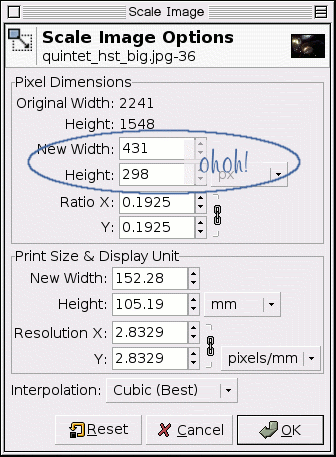
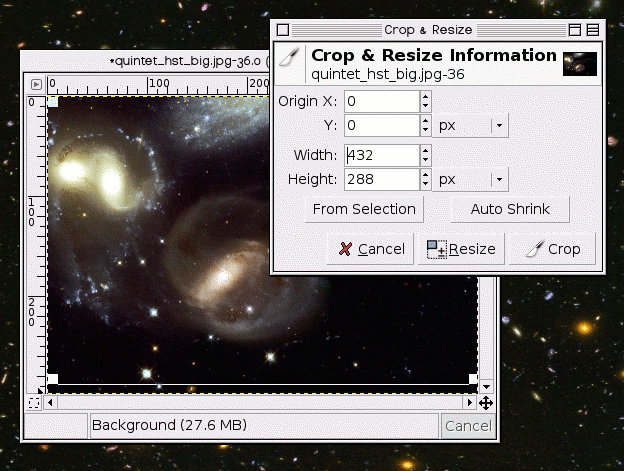
It is nice to have images appear on a browser window as a photo would. Photos online appear to be 4x6 inches when scaled to 288x432 pixels (72 dpi for many monitors). There is a problem, however, if you try to scale this image. The ratio of width to length of the original does not match the ratio of the photo. So, to make the scaled image the correct size crop 10 pixels from the height. For the sample image, it was best to crop 10 pixels off from the top. The final image should “appear” as a 6x4 inch photo on most monitors.
There will be problems whenever mixing scanned photos with digital photos and also with scanned negatives. Modern film developing machines automatically crop one half of an inch off from each image -- the rumor is that the photo printing machines match a certain style of camera view. If you are preparing an image to be printed on a machine like this; or if you are planning on a gallery where the images are from different sources, some intelligent cropping to fit the best size for the medium you have chosen will be a plus. If this is confusing; please blame the photo printing industry and not GIMP.
You can change the Resolution of your image as well, using the same methods as we used in the Scale, although, in my somewhat limited use, the issue is more about how many pixels. Let's say you want to get this image printed at the photo lab. 300 pixels for every inch is preferred. This original image will print easily as a 7 x 5 photo. 2241px/300ppi = 7.47 in. Get out your calculator for the short side. 1548/300 = _.
There is another brutal fact you should come to terms with if you are new to graphics and computers. Just because it looks good on the screen doesn't mean that it will print that nicely. I tried to emulate how this image would appear printed at 300dpi. Sorry. There are some options, for instance my friend printed images and then scanned them back in. Terrible business!