| 8.4. Emboss | ||
|---|---|---|
 |
8. Distort Filters |  |
| 8.4. Emboss | ||
|---|---|---|
| |
8. Distort Filters | |
You can find this filter through → → .
You can use it only with RGB images. If your image is grayscale, it will be grayed out in the menu.
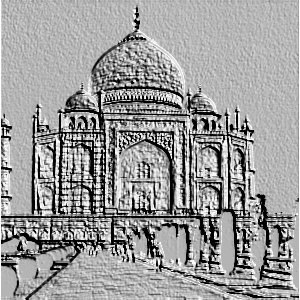
It stamps and carves the active layer or selection, giving it relief with bumps and hollows. Bright areas are raised and dark ones are carved. You can vary the lighting.
All your setting changes will appear in the Preview without affecting the image until you click on OK. Don't keep Do Preview checked if your computer is too much slow.
Bumpmap: Relief is smooth and colors are preserved.
Emboss: It turns your image to grayscale and relief is more marked, looking like metal.
Azimuth: This is about lighting according to the points of the compass (0 - 360). If you suppose South is at the top of your image, then East (0°) is on the left. Increasing value goes counter-clockwise.
Elevation: That's height from horizon (0°), in principle up to zenith (90°), but here up to the opposite horizon (180°).
Depth Seems to be the distance of the light source. Light decreases when value increases.