| 9.4. GIMPressionist | ||
|---|---|---|
 |
9. Artistic Filters |  |
| 9.4. GIMPressionist | ||
|---|---|---|
| |
9. Artistic Filters | |
Figure 16.162. Example for the “GIMPressionist” filter
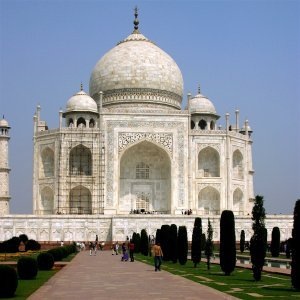
Original image
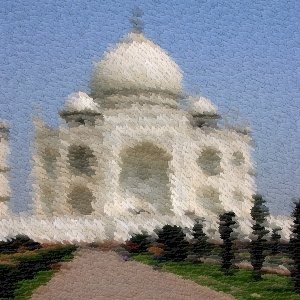
Filter “GIMPressionist” applied
It's the king of Artistic filters. It can do what Cubism and Apply Canvas do and much more. It gives your image the look of a painting. All is going as if your image was painted again on a paper and with a brush you'd have chosen. It works on the active layer or selection.
All your setting changes will appear in the Preview without affecting the image until you click on . The button refreshes the preview window (it is not automatic, Gimpressionist has so much work to do!), and the button reverts to the original image.
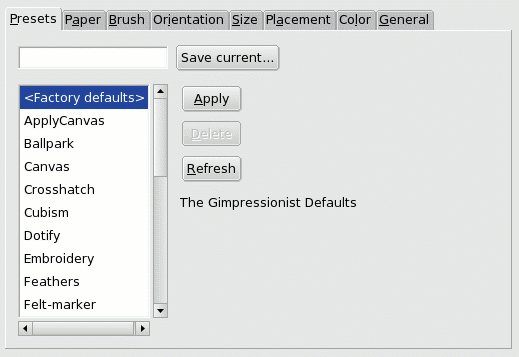
GIMPressionist has a lot of parameters. When combined, they give an astronomical number of possibilities. So, it is important, when an interesting preset has been found, to save it and also to send it to the plugin author if exceptional. Per contra, the intricacy of all these parameters makes difficult understanding and foreseeing how each one works.
Save Current: Save current parameters. You can give a name in the input box on the left and a short description in the dialog that appear.
Apply: Load the parameters of the selected preset in the list.
Delete: Delete the selected preset. You can delete only the presets you have created.
Refresh: Update the preset list.
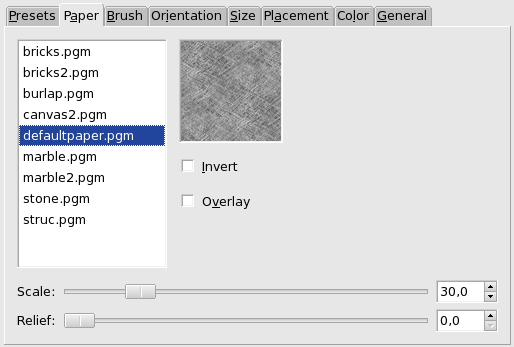
This tab concerns the texture of the canvas your image will be painted on. You have a list of textures and a Preview for the selected texture. A description is displayed on the right for every texture when selected.
Inverts the paper texture: what was a hollow turns to a bump and vice-versa.
Apply the paper as it, without embossing it. It looks like if a transparent paper has been overlayed on the image.
Specifies the scale of the texture (in % of the original file): controls the graininess of the texture.
Specifies the amount of embossing to apply (3-150).
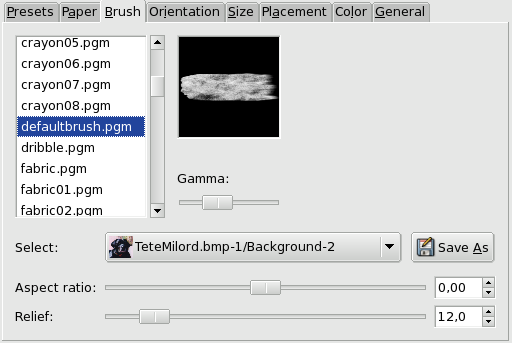
"Brush" is a general term for any material used to paint. A list of brushes is available with a Preview for the selected one.
Changes the gamma (luminosity) of the selected brush. The gamma correction brightens or darkens midtones.
You can also use a brush pattern you have created by selecting its image (arrow button on the Select line). This image must be on your screen before you launch the filter to be taken in account. Of course, don't use big images.
If your image has several layers, they also will be displayed in the Select list and can be used as a brush. When selected, the layer appears in the brush preview and the normal brush is deselected.
The button allows you to save the selected brush.
Specifies the brush proportions, height (0 -1) and width (0 +1).
Specifies the amount of paint used for each stroke. This may evoke painting with a palette knife.
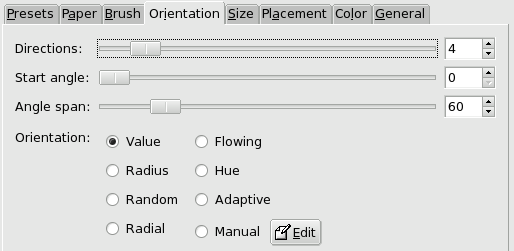
This tab allows to set the orientation of the brush strokes. A painter is not obliged to go over with the same paintbrush angle. To perform some effects, he can vary their orientation.
With this option, you can set how many times the brush will pass through a same place, with each time a different direction, resulting in a more and more thick paint.
Specifies the general direction of the strokes, the angle that the angle range will start from. Directions are often chosen to give some movement to the image.
Specifies the angle, the sector, of the stroke "fan".
Specifies the direction of the brush strokes.
Value : Let the Value (luminosity) of the region determine the direction of the stroke.
Radius : The distance from the center of the image determines the direction of the stroke.
Random : Select a random direction for each stroke.
Radial : Let the direction from the center determine the direction of the stroke.
Flowing : Not a direction question here: the strokes follow a "flowing" pattern.
Hue : Let the hue of the region determine the direction of the stroke.
Adaptive : The brush direction that matches the original image the closest is selected.
Manual : The Edit button opens the Edit orientation Map dialog that allows you to set the directions manually.
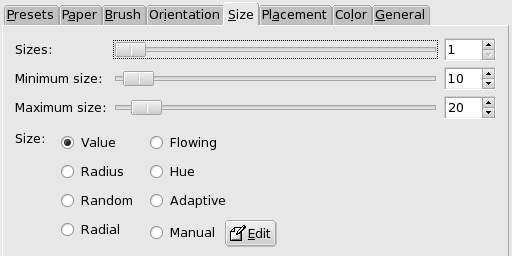
This tab allows you to set the number of brush sizes that will be used to paint, the limits of variation of these sizes and the criterion used to determine them.
You can specify how many brush sizes are to be used and their sizes.
Sizes: The number of brush sizes to use.
Minimum Size and Maximum Size : The brush sizes are between these two values. Greater the size, greater the length and width of strokes.
You have there options to specify how the size of strokes will be determined.
Value: Let the Value (luminosity) of the region determine the size of the stroke.
Radius : The distance from the center of the image determines the size of the stroke.
Random : Select a random size for each stroke.
Radial : Let the direction from the center determine the size of the stroke.
Flowing : Not a length question here: the strokes follow a "flowing" pattern.
Hue : Let the hue of the region determine the size of the stroke.
Adaptive : The brush size that matches the original image the closest is selected.
Manual : The Edit button opens the Size Map Editor. That allows you to specify the size of strokes by yourself.
In this tab you can set how strokes will be distributed.
In the preview of the Orientation Map Editor, all small arrows look like a flow around objects. Inside this flow, strokes may be placed in two different ways:
Randomly: Places strokes randomly. This produces a more realistic paint.
Evenly: Strokes are evenly distributed across the image.
The greater the density the closer the strokes. With a low density, the paper or background may be visible in unstroke areas.
Focus brush strokes around center.
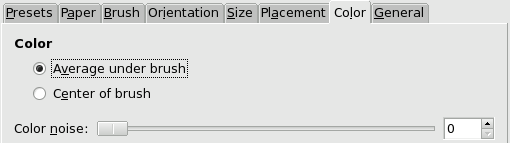
In this tab, you can set what the stroke color will be.
You can set the stroke color in two ways:
Average under brush: Stroke color is computed from the the average of all pixels under the brush.
Center of brush: Samples the color from the pixel in the center of the brush.
This slider, and its input box, allow you to introduce noise in the stroke color, that will look less homogeneous.
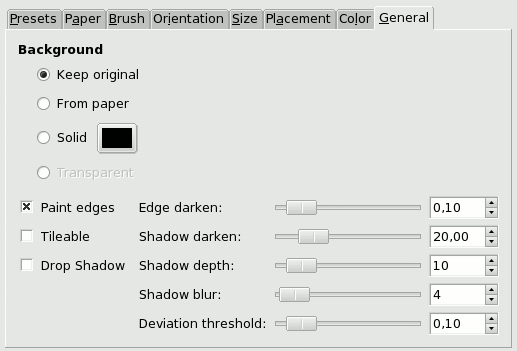
In this tab you can set what will be the background and the relief of brush strokes.
Keep Original: The original image will be used as a background.
From Paper: Copy the texture of the selected paper as a background.
Solid: By clicking on the color dwell you can select a solid colored background.
Transparent: Use a transparent background. Only the painted strokes will be visible. This option is available only if your image has an Alpha channel.
If it is disabled, a thin border will not be painted around the outside border of the image.
If checked, the resulting image will be seamlessly tileable. The right side will match the left side and the top will match the bottom. This is interesting if your image will be repeatedly used in a Web background.
Add a shadow effect to each brush stroke.
How much to darken the edges of each brush stroke. This increases paint relief or thickness.
How much to darken the brush shadow.
How far apart from the object the drop shadow should be.
How much to blur the drop shadow.
A bail-out value for adaptive selections of brush size.