| 2. Ventanas principales del GIMP | ||
|---|---|---|
 |
Capítulo 3. Primeros pasos con Wilber |  |
| 2. Ventanas principales del GIMP | ||
|---|---|---|
| |
Capítulo 3. Primeros pasos con Wilber | |
Figura 3.2. The standard windows of GIMP
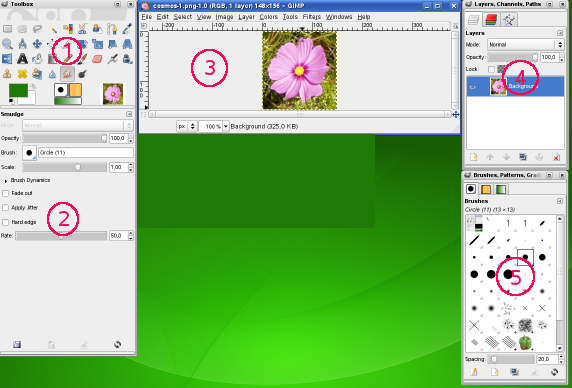
La captura de pantalla ilustra las ventanas principales del GIMP
The screenshot above shows the most basic arrangement of GIMP windows that can be used effectively.
The Main Toolbox: Contains a set of icon buttons used to select tools. May also contain the foreground and background colors; brush, pattern, and Gradient; and an icon of the active image. Use → → to enable, or disable the extra items.
Tool options: Docked below the main Toolbox is a Tool Options dialog, showing options for the currently selected tool (in this case, the Smudge tool).
An image window: Each image open in GIMP is displayed in a separate window. Many images can be open at the same time, limited by only the system resources. Before you can do anything useful in GIMP, you need to have at least one image window open. The image window holds the Menu of the main commands of GIMP (File, Edit, Select...), which you can also get by right-clicking on the window.
The Layers, Channels, Paths dock with the Layers Dialog open; note that the “dialogs” in the “dock” are tabs. This dialog window shows the layer structure of the currently active image, and allows it to be manipulated in a variety of ways. It is possible to do a few very basic things without using the Layers dialog, but even moderately sophisticated GIMP users find it indispensable to have the Layers dialog available at all times.
Brushes/Patterns/Gradients: The docked dialog below the layer dialog shows the dialogs (tabs) for managing brushes, patterns and gradients.
This is a minimal setup. There are over a dozen other types of dialogs used by GIMP for various purposes, but users typically open them when they need them and close them when they are done. Knowledgeable users generally keep the Toolbox (with Tool Options) and Layers dialog open at all times. The Toolbox is essential to many GIMP operations; in fact, if you close it, GIMP will exit after confirming that that is actually what you want to do. The Tool Options section is actually a separate dialog, shown docked to the Main Toolbox in the screenshot. Knowledgeable users almost always have it set up this way: it is very difficult to use tools effectively without being able to see how their options are set. The Layers dialog comes into play when you work with an image with multiple layers: after you advance beyond the most basic stages of GIMP expertise, this means almost always. And of course it helps to display the images you're editing on the screen; if you close the image window before saving your work, GIMP will ask you whether you want to close the file.
![[Nota]](images/note.png)
|
Nota |
|---|---|
|
If your GIMP layout is lost, your arrangement
is easy to recover using
→
; the Windows menu command is only available while an image is open.
To add, close, or detach a tab from a dock, click
|
GIMP does not support placing all controls and images into a single comprehensive window. The consensus in the GIMP community, is that multiple windows offers a better user experience—and a single window is difficult to do in a way that works correctly across all of the operating systems on which GIMP runs.
Earlier versions of GIMP (up to GIMP 1.2.5) used many dialogs: advanced users often had half a dozen or more dialogs open at once, scattered all over the screen and very difficult to track. GIMP 2.0 is much better in this respect, because it allows dialogs to be docked together in a flexible way. (The Layers dialog in the screenshot actually contains four dialogs, represented by tabs: Layers, Channels, Paths, and Undo.) The system takes a little while to learn, but once you learn it, we hope that you will like it.
The following sections walk you through the components of each of the windows shown in the screenshot, explaining what they are and how they work. Once you have read them, plus the section describing the basic structure of GIMP images, you should have learned enough to use GIMP for a wide variety of basic image manipulations. You can then look through the rest of the manual at your leisure (or just experiment) to learn the almost limitless number of more subtle and specialized things that are possible. Have fun!
The Toolbox is the heart of GIMP. If you close it, you quit GIMP. Here is a quick tour of what you will find there.
![[Sugerencia]](images/tip.png)
|
Sugerencia |
|---|---|
|
In the Toolbox, as in most parts of GIMP, moving the mouse over something and letting it rest for a moment, usually displays a “tooltip” that describes the thing. Short cut keys are also frequently shown in the tooltip. In many cases, you can hover the mouse over an item and press the F1 key to get help about the thing that is underneath the mouse. |
Tool icons: These icons are buttons which activate tools for a wide variety of purposes: selecting parts of images, painting an image, transforming an image, etc. Sección 1, “La caja de herramientas” gives an overview of how to work with tools, and each tool is described systematically in the Tools chapter.
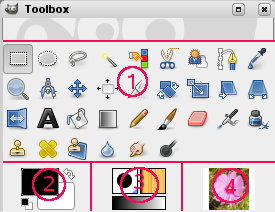
Foreground/Background colors: The color areas here show you GIMP's current foreground and background colors, which come into play in many operations. Clicking on either one of them brings up a color selector dialog that allows you to change to a different color. Clicking on the double-headed arrow swaps the two colors, and clicking on the small symbol in the lower left corner resets them to black and white.
Brocha, patrón y degradado Estos símbolos muestran las opciones actuales para: la brocha que emplean todas las herramientas que le permiten pintar sobre la imagen (recuerde que "pintar" incluye a operaciones como borrar y difuminar); el patrón empleado al rellenar las áreas seleccionadas de una imagen; y el degradado, el que entra en juego cuando una operación requiere una variación suave por un rango de colores. Al hacer clic sobre cualquiera de estos símbolos aparece una ventana de diálogo que le permite cambiarlo.
Active Image: In GIMP, you can work with many images at once, but at any given moment, only one image is the “active image”. Here you find a small iconic representation of the active image. Click the icon to display a dialog with a list of the currently open images, click an image in the dialog to make it active. You can also click an image window to make it the active image.
|
|
Nota |
|---|---|
|
La previsualización de la imagen activa se encuentra desactivada de fábrica. Si desea tenerla, puede activarla en las preferencias de la caja de herramientas. |
|
|
Nota |
|---|---|
|
At every start, GIMP selects a tool (the brush), a color, a brush and a pattern by default, always the same. If you want GIMP to select the last tool, color, brush and pattern you used when quitting your previous session, check the Save input device settings on exit in Preferences/Input Devices. |
|
|
Sugerencia |
|---|---|
|
The Toolbox window displays “Wilber's eyes” along the top
of the dialog. You can get rid of the “Wilber's eyes”
by adding the following line to your |
|
|
Sugerencia |
|---|---|
|
Drag and drop an image into the Toolbox window to open the image in its own Image window. This is very different than dragging an image into an existing Image window, which adds it to the currently open image in a new layer—usually not what you want. |