| 2. Diálogos relacionados con la estructura de la imagen | ||
|---|---|---|
 |
Capítulo 14. Diálogos |  |
| 2. Diálogos relacionados con la estructura de la imagen | ||
|---|---|---|
| |
Capítulo 14. Diálogos | |
The following dialogs let you control and manipulate image structures, such as layers, channels, or paths.
El diálogo Capas ofrece la interfaz principal para editar, modificar y administrar sus capas. Puede pensar a las capas como a una pila de ropa sobre su cuerpo. Empeándolas, puede construir una imagen desde un conjunto de partes conceptuales, cada una de las cuales puede ser manipulada sin que se afecten las otras. Las capas se apilan una sobre otra. La capa inferior es el fondo de la imagen.
The “Layers” dialog is a dockable dialog; see the section Sección 2.3, “Diálogos empotrables” for help on manipulating it.
You can access it:
from the image menu: → → ;
from the Tab menu in any dockable dialog by clicking on
 and selecting
→ ,
and selecting
→ ,
from the (default) shortcut: Ctrl+L.
In the menu, there is a list of detached windows which exists only if at least one dialog remains open. In this case, you can raise the “Layers” dialog from the image-menu: → .
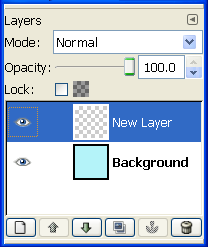
Cada capa se ilustra en el diálogo como una miniatura. Cuando una imagen tiene múltiples capas y componentes, se los muestra como una lista. La capa superior de la lista es la primera que se ve, y la capa inferior es la última que se ve, el fondo. A lo largo de la lista uno puede encontrar características relacionadas a cada capa en particular. Debajo de la lista hay botones para el manejo de la lista de capas. Haciendo clic derecho sobre la miniatura de una capa se abre el menú de la capa.
Todas las capas se muestran en la lista junto con sus atributos.

 Layer visibility
In front of the thumbnail is an icon showing an eye. By clicking on the eye, you toggle whether the layer is visible or not. (Shift-clicking on the eye causes all other to be temporarily hidden.)
 Chain layers
Another icon, showing a chain, allows you to group layers for operations on more than one layer at a time (for example with the Move tool).
The main attribute is the name of the layer. You can edit this by a double-click on the name or the thumbnail of the layer.
![[Nota]](images/note.png)
|
Nota |
|---|---|
|
En el caso de una animación por capas (GIF o MNG), el nombre de la capa puede usarse para especificar ciertos parámetros: Nombre_de_capa (duración en ms.) (modo de combinación), por ejemplo Cuadro-1 (100 ms) (replace). La duración define el tiempo en que una capa de la animación se hace visible. El modo de combinación define si la capa se combina con la precesora, o si la reemplaza. Este modo o es (combine) o es (replace). |
Sobre la lista, hay unos controles que permiten especificar las propiedades de la capa activa. La capa activa es la que aparece resaltada. Las propiedades son: "modo de la capa", "mantener transparencia", y "opacidad".
El modo de la capa determina cómo interactua con las demás. Desde esta casilla puede acceder a todos los modos provistos por el GIMP. Los modos de las capas se describen en detalle en el Modos de capas.
Si activa esta opción, las áreas transparentes de la capa se mantendrán, incluso si ha activado la opción Rellenar áreas transparentes de la herramienta Relleno de cubeta.
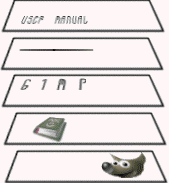
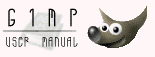
Figura 14.3. Example for Locking Alpha Channel
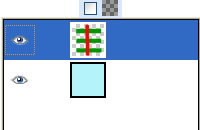
The active layer has three horizontal, opaque, green stripes on a transparent background. We paint a vertical red stripe. “Lock” unchecked: Opaque and transparent areas of the active layer are painted with red.
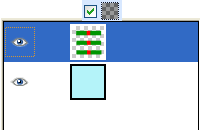
“Lock” checked: Only opaque areas of the active layer are painted with red. Transparent areas are preserved.
![[Sugerencia]](images/tip.png)
|
Sugerencia |
|---|---|
|
If a layer name in the Layer Dialog is in bold, then this layer has no Alpha channel. |
Al mover este deslizador le da más o menos opacidad a la capa. Con un valor de opacidad de cero, la capa es completamente invisible. No confunda esto con la máscara de capa, la que define la transparencia píxel por píxel.
Debajo de la lista, un conjunto de botones le permiten realizar algunas operaciones básicas con las capas.
Aquí puede crear una capa nueva. Se abre un diálogo en el cual puede ingresar el nombre de la capa, tal vez cambiar la anchura y la altura predeterminadas, y escoger el tipo de relleno de la capà con el que se pinta completamente.
Aquí puede subir un nivel a la capa de la lista. Presione la tecla Shift para mover la capa al tope de la lista.
Aquí puede descender de nivel a la capa de la lista. Presione la tecla Shift para mover la capa al fondo de la lista.
|
|
Sugerencia |
|---|---|
|
Para bajar una capa al fondo de la lista, primero puede ser necesario añadir un canal de transparencia (también llamado canal alfa) a la capa del fondo. Para hacer esto, haga clic derecho sobre la capa del fondo y seleccione Añadir canal alfa del menú. |
 Duplicar la capa
Aquí puede crear una copia de la capa activa. Al nombre de la capa original se le agrega un sufijo.
 Anclar la capa
Cuando una capa activa es una capa temporal (también llamada selección flotante) representada por este icono
 , este botón la "ancla" a la capa previamente activa.
Aquí puede borrar la capa activa.
Otras operaciones sobre el tamaño de la capa se encuentran disponibles en el menú de la capa que se obtiene haciendo clic derecho sobre el diálogo de capas. También puede hallar estas operaciones en el sub-menú Capas del menú de la imagen.
You will find merging layers functions in the Image menu.
Al hacer clic y mantener el botón del ratón sobre la miniatura de una capa, ésta se amplía un poco y se la puede mover.
Con esto puede colocar la capa en algún otro lugar de la lista de capas.
You can also put the layer down into Toolbox: a new image is created that contains this layer only.
Finally, you can put the layer down into another image: this layer will be added to the layer list, above existing layers.
A transparency mask can be added to each layer, it's called Layer mask. A layer mask has the same size and same pixel number as the layer to which it is attached. Every pixel of the mask can then be coupled with a pixel at the same location in the layer. The mask is a set of pixels in gray-tone on a value scale from 0 to 255. The pixels with a value 0 are black and give a full transparency to the coupled pixel in the layer. The pixels with a value 255 are white and give a full opacity to the coupled pixel in the layer.
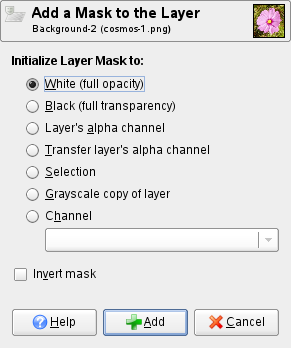
To create a layer mask start with a right click on the layer to call the context menu and select Add layer mask in the menu. A dialog appears where you can initialize the content of the mask:
White (full opacity): the mask is white in the Layer Dialog. So, all pixels of the layer are visible in the image window since painting the mask with white makes layer pixels fully visible. You will paint with black to make layer pixels transparent.
Black (full transparency): the mask is black in the Layer Dialog. So, the layer is fully transparent since painting the mask with black makes layer pixels transparent. Painting with white will remove the mask and make layer pixels visible.
Layer's alpha channel: the mask is initialized according to the content of layer Alpha channel. If the layer still contains transparency it's copied in the mask.
Transfer layer's alpha channel: Does the same thing as the previous option, except that it also resets the layer's alpha channel to full opacity.
Selection : the mask is initialized according to pixel values found in the selection.
Grayscale copy of layer: the mask is initialized according to pixel values of the layer.
Channel: The layer mask is initialized with a selection mask you have created before, stored in the Channel dialog.
Invert mask : This checkbox allows you to invert : black turns to white and white turns to black.
When the mask is created it appears as a thumbnail right to the layer thumbnail. By clicking alternatively on the layer and mask thumbnail you can enable one or other. The active item has a white border (which is not well visible around a white mask). That's an important point. Always keep the Layers Dialog prominently when working with masks, because you can't see, looking at the canvas, which of the layer or the mask is active.
Pressing Alt (or Ctrl+Alt and click on the layer mask thumbnail) is equivalent to the Show Layer Mask command : the layer mask border turns to green. If you press Ctrl the border is red and the result is equivalent to the Disable Layer Mask command. To return to normal view redo last operation. These options are for greater convenience in your work.
Figura 14.5. A layer with layer mask
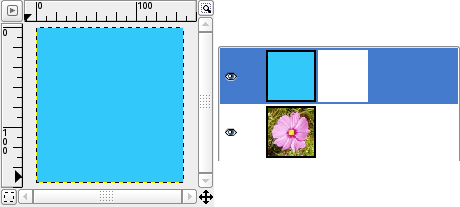
This image has a background layer with a flower and another blue one, fully opaque. A white layer mask has been added to the blue layer. In the image window, the blue layer remains visible because a white mask makes layer pixels visible.
Figura 14.6. Painting the layer mask
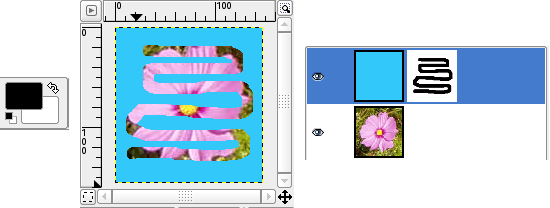
The layer mask is active. You paint with black color, which makes the layer transparent : the underlying layer becomes visible.