| 3.4. Bucket Fill | ||
|---|---|---|

|
3. Paint Tools |  |
| 3.4. Bucket Fill | ||
|---|---|---|
|
|
3. Paint Tools | |
This tool fills a selection with the current foreground color. If you Ctrl+click and use the Bucket tool, it will use the background color instead. Depending on how the tool options are set, the Bucket Fill tool will either fill the entire selection, or only parts whose colors are similar to the point you click on. The tool options also affect the way transparency is handled.
The amount of fill depends on what Fill Threshold you have specified. The fill threshold determines how far the fill will spread (similar to the way in which the magic wand works). The fill starts at the point where you click and spreads outward until the color or alpha value becomes “too different”.
When you fill objects in a transparent layer (such as letters in a text layer) with a different color than before, you may find that a border of the old color still surrounds the objects. This is due to a low fill-threshold in the Bucket Fill options dialog. With a low threshold, the bucket tool won't fill semi-transparent pixels, and they will stand out against the fill because they have kept their original color.
If you want to fill areas that are totally transparent, you have to make sure that the “Lock” option (in the Layers dialog) is unchecked. If this option is checked, only the non-transparent parts of the layer will be filled.
You can find the Bucket Fill tool from the image-menu through: → →
You can also call it by clicking the tool icon:
 in the toolbox.
or by pressing the Shift+B keys.
Ctrl toggles the use of BG Color Fill or FG Color Fill on the fly.
Shift toggles the use of Fill Similar Color or Fill Whole Selection on the fly.
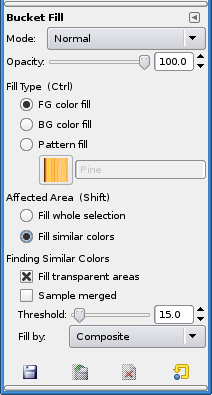
Normally, tool options are displayed in a window attached under the Toolbox as soon as you activate a tool. If they are not, you can access them from the image menu bar through → → which opens the option window of the selected tool.
See Paint Tools for help with options that are common to all these tools. Only options that are specific to the Bucket Fill tool are explained here.
GIMP provides three fill types:
sets the fill color to the currently selected foreground color.
sets the fill color to the currently selected background color.
sets the fill color to the currently selected pattern. You can select the pattern to use in a drop down list.
This drop-down list allows the user to select one of many fill patterns to use on the next fill operation. The manner in which the list is presented is controlled by the four buttons at the bottom of the selector.
This option makes GIMP fill a pre-existent selection or the whole image. A quicker approach to do the same thing could be to click and drag the foreground, background or pattern color, leaving it onto the selection.
This is the default setting: the tool fills the area with a color near the pixel onto you have clicked. The color similarity is defined by a brightness threshold, that you can set by a value or by a cursor position.
Under this section you can find two options:
The option Fill Transparent Areas offers the possibility of filling areas with low opacity.
The option Sample Merged toggles the sampling from all layers. If Sample Merged is active, fills can be made on a lower layer, while the color information used for threshold checking is located further up. Simply select the lower level and ensure that a layer above is visible for color weighting.
The Threshold slider sets the level at which color weights are measured for fill boundaries. A higher setting will fill more of a multi colored image and conversely, a lower setting will fill less area.
With this option you can choose which component of the image GIMP shall use to calculate the similarity and to determine the borders of filling.
The components you can choose from are , , , , , and .
This option is not easy to understand. You have chosen, for example, the Red channel. When you click on any pixel, the tool searches for contiguous pixels similar for the red channel to the clicked pixel, according to the set threshold. Here is an example:
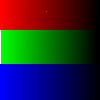
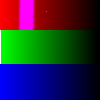
Original image: three strips with gradients of pure colors. Red (255;0;0), Green (0;255;0), Blue (0;0;255). We are going to use the Bucket-fill tool with the magenta color and a Threshold set to 15.
Image 1: Fill By = Composite. We successively clicked in the three color strips. Every strip is filled according to the threshold.
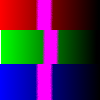
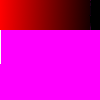
Image 2: Fill By = Red. We clicked in the red strip. The tool searches for contiguous pixels which have a similar value in the red channel, according to the set threshold. Only a narrow area corresponds to these standards. In the green and the blue strip, the value of pixels in the red channel is 0, very much different from the red channel value of the clicked pixel: the color doesn't spread to them.
Image 3: Fill By = Red. We clicked in the green strip. There, the value of the clicked pixel in the red channel is 0. All pixels in the green and the blue strips have the same red channel value (0): they are all painted.