| 2.2. Rechthoekselectie Gereedschap | ||
|---|---|---|

|
2. Selectie Gereedschappen |  |
| 2.2. Rechthoekselectie Gereedschap | ||
|---|---|---|
|
|
2. Selectie Gereedschappen | |
The Rectangle Selection tool is designed to select rectangular regions of the active layer: it is the most basic of the selection tools, but very commonly used. For information on selections and how they are used in GIMP see Selections; for information on features common to all selection tools see Selection Tools.
Het rechthoekselectie gereedschap wordt ook gebruikt om een rechthoek te tekenen. Om een gevulde (d.w.z geheel gekleurde) rechthoek te maken, maakt u eerst een rechthoekige selectie, en vult u deze selectie met behulp van het Emmer Vul gereedschap Om alleen de buitenkant van de rechthoek te tekenen, is het het gemakkelijkst om eerst een rechthoekige selectie te maken en deze dan over te trekken.
U kunt het rechthoekselectie gereedschap op een aantal verschillende manieren aanroepen:
from the image menu bar → → ,
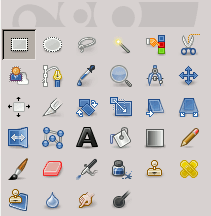
by clicking on the tool icon
 in the ToolBox,
by using the keyboard shortcut R.
![[Opmerking]](images/note.png)
|
Opmerking |
|---|---|
|
Zie Selectie Gereedschappen voor meer informatie over de sneltoetsen die alle selectie gereedschappen op de zelfde manier beinvloeden. In de rest van dit hoofdstuk worden alleen de effecten besproken die specifiek zijn voor het Rechthoekselectie gereedschap. |
Pressing the Ctrl key after starting
your selection, and holding it down until you are finished,
causes your starting point to be used as the center of the
selected rectangle, instead of a corner. Note that if you
press the Ctrl key before
starting to make the selection, the resulting selection will be
subtracted from the existing selection. The cursor becomes

If you press the Shift key
before starting the selection, the
resulting selection will be added to the existing one. The cursor
becomes

Pressing the Shift key after starting your selection, toggles the Fixed option, and holding it down until you are finished, will constrain the selection to a square, if it is your first selection. Later, with the default Aspect Ratio , your selection will respect the aspect ratio of the previous selection.
Pressing both keys after starting your selection
combines the two effects, giving you a square selection centered
on your starting point. Note that pressing these keys before
starting your selection intersects the resulting selection with
the existing one and the pointer change shape accordingly :

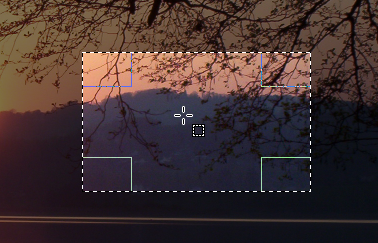
When this tool is selected the mouse pointer is displayed like this:
 as soon as it is over the image. A drag and drop allows to get a
rectangular (or square) shape. When the mouse button is relaxed, a
dotted line (“marching ants”) outlines the selection. It's
not necessary to adjust the selection with care; you can resize it
easily later.
as soon as it is over the image. A drag and drop allows to get a
rectangular (or square) shape. When the mouse button is relaxed, a
dotted line (“marching ants”) outlines the selection. It's
not necessary to adjust the selection with care; you can resize it
easily later.
When the pointer is moving on the canvas, the pointer and selection aspects change:
- outside the selection it looks like previously; this allows to design a new selection but will erase the existing one if this isn't combined with an action on the relevant key to add or subtract another selection as described in the previous paragraph.
- within selection peripheral parts, the mouse pointer changes into
various shapes when overflying rectangular sensitive and clearly marked
areas. These handles allow you to resize the
selection. In selection corners the pointer changes into a shape
according to the context; for instance in the low right corner it
becomes:
 .
So, by click-and-dragging these areas, you can magnify or shrink the
selection size. Over median selection parts, lateral, low or up,
pointer is changed into appropriate shapes according to the context.
For instance, when the mouse pointer is over the median right side, the
pointer looks like:
.
So, by click-and-dragging these areas, you can magnify or shrink the
selection size. Over median selection parts, lateral, low or up,
pointer is changed into appropriate shapes according to the context.
For instance, when the mouse pointer is over the median right side, the
pointer looks like:
 .
So you can click-and-drag to magnify or to shrink the selection size by
moving the chosen boundary.
.
So you can click-and-drag to magnify or to shrink the selection size by
moving the chosen boundary.
- inside selection central area the mouse pointer looks like usual for
object manipulation, i.e.:
 .
So you can move the whole selection by a click-and-drag.
.
So you can move the whole selection by a click-and-drag.
Moreover, if you have not unchecked the Highlight option, your work will be easier because what is out the selection will be darkest than what is in the selection, and then the selection seems highlighted.
![[Tip]](images/tip.png)
|
Tip |
|---|---|
|
If you use moving keys you can move the selection or modify its size by one pixel step. If you use it in combination with Shift you can move it by a 25 pixel step. |
Figuur 14.12. Sensitive selection areas
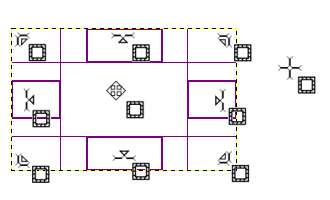
Display of all possible pointers in function of their localization with respect to the selection area.
After creating and modifying the selection, you will have to exit this editing mode (and commit any changes). You can do this with a single click inside the selection or by pressing the Enter key. Or you can just use a non-selection tool and, for example, fill or paint the selection.
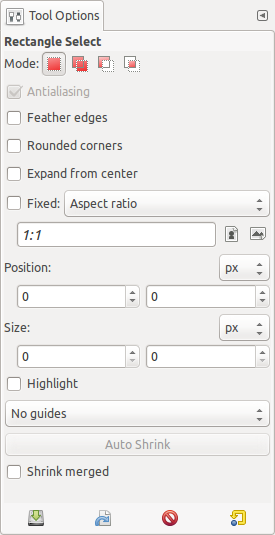
Normally, tool options are displayed in a window attached under the Toolbox as soon as you activate a tool. If they are not, you can access them from the image menu bar through → → which opens the option window of the selected tool.
|
|
Opmerking |
|---|---|
|
Zie Selectie Gereedschappen voor meer informatie over eigenschappen die gelden voor alle selectie gereedschappen. Alleen opties specifiek voor het rechthoekselectie gereedschap worden hier besproken. |
Common select options.
If you enable this option, a slider appears. You can use this to adjust the radius that is used to round the corners of the selection.
If you enable this option, the point the selection is started by pressing the mouse button is used as center of the selected area.
Dit menu geeft u de mogelijkheid om de vorm en grootte van de rechthoekige selectie op drie verschillende manieren te beinvloeden en beperken:
Deze optie stelt u in staat om de verhouding tussen de hoogte en breedte te behouden tijdens het vergroten en verkleinen van de selectie. Deze verhouding wordt bepaald door de getallen in de invoervelden voor de Breedte en Hoogte.
Deze optie stelt u in staat om handmatig de grootte van de selectie rechthoek op te geven door middel van het invullen van de invoervelden voor Breedte, Hoogte en Eenheid
With this choice you can fix the height of the selection.
With this choice you can fix the width and height of the selection.
These two text fields contain the current horizontal and vertical coordinates of the upper left corner of the selection. You can use these fields to adjust the selection position precisely.
These two text fields contain the current width and height of the the selection. You can use these fields to adjust the selection size precisely.
If you enable this option, the selected area is emphasized by a surrounding mask to make visual selection much easier.
With this menu you can select the type of guides that is shown within the selection to make the creation of a selection easier, respecting Photo composition rules.
Six options are available:
No Guides
Center lines
Rule of thirds
Rule of fifths
Golden sections
Diagonal lines
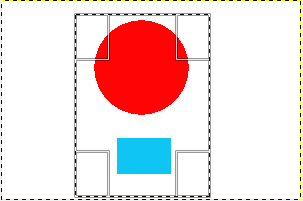
This option is active when a rectangle selection is drawn. Clicking on the button will make the selection automatically shrink to the nearest rectangular shape including elements in the selection. The algorithm for finding the best rectangle to shrink to is “intelligent”, which in this case means that it sometimes does surprisingly sophisticated things, and sometimes does surprisingly strange things. In any case, if the region that you want to select has a solid-colored surround, auto-shrinking will always pick it out correctly. Note that the resulting selection does not need to have the same shape as the one you sweep out.
Indien Samengevoegd Monsteren aangevinkt is, gebruikt Auto Shrink de pixel informatie van het hele zichtbare deel van de afbeelding, in plaats van alleen de pixel informatie van de huidige laag.