| 6.6. Text | ||
|---|---|---|

|
6. Other |  |
| 6.6. Text | ||
|---|---|---|
|
|
6. Other | |
The Text tool places text into an image. With GIMP-2.8, you can write your text directly on the canvas. No Text Editor is needed anymore (although you can still use it if you want by checking the Use editor option in the Tool Options dialog. A text toolbar has been added which allows you to edit text in different ways but you can still go on using the Text Option dialog, to change the font, color and size of your text, and justify it, interactively. Right clicking on the frame opens a context menu that allows you to copy, cut, paste, load a text...
As soon as you type your text, it appears on the canvas in a rectangular frame. If you draw the rectangular frame first, the text is automatically adapted to the frame size. You can enlarge this frame as you do with rectangular selections.
In this chapter, tool options will be described. To know how to use the Text tool, please refer to text management.
You can access this tool in several ways:
In the image menu through → ,
by clicking the tool icon
 in Toolbox,
or by using the T keyboard shortcut.
Normally, tool options are displayed in a window attached under the Toolbox as soon as you activate a tool. If they are not, you can access them from the image menu bar through → → which opens the option window of the selected tool.
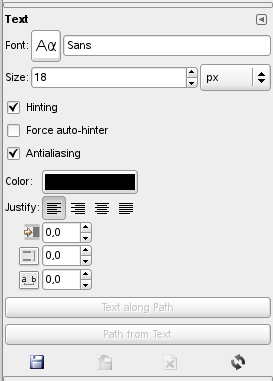
Click on the fonts button to open the font selector of this tool, which offers you a list of installed X fonts.
At the bottom of the font selector you find some icons which act as buttons for:
resizing the font previews,
selecting list view or grid view,
opening the font dialog.
Choose a font from the installed fonts. When you select a font it is interactively applied to your text.
![[Tip]](images/tip.png)
|
Tip |
|---|---|
|
You can use the scroll wheel of your pointing device (usually your mouse) on the fonts button in order to quickly change the font of your text (move the pointer on the fonts button, and don't click, just use the wheel button). |
This control sets the size of the font in any of several selectable units.
Use an external editor window for text editing instead of direct-on-canvas editing.
Antialiasing will render the text with much smoother edges and curves. This is achieved by slight blurring and merging of the edges. This option can radically improve the visual appearance of the rendered typeface. Caution should be exercised when using antialiasing on images that are not in RGB color space.
Uses the index of adjustment of the font to modify characters in order to produce clear letters in small font sizes.
Color of the text that will be drawn next. Defaults to black. Selectable from the color picker dialog box that opens when the current color sample is clicked.
|
|
Tip |
|---|---|
|
You can also click-and-drag the color from the Toolbox color area onto the text. |
Causes the text to be justified according to any of four rules selectable from the associated icons.
Controls the indent spacing from the left margin, for the first line.
Controls the spacing between successive lines of text. This setting is interactive: it appears at the same time in image text. The number is not the space between lines itself, but how many pixels must be added to or subtracted from this space (the value can be negative).
Controls the spacing between letters. Also in this case the number is not the space itself between letters, but how many pixels must be added to or subtracted from this space (the value can be negative).
Concerns the text box. The associated drop down list offers two options:
Dynamic: default option. The size of the text box increases as you type. Text may go out of the image. You have to press the Enter key to add a new line. The indent option indents all lines. If you increase the box size, the option turns to "Fixed".
Fixed: you must enlarge the text box first. Else, usual shortcuts are active! The text is limited by the right side of the box and continues on next line. This is not true new line: you must press the Enter key to add a real new line. The text may go out the lower border of the image. The indent option works on the first line only.
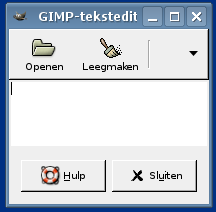
With GIMP-2.8, this text editor is available only if the Use editor option is checked. It persists probably because all its functions are not transferred to the direct-on-canvas mode. We will limit description to commands that has not been transferred.
As soon as you start writing, a Text layer is created in the Layer
Dialog. On an image with such a layer (the image you are working on, or
a .xcf image), you can resume
text editing by activating this text layer then clicking on it (double
click). Of course, you can apply to this text layer the same functions
you use with other layers.
To add another text to your image click on a non-text layer: a new Text Editor will appear and a new text layer will be created. To pass from a text to another one activate the corresponding text layer and click on it to activate the editor.
The Text Editor options
Text can be loaded from a text file by clicking the folder icon in the text editor. All the text in the file is loaded.
This option is also in the text context menu.
This option causes text to be entered from left to right, as is the case with most Western languages and may Eastern languages.
This option is also in the text context menu.
This option allows text to be entered from right to left, as is the case with some Eastern languages, such as Arabic (illustrated in the icon).
This option is also in the text context menu.
Default doesn't use the font you have selected in the Options dialog. If you want to use it, check this option.
![[Opmerking]](images/note.png)
|
Opmerking |
|---|---|
|
See also Paragraaf 2, “Text”. |