The dynamics apply a more „real feeling“ to the brush by connecting one or more of the brush parameters to the way of using the brush. You may for instance let the width of the pencil vary according to the speed of the stylus or the mouse, make the color saturation depending on the stylus pressure, make the color changing as the direction of the brush changes on the canvas, and so on. You may choose among several presets or define your own. The dynamics are created to be used together with drawing tablets, but some are available using the mouse.
The dynamics will make some of the behaviors of the drawing tools act more like the physical („real“) tools.
The Dynamics area in the Tool Option dialog shows from left to right, the
button to open the list containing the available dynamic presets, a field
displaying the name of the current preset, and rightmost the edit button.
Click on the
![]() button to open the dialog window displaying the available dynamics presets
and select another preset.
button to open the dialog window displaying the available dynamics presets
and select another preset.
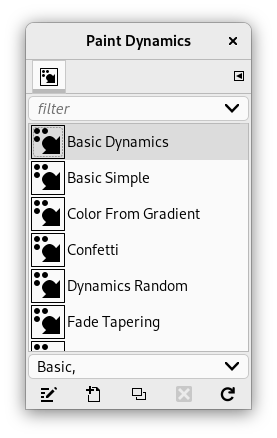
The Paint Dynamics dialog window can be opened
-
from the main menu: → → ,
-
or by clicking on the button in the list of dynamics presets.
This dialog is a dockable dialog; see the section 2.3 – „Dokování dialogů“ for help on manipulating it.
From this dialog you can select from all the available presets, just as from the list of dynamics presets.
The button bar at the bottom offers the following functionality:
-
 Edit this dynamics: Clicking this will open the
Paint Dynamics Editor dialog
where you will be able to edit the selected dynamics.
Edit this dynamics: Clicking this will open the
Paint Dynamics Editor dialog
where you will be able to edit the selected dynamics.
-
 Create a new dynamics: Do just that.
-
 Duplicate this dynamics: Make a copy of the
selected dynamics.
Duplicate this dynamics: Make a copy of the
selected dynamics.
-
 Delete this dynamics: Delete the selected
dynamics. Note: this button is disabled for the default dynamics
that come with GIMP.
Delete this dynamics: Delete the selected
dynamics. Note: this button is disabled for the default dynamics
that come with GIMP.
-
 Refresh dynamics: Update the dynamics list.
- Overview
-
You can get the dynamics context menu by right clicking on a dynamics preset. Most of the operations on dynamics are also available through buttons at the bottom of the dynamics dialog. Those operations are documented there.
- Edit Dynamics…, New Dynamics, Duplicate Dynamics, Delete Dynamics, Refresh Dynamics
-
See Dynamics Dialog.
- Copy Dynamics Location
-
Copy Dynamics Location allows you to copy the path of the selected Dynamics preset to the clipboard.
- Show in File Manager
-
Show in File Manager opens the location of the Dynamics preset in the default File Manager on your system.
The Paint Dynamics Editor can be called from:
-
the edit button in the Tool Options dialog,
-
the Paint Dynamics selection dialog by clicking either the button or the button.
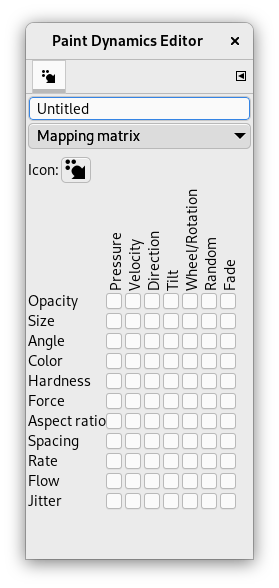
You select the desired behaviors by clicking in the small squares. Clicking a second time will unselect the marking.
![[Poznámka]](images/note.png)
|
Poznámka |
|---|---|
|
Pre-installed dynamics are disabled as you cannot change their settings. To edit the options you have to work on a copy made from one of the pre-installed dynamics or create a new dynamics. |
The main part of the edit dialog is a table where you can decide which brush parameters should be affected by the way you use the stylus or the mouse. You can enable as many parameters and parameter combinations you want, but usually the fewer the better.
Each column in the table represents a stylus or mouse action except the random and the fade functions. All functions works with graphic tablet. Some of the functions are also available using the mouse. These functions are marked in the tables. The descriptions are using the default settings of all functions
-
Pressure: It allows you to decide which aspects of the tool's action will be affected by pressing the stylus against the tablet.
-
Velocity: (mouse) This is the speed of the brush.
-
Direction: (mouse) This is the moving direction of the brush.
-
Tilt: The behavior of the function depends on the tilting of the stylus.
-
Wheel: The output depends on the rotation of the stylus or the setting of the wheel on the airbrush pen.
-
Random: (mouse) The selected option will change at random.
-
Fade: (mouse) The selected option will be faded in or out depending on the settings of the fade options in the Dynamic Options menu of the Tools Option dialog.
Each row shows a brush parameter and seven checkboxes, one for each action. You connect the parameters to the actions by clicking the appropriate boxes. Clicking on a selected box will unselect the connection.
- Krytí
-
Pressure: Press harder to make the drawing less transparent.
Velocity: (mouse) The opacity decreases as the speed of the stylus increases.
Direction: (mouse) The opacity depends on the direction of the stylus or the mouse. The effect seems to have a touch of randomness built in.
Tilt: The opacity depends on the tilt of the stylus.
Wheel
Random: (mouse) The opacity changes at random in the interval set by the opacity slider in the Tool Options dialog.
Fade: (mouse) Starting with full transparency and ending with the opacity set by the opacity slider in the Tool Options dialog.
- Velikost
-
Pressure: Press harder to make the brush wider.
Velocity: (mouse) Increasing speed decreases the width of the brush.
Direction: (mouse) The size of the brush depends on the moving direction of the stylus or the mouse. The effect seems to have a touch of randomness built in.
Tilt: The size of the brush depends on the tilt of the stylus.
Wheel
Random: (mouse) The size of the brush changes at random up to the size set in the brush size slider in the Tool Options dialog.
Fade: (mouse) Fades from a narrow brush to the size set by the brush size slider in the Tools Options dialog.
- Úhel
-
- Color
-
By default the color is picked from the foreground color in the toolbox. However, if the color is activated in the dynamics editor, the color is instead collected from the active gradient.
Velocity: (mouse) At slow speeds the color is collected from the right side of the gradient. As the speed increase the color is picked more and more from the left side of the gradient.
Direction: (mouse) The direction determine where on the gradient the color is picked from. The effect seems to work a bit on random.
Random: (mouse) The color is picked at random from the gradient.
Fade: (mouse) The start color is collected from the left side of the gradient and then more and more from the right side during the stroke. The behavior of the fading is set in the Fade Options in the Tool Options Dialog.
- Hardness
-
The hardness option is useful only for fuzzy brushes.
Velocity: (mouse) At slow speed the brush is hard and become more fuzzy as the speed increase.
Random: (mouse) The fussiness of the brush varies at random.
Fade: (mouse) The brush become less fuzzy during the stroke. The behavior of the fading is set in the Fade Options in the Tool Options Dialog.
- Force
-
- Aspect Ratio
-
The Aspect Ratio Slider in the Tool Options Dialog must be set to other values than the default value of 0.00 to activate the dynamics. If the aspect ratio slider is set to a negative value the width of the brush will vary while the height of the brush is constant. If the slider is set to a positive value only the height of the brush will vary.
Velocity: (mouse) The aspect ratio of the brush (width / height) varies with the speed of the brush.
Direction: (mouse) The aspect ratio of the brush varies with the moving direction of the brush. The effect seems to have a touch of randomness built in.
Random: (mouse) The aspect ratio of the brush varies at random.
Fade: (mouse) If the Aspect Ratio Slider is set to a positive value the brush will fade from full height at the start of the stroke to the height set by the aspect ratio slider. If the slider is set to a negative value the brush fades from full width to the width set by the aspect ratio slider. The behavior of the fading is set in the Fade Options in the Tool Options Dialog.
- Spacing
-
Spacing is the distance between the marks set by the brush when drawing lines. With this option set the spacing is affected by how the stylus or mouse is used.
Velocity: (mouse) The spacing between the footprints of the brush increases with increasing speed.
Direction: (mouse) The spacing varies with the moving direction of the brush. The effect seems to have a touch of randomness built in.
Random: (mouse) The spacing varies at random.
Fade: (mouse) Starting with a wide spacing and gradually make the spacing narrower. The behavior of the fading is set in the Fade Options in the Tool Options Dialog.
- Přeběh
-
This option applies to the Airbrush, Blur/Sharpen tool, and Smudge tool, all of which have time-based effects.
The actions of these tools are more or less quick. The amount of Rate depends on the setting of the Rate slider in the Tool Options dialog.
- Flow
-
Significant only for the Airbrush: more or less paint is delivered. The amount of flow depends on the setting of the Flow slider in the Tool Options dialog.
- Jitter
-
Normally the brush draws a line by printing the brush marks close together. Adding jitter means that the brush prints are scattered along the line. The amount of scattering depends on the setting of the jitter slider in the Tool Options dialog window.
Pressure: At low pressure the brush prints are spread according to the value set in the jitter amount slider. As the pressure increases the scattering amount decreases.
Velocity: (mouse) At slow speed the brush prints are spread according to the value set in the jitter amount slider. As the speed increase the scattering amount decrease.
Direction: (mouse) The jitter effect depends on the direction of the brush. The effect seems to have a touch of randomness built in.
Random: (mouse)The jitter varies at random.
Fade: (mouse) Starting with no jitter and ending with the amount of jitter set in the jitter amount slider. The behavior of the fading is set in the fade options in the Tool Options dialog.
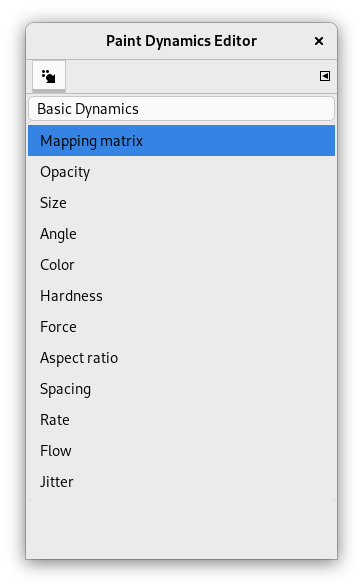
If the current options do not suits you, you may fine-tune the settings from the Paint Dynamics Editor. Click on the down arrow to open the drop-down menu and then select what option to change.

Click on one of the options to open the customizing dialog. The upper part of the dialog contains a curve where you can adjust the behaviour of the chosen parameters selected in the lower part of the dialog. You can drag the curve by pointing on it with the mouse pointer, holding down the left mouse button and the move the curve wherever you want inside the diagram.
Obrázek 14.45. Dynamics Options
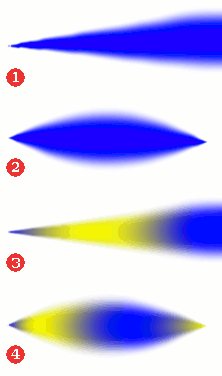
The brush strokes examples

Image 5: Brush size: Fade curve
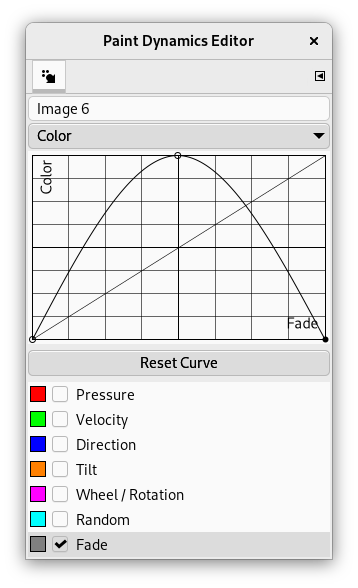
Image 6: Color: Fade curve
The examples shown are very brief, but will perhaps give you an idea of how to use this functions. Feel free to try other combinations. In these examples the foreground color is set to blue (#0000ff) and the background color to yellow (#ffff00). Fading: 200 pixels. Paintbrush size: 72. All other settings are the default values except for those values changed
-
Example 1 shows the result when the brush size is connected to the fading. Default options. The brush size starts as zero and increase to the size set in the brush size slider in the Tools Options Dialog.
-
In example 2 the brush size is still connected to the fade tool, but the fade curve is set as in image 5. The brush size starts at zero, fades up to full size and then fades down to zero again.
The full fade length is set along the x-axis from left to right. The y-axis determines the size of the brush. At the bottom the brush size is zero, and at the top of the diagram the brush is set to the full size according to the size set in the slider in the Brush Options Dialog. Study the example and the curve to see the relationship.
-
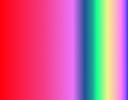
In example 3 the brush size is disconnected from the fade tool. The color is connected with the fade option with the curve set as in image 6. At the start of the drawing the color is picked from the left side of the gradient, then gradually more from the right side of the gradient and then finally fading back to the left side again.
As usual the x-axis is the total fade length. When the curve is near the bottom of the diagram the color is picked from the left side of the gradient. With the curve at the top of the diagram the color is picked from the right side of the gradient.
-
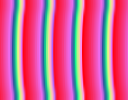
The last example shows a combination of these two settings. Both the size of the brush and the color are connected to the fading function with the curves set as in image 5 and 6.
Many of the dynamics behaviors also depends on the settings of the Dynamics Options in the Tool Options dialog and vice versa. For example the fading will not work if it is not applied in the Dynamics section.
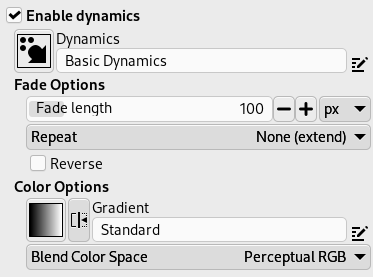
- Fade Options
-
This slider determines the length of the fading. What will actually happen depends on the setting of the Dynamic. If set to act on the color for example, the color will be taken from the current gradient starting from the left side of the gradient and moving toward the right side of the gradient.
The Fade Options has a drop-down list determining how the fading is repeated.
Obrázek 14.47. Illustration of the effects of the three gradient-repeat options, for the Abstract 2 gradient.
Přechod Abstract2

None
Sawtooth
Trojúhelníkovitá vlna
This option determines what happens if a brush stroke extends farther than the Length specified by the slider. There are three possibilities:
-
None means that the color from the end of the gradient will be used throughout the remainder of the stroke;
-
Sawtooth wave means that the gradient will be restarted from the beginning, which will often produce a color discontinuity;
-
Triangular wave means that the gradient will be traversed in reverse, afterwards bouncing back and forth until the end of the brush stroke.
-
- Color Options
-
Here you can choose the gradient to use as color source when using the brush with the color option set. Click on the box showing the gradient to change to another one from the gradient list.
If no color option is selected in the currently used dynamics, the brush will use the foreground color set in the toolbox.


