The command adds layer masks to the selected layers. It displays a dialog in which you can set the initial properties of the masks. If the layers already have a layer mask, this menu entry is disabled.
A layer mask lets you define which parts of the layer are opaque, semi-transparent or transparent.
See the Layer Masks section for more information.
-
You can access this command from the main menu through → → .
-
From the Layers Dialog, you can access it through the command of its context menu, or by clicking on the
 icon button on the bottom of that dialog.
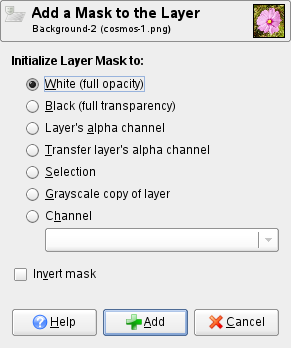
- Iniciar máscara de capa a
-
Este diálogo le ofrece varias opciones para los contenidos iniciales de la máscara de capa:
- Blanco (opacidad total)
-
Con esta opción, la máscara de capa hará opaca a toda la capa. Esto significa que no verá ninguna diferencia en la apariencia de la capa hasta que pinte sobre la máscara de capa.
- Negro (transparencia total)
-
Con esta opción, la máscara de capa hará transparente toda la capa. Esto se representa en la imagen con un patrón de cuadros sobre el que necesitará pintar para hacer una parte visible.
- Canal alfa de la capa
-
Con esta opción, los contenidos del canal alfa se usan para rellenar la máscara de capa. El canal alfa, en sí mismo, no se altera, por lo que la transparencia de las áreas parcialmente visibles se incrementan dirigiéndose a una capa más transparente.
- Transferir el canal alfa de la capa
-
Esta opción hace lo mismo que la opción anterior, pero el canal alfa de la capa se restablece a una opacidad total más tarde. El efecto es transferir la información de transparencia desde el canal alfa a la máscara de capa, dejando la capa con la misma apariencia que antes. La visibilidad de la capa ahora la determina la máscara de capa sola y no el canal alfa. Si duda, seleccione esta opción en lugar de “Canal alfa de la capa”, porque mantendrá la apariencia.
- Selección
-
This option converts the current selection into a layer mask, so that selected areas are opaque, and unselected areas are transparent. If any areas are partially selected, you can click on the Quick Mask button to help you predict what the effects will be.
- Copia en escala de grises de la capa
-
Esta opción convierte la capa en la máscara de capa. Particularmente útil cuando planea añadir nuevos contenidos a la capa.
- Canal
-
With this option the layer mask is initialized with a selection mask you have created before, stored in the Channels dialog. Note: that the normal RGBA channels are not part of this list, it only lists the extra channels you have created.
- Invertir la máscara
-
If you check the Invert mask box at the bottom of the dialog, the resulting mask is inverted, so that transparent areas become opaque and vice versa.
When you click on the button, a thumbnail of the layer mask appears to the right of the thumbnail of the layer in the Layers Dialog.


