| Luku 12. Rikasta GIMPini | ||
|---|---|---|

|
Osa II. Kuinka tulla GIMP velhoksi? |  |
| Luku 12. Rikasta GIMPini | ||
|---|---|---|
|
|
Osa II. Kuinka tulla GIMP velhoksi? | |
Sisällys
Tulet luultavasti usein joutumaan laittaa kuvaan, jotain tarkasti ja tulet huomaamaan, että se ei ole helppoa tehdä hiirellä. Voit usein saada parempia tuloksia käyttäen näppäimistön nuolinäppäimiä (jotka siirtävät valittua esinettä yksi pikseli kerrallaan tai 25 pikseliä, jos pidät Shift näppäintä pohjassa), mutta GIMP tarjoaa myös kaksi muuta apuvälinettä tekemään asemoinnista helpompaa: ruudukot ja apulinjat.
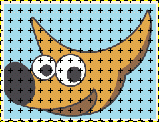
Each image has a grid. It is always present, but by default it is not visible until you activate it by toggling → in the main menu. If you want grids to be present more often than not, you can change the default behavior by checking Show grid in the Image Windows Appearance page of the Preferences dialog. (Note that there are separate settings for Normal Mode and Fullscreen Mode.)
The default grid appearance, set up when you install GIMP, consists of solid lines, spaced every 10 pixels both vertically and horizontally. You can customize the default grid using the Default Image Grid page of the Preferences dialog. If you only want to change the grid appearance for the current image, you can do so by choosing → from the main menu: this brings up the Configure Grid dialog.
Not only can a grid be helpful for judging distances and spatial relationships, it can also permit you to align things exactly with the grid, if you toggle → in the main menu: this causes the pointer to "warp" perfectly to any grid line located within a certain distance. You can customize the snap distance threshold by setting "Snap distance" in the Tool Options page of the Preferences dialog, but most people seem to be happy with the default value of 8 pixels. (Note that it is perfectly possible to snap to the grid even if the grid is not visible. It isn't easy to imagine why you might want to do this, though.)
![[Huomaa]](images/note.png)
|
Huomaa |
|---|---|
|
To create a grid that is actually part of the image, use the Grid plug-in. |
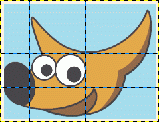
Kuvaruudukon lisäksi GIMP antaa sinulle joustavamman tyypin asemointiapuvälineitä : apulinjoja. Ne ovat horisontaaleja tai vertikaaleja linjoja, jotka voit väliaikaisesti panna esille kuvaan, kun työstät sitä.
Luodaksesi apulinja napsauta, jompaa kumpaa viivoitinta kuvaikkunassa ja vedä apulinjaa samalla kun pidät hiiren pohjassa. Apulinja on kuvattu sinisenä katkoviivana, joka seuraa osoitinta. Heti kun luot apulinjan ”>Siirrä”-työkalu aktivoituu ja hiirenosoitin muuttuu Siirrä-ikoniksi.
Voit myös luoda apulinjan Uusi apulinja (New Guide) komennolla, joka mahdollistaa apulinjan tarkan asemoinnin kuvaan, Uusi apulinja (prosenteilta)(New Guide (by Percent)) komennolla tai Uusi apulinja valinnasta (New Guides from Selection) komennolla.
You can create as many guides as you like, positioned wherever you like. To move a guide after you have created it, activate the Move tool in the Toolbox (or press the M key), you can then click and drag a guide; click-and-drag the intersection of two guides to move them together. To delete a guide, simply drag it outside the image. Holding down the Shift key, you can move everything but a guide, using the guides as an effective alignment aid.
Apulinjojen käyttäytyminen riippuu Siirrä ”Siirto”työkalun (Vaikutus) tilasta. Kun Taso tila on valittu, hiirenosoitin muuttuu pieneksi kädeksi, kun se pääsee apulinjan lähelle. Sitten apulinja aktivoituu ja muuttuu punaiseksi, voit siirtää apulinjaa tai poistaa sen liikuttamalla sen takaisin viivoittimelle. Jos Valinta tila on valittu voit asemoida apulinjan, mutta et voi siirtää sitä sen jälkeen.
As with the grid, you can cause the pointer to snap to nearby guides, by toggling → in the main menu. If you have a number of guides and they are making it difficult for you to judge the image properly, you can hide them by toggling → . It is suggested that you only do this momentarily, otherwise you may get confused the next time you try to create a guide and don't see anything happening.
Jos se tekee asiat helpommaksi voit muuttaa apulinjojen oletustoimintaa Kuvaikkunan ulkoasu sivulta Asetukset dialogista. Näytä apulinjat on oletettavasti huono idea aikaisemmin mainitusta syystä.
Voit poistaa apulinjat → → komennolla.
|
|
Huomaa |
|---|---|
|
Another use for guides: the Slice Using Guides plug-in can use guides to slice an image into a set of sub-images. |