| 5.2. Creating animated brushes | ||
|---|---|---|

|
5. Pennelli |  |
| 5.2. Creating animated brushes | ||
|---|---|---|
|
|
5. Pennelli | |
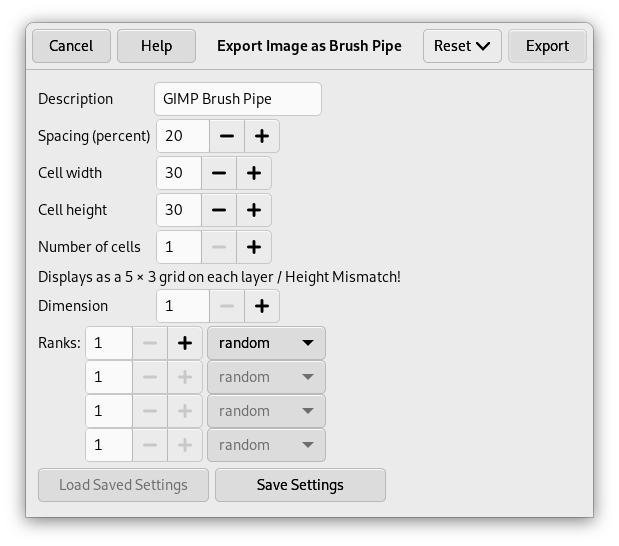
When your new animated brush is created, it is displayed within the image window. To save the brush into gih format, select → , name your work with the gih extension, and press the button. The following window is displayed:
Questa finestra di dialogo possiede diverse opzioni non facili da capire che servono a determinare il comportamento del pennello.
La «spaziatura» è la distanza tra due segni consecutivi creati da un'operazione di disegno con un pennello (in pratica una «pennellata»). È importante per la comprensione del concetto, considerare il disegno con un qualsiasi pennello, come una forma di «timbratura multipla». Se la spaziatura è poca, i segni saranno molto vicini ed il tratteggio apparirà continuo. Se la spaziatura è invece elevata, i segni saranno separati; quest'ultima impostazione può tornare utile con un pennello colorato, come il «peperone verde» per intenderci. Il valore varia da 1 a 200 e si riferisce alla percentuale del diametro del pennello: 100% significa un diametro intero.
È il nome del pennello che apparirà in cima alla finestra di dialogo del pennello (modalità griglia) quando il pennello sarà selezionato.
That is size of cells you will cut up in layers. Default is one cell per layer and size is that of the layer. Then there is only one brush aspect per layer.
Possiamo avere solo un grande livello e tagliarne all'interno le celle che verranno usate per i diversi aspetti del pennello animato.
For instance, we want a 100×100 pixels brush with 8 different aspects. We can take these 8 aspects from a 400×200 pixels layer, or from a 300×300 pixels layer but with one cell unused.
Questo è il numero di celle (una per ogni aspetto) che verranno tagliate in ogni livello. Il valore predefinito è il numero di livelli tale per cui ci sia un solo livello per aspetto.
Questa voce mostra come le celle sono state disposte nei livelli. Se per esempio, si è disposto otto celle, due celle per livello su quattro livelli, GIMP mostrerà: 1 righe di 2 colonne su ogni livello.
Adesso l'argomento comincia a complicarsi: qualche spiegazione diventa necessaria per capire come disporre le celle e i livelli.
GIMP starts retrieving cells from each layer and stacks them into a
FIFO stack (First In First Out: the first in is at the top of the
stack and so can be first out). In our example 4 layers with 2 cells
in each, we'll have, from top to bottom: first cell of first layer,
second cell of first layer, first cell of second layer, second cell
of second layer, …, second cell of fourth layer. With one cell per
layer or with several cells per layer, result is the same. You can
see this stack in the Layers Dialog
of the resulting
.gih image file.
GIMP crea un array dalla pila con le Dimensioni che avete impostato. Potete usare quattro dimensioni.
Nella terminologia informatica una struttura dati, comunemente detta array, a tre dimensioni ha una forma «mioarray(x,y,z)». È facile immaginare un array a due dimensioni: sulla carta è un array con righe e colonne
Con un array a tre dimensioni (3D) non si parla di righe e colonne ma di Dimensioni e Ranghi. La prima dimensione è lungo l'asse x, la seconda lungo quello delle y e la terza lungo l'asse z. Ogni dimensione ha ranghi di celle.
To fill up this array, GIMP starts retrieving cells from the top of stack. The way it fills the array reminds that of an odometer: right rank digits turn first and, when they reach their maximum, left rank digits start running. If you have some memories of Basic programming you will have, with an array(4,2,2), the following succession: (1,1,1),(1,1,2),(1,2,1),(1,2,2),(2,1,1),(2,1,2),(2,2,2),(3,1,1),…, (4,2,2). We will see this later in an example.
Oltre al numero di rango che è possibile assegnare ad ogni dimensione, si può assegnare anche una modalità Selezione. Ci sono diverse modalità che saranno applicate durante il disegno:
GIMP seleziona un rango dalla dimensione interessata a seconda dell'ordine che possiedono i ranghi in quella dimensione.
GIMP seleziona un rango nella dimensione interessata a seconda dell'angolo mobile del pennello.
The first rank is for the direction 0°, upwards. The other ranks are affected, clockwise, to an angle whose value is 360/number of ranks. So, with 4 ranks in the concerned dimension, the angle will move 90° clockwise for each direction change: second rank will be affected to 90° (rightwards), third rank to 180° (downwards) and fourth rank to 270° (-90°) (leftwards).
GIMP seleziona un rango a caso dalla dimensione interessata.
Queste opzioni riguardano le tavolette grafiche più sofisticate.
Esempi
Bene! E a cosa serve tutto ciò? Le vedremo con calma usando degli esempi. È possibile impostare ogni dimensione per fare in modo che il pennello faccia un'azione particolare.
Cominciamo con un pennello monodimensionale che ci permetterà di studiare l'azione della modalità di selezione. Lo si può immaginare così:
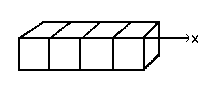
Seguire questi passi:
Select → from the main menu.
Set Width and Height for example to 30 pixels.
In the Advanced Options, set the Color space to RGB color and set Fill with to Transparency.
Using the Text tool create 4 layers «1», «2», «3», «4». Delete the «background» layer.
Select
→ from the main menu to first save your image as an
.xcf file to keep its properties.
Select
→ from the main menu to export the image as an animated brush
with the .gih extension.
Export the image with a .gbr extension in the
brushes directory in your personal
GIMP folder. The location of this folder depends on your
OS:
Linux: /home/user_name/.config/GIMP/2.99/
macOS: /Users/user_name/Library/Application Support/GIMP/2.99/
Windows: C:\Users\user_name\AppData\Roaming\GIMP\2.99\
In the Export Image as Brush Pipe dialog, provide a Description, set the Spacing (percent) to 100, set the Cell size to 30×30, set Dimension to 1, and set Ranks to 4, and the Selection drop-down to incremental. Then click the button.
In the Brush Dialog, click on
the button
![]() .
.
Your brush appears among the other brushes. You can use it immediately, without restarting GIMP.
Select your brush. Select pencil tool for instance and click and hold with it on a new image:
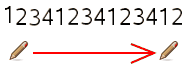
Si osserverà le cifre 1, 2, 3, 4 susseguirsi in ordine.
Take your .xcf image file
back and save it as .gih
setting the Selection drop-down to random:
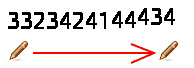
Le cifre verranno mostrate in ordine casuale.
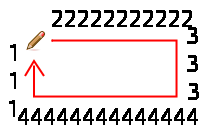
Now set the Selection drop-down to angular:
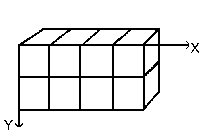
Ora creeremo un pennello animato a 3 dimensioni: la sua orientazione varierà a seconda della direzione del pennello, varierà la mano destra/sinistra regolarmente ed il suo colore cambierà casualmente tra nero e blu.
The first question we have to answer to is the number of images that is necessary. We reserve the first dimension (x) to the brush direction (4 directions). The second dimension (y) is for Left/Right alternation and the third dimension (z) for color variation. Such a brush is represented in a 3D array «myarray(4,2,2)»:
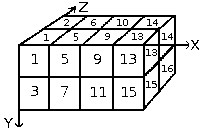
There are 4 ranks in first dimension (x), 2 ranks in second dimension (y) and 2 ranks in third dimension (z). Thus there are 4×2×2 = 16 cells. We need 16 images.
Creazione di immagini di dimensione 1 (x)
Open a new 30×30 pixels image, RGB with Transparent Fill Type.
Using the zoom draw a left hand with fingers upwards.[2]
Save it as handL0k.xcf (hand Left 0°
Black).
Open the Layers Dialog. Double click on the layer to open the Layer Attributes Dialog and rename it to handL0k.
Duplicate the layer. Let visible only the duplicated layer, select it and apply → → . Rename it to handL90k.
Ripetere le stesse operazioni per creare handL180k e handL90k (o handL270k).
Creazione immagini di dimensione 2 (y)
Questa dimensione nel nostro esempio possiede due ranghi, uno per la mano sinistra e l'altro per la destra. Il rango della mano sinistra esiste ancora. Dobbiamo costruire le immagini della mano destra riflettendole orizzontalmente.
Duplicate the handL0k layer. Let it visible only and select it. Rename it to handR0K. Apply → → .
Ripetere la stessa operazione sugli altri livelli della mano sinistra per creare i corrispondenti della mano destra.
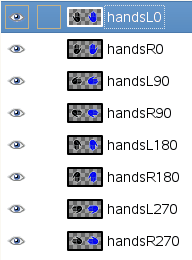
Re-order layers to have a clockwise rotation from top to bottom, alternating Left and Right: handL0k, handR0k, handL90k, handR90k, …, handR-90k.
Creazione immagini di dimensione 3 (z)
Creazione di immagini di dimensione 3 (z): La terza dimensione possiede due ranghi, uno per il colore nero e uno per il blu. Il primo rango, nero, esiste già. Vedremo che le immagini di dimensione 3 saranno una copia, in blu, delle immagini in dimensione 2. Così si otterranno le nostre 16 immagini. Ma una riga di 16 livelli non è semplice da gestire: si useranno livelli con due immagini.
Select the handL0k layer and let it visible only. Use → to change the canvas size to 60×30 pixels.
Duplicare il livello hand0k. Sulla compia, riempire la mano con il blu usando lo strumento di riempimento di colore.
Ora selezionare lo strumento di spostamento. Fare doppio clic su di esso per accedere alle proprietà dello strumento: impostare l'opzione «Sposta il livello corrente». Spostare la mano blu nella parte destra del livello aiutandosi con lo per ottenere un risultato preciso.
Make sure only handL0k and its blue copy are visible. Right click on the Layers dialog: Apply the command with the option Expand as Necessary. You get a 60×30 pixels layer with the black hand on the left and the blue hand on the right. Rename it to «handsL0».
Ripetere le stesse operazioni sugli altri livelli.
Imposta i livelli in ordine
Layers must be set in order so that GIMP can find the required image at some point of using the brush. Our layers are yet in order but we must understand more generally how to have them in order. There are two ways to imagine this setting in order. The first method is mathematical: GIMP divides the 16 layers first by 4; that gives 4 groups of 4 layers for the first dimension. Each group represents a direction of the brush. Then, it divides each group by 2; that gives 8 groups of 2 layers for the second dimension: each group represents a L/R alternation. Then another division by 2 for the third dimension to represent a color at random between black and blue.
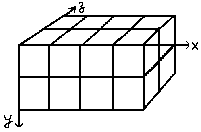
L'altro metodo è visuale, usando la rappresentazione ad array. La correlazione tra i due metodi è rappresentata nell'immagine seguente:
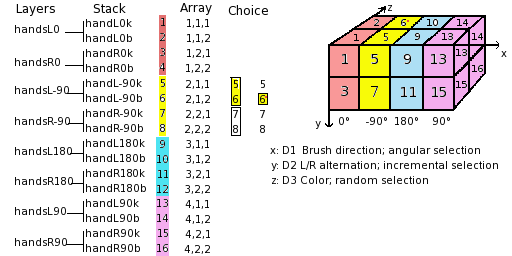
Come leggerà GIMP questo array?: GIMP comincia con la prima dimensione per la quale è stato programmato come «angolare», per esempio 90°. In questo rango 90°, in giallo, nella seconda dimensione, seleziona un'alternanza S/D, in modo «incrementale». Poi, nella terza dimensione, in modo casuale, sceglie un colore. Infine, i nostri livelli dovrebbero risultare nel seguente ordine:
Voilà. Your brush is ready. Save it as
.xcf first, then export as
.gih with the following
parameters:
Spaziatura: 100
Descrizione: Mani
Cell Size: 30×30
Numero di celle: 16
Dimensioni: 3
Dimensione 1: 4 ranghi Selezione: Angolare
Dimensione 2: 2 ranghi Selezione: Incrementale
Dimensione 3: 2 ranghi Selezione: Casuale
Place your .gih file into
the GIMP brush directory and refresh the brush
box (see steps above). You can now use your brush.
Figura 7.19. Ecco il risultato di un tratto di una selezione elittica con il pennello:
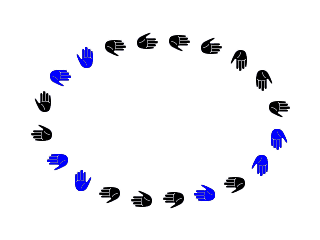
Questo pennello alterna con regolarità la mano destra e sinistra usando casualmente i colori blu e nero, a seconda delle 4 direzioni prese dal pennello.
[2] Ok, we are cheating here: our hand is borrowed from https://commons.wikimedia.org/wiki/File:Stop_hand.png.