I seguenti pannelli permettono di controllare e gestire le strutture dell'immagine, come i livelli, i canali o i tracciati.
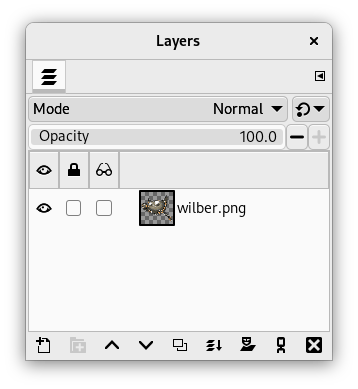
La finestra di dialogo «Livelli» è la principale interfaccia per modificare e gestire i livelli.
Questa finestra di dialogo è di tipo agganciabile; vedere la sezione sulle Finestre agganciabili per le istruzioni su come gestire questo tipo di finestre.
È accessibile:
-
dal menu principale: → → ;
-
dal menu Scheda in qualsiasi finestra di dialogo agganciabile facendo clic sul pulsante del menu scheda
 e selezionando → ,
 -
attraverso la combinazione di tasti (predefinita): Ctrl+L.
Nel menu , è presente un elenco di finestre staccate, che esiste solo se almeno una finestra di dialogo rimane aperta. In questo caso, è possibile aprire la finestra di dialogo «Livelli» dal menu principale: → .
- Panoramica
-
Ogni livello appare nella finestra di dialogo sotto forma di miniatura. Quando un'immagine ha più livelli come componenti, questi vengono visualizzati come un elenco. Il livello superiore nell'elenco è il primo visibile, mentre quello inferiore è l'ultimo visibile, ovvero lo sfondo. Sopra l'elenco si trovano le caratteristiche relative a ciascun livello. Sotto l'elenco si trovano i pulsanti di gestione per l'elenco dei livelli. Facendo clic con il pulsante destro del mouse sulla miniatura di un livello si apre il menu contestuale Livello.
- Seleziona più livelli
-
GIMP consente di selezionare più livelli ed eseguire azioni su di essi. Ad esempio, è possibile spostarli in una posizione diversa nella pila dei livelli, ridimensionarli, ecc. La selezione di più livelli avviene utilizzando il mouse e il tasto Maiusc, per aggiungere un intervallo di livelli, o il tasto Ctrl, per aggiungere o rimuovere il livello cliccato.
Si tenga presente che alcune azioni possono essere eseguite solo su un singolo livello. Se si prova a usare un'azione del genere, ad esempio usando il pennello, verrà visualizzato un messaggio di avviso che informa che non si può fare e che si deve selezionare un singolo livello.
- Intestazione elenco livelli
-
Direttamente sopra l'elenco dei livelli si trova la barra dell'intestazione. A sinistra ci sono tre icone che mostrano quale colonna viene utilizzata per la visibilità, il blocco e gli effetti livello. Al centro, un'etichetta di testo indica quanti livelli sono attualmente selezionati, se ne sono selezionati più di uno. A destra è presente un'icona di ricerca. Facendo clic su questa parte si apre una finestra di dialogo di ricerca in cui è possibile cercare i livelli.
-
 Ricerca livelli e ricerche salvate
-
La ricerca dei livelli può essere utile se il progetto contiene molti livelli. Non appena si inizia a digitare nella barra di ricerca, il sistema inizierà a trovare i livelli che corrispondono alla ricerca e a selezionarli. Verranno selezionati più livelli se tutti questi corrispondono alla ricerca.
Sotto la barra di ricerca si osserverà un'icona con un segno più. Facendo clic su di esso si potrà aggiungere la ricerca corrente come nuovo insieme con nome. Questa ricerca, e quelle definite in precedenza, appariranno sotto la barra di ricerca. Facendo clic su una di queste ricerche salvate, verranno selezionati tutti i livelli corrispondenti al testo della ricerca. Ogni ricerca salvata ha un'icona di chiusura nell'angolo destro, che può essere utilizzata per rimuovere la ricerca salvata.
-
- Attributi livello
-
Ogni livello viene mostrato nell'elenco con i suoi attributi:
-
 Visibilità livello
-
Facendo clic su questa icona si attiva o disattiva la visibilità del livello. (Se si fa clic tenendo premuto Maiusc sull'icona, tutti gli altri livelli dello stesso livello vengono visualizzati o nascosti alternativamente. Se si fa clic tenendo premuto Alt sull'icona, tutti gli altri livelli selezionati sullo stesso livello vengono visualizzati o nascosti alternativamente.)
-
 Blocca
-
Facendo clic sulla casella di controllo vuota nella colonna di blocco di un livello si apre un menu con le seguenti opzioni. (Maiusc-clic su un'icona fa sì che tutti gli altri livelli sullo stesso livello vengano alternativamente bloccati o sbloccati. Alt-clic su un'icona fa sì che tutti gli altri livelli selezionati sullo stesso livello vengano alternativamente bloccati o sbloccati.)
-
 Blocca i pixel
-
Quando questo pulsante è abilitato, non è possibile utilizzare alcuno strumento pennello (pennello, matita, gomma ecc.), l'aerografo o lo strumento inchiostro sul livello attualmente selezionato. Questo consente di proteggerli da modifiche indesiderate.
-
 Blocca posizione e dimensioni
-
Questo pulsante bistabile abilita e disabilita la protezione dei livelli dagli spostamenti e dalle trasformazioni. Quando il pulsante è premuto, non è possibile usare un qualsiasi strumento di trasformazione (Ruota, Inclina, Prospettiva e altri) o effettuare uno spostamento.
-
 Blocca visibilità
-
Questo pulsante controlla l'impostazione «Blocca» per la visibilità del livello. Se questa opzione è abilitata, la visibilità del livello non può essere modificata finché non si disabilita il blocco.
-
 Blocca il canale alfa
-
Questo pulsante controlla l'impostazione «Blocca» per la trasparenza del livello. Se questa opzione è abilitata, il canale alfa del livello viene bloccato e nessuna operazione avrà alcun effetto su di esso. In particolare, nessuna azione su una parte trasparente del livello avrà alcun effetto.
Figura 15.2. Esempio di blocco del canale alfa

Il livello attivo ha tre strisce orizzontali, opache e verdi su uno sfondo trasparente. Disegnamo una striscia rossa verticale. «Blocco» non impostato: le aree opache e trasparenti del livello attivo vengono disegnate di rosso.

«Bloccato» spuntato: solo le aree opache del livello attivo vengono dipinte di rosso. Le aree trasparenti vengono preservate.
![[Suggerimento]](images/tip.png)
Suggerimento Se un nome di livello nel pannello dei livelli è in grassetto, allora questo livello non possiede un canale alfa.
-
-
 Effetti livello
-
Quando questa icona è visibile, sono presenti effetti livello per questo livello. Cliccandoci sopra si aprirà una finestra di dialogo in cui si potrà osservare un elenco di tutti gli effetti aggiunti a questo livello. Per ogni effetto si può cambiare la visibilità, l'ordine degli effetti, unire tutti gli effetti al livello o rimuoverli.
Gli effetti livello sono filtri che modificano il livello in modo non distruttivo, ovvero possono essere aggiunti, rimossi o modificati senza modificare il livello stesso. Aggiungono invece effetti sopra il livello.
Vedere Uso degli effetti di livello per ulteriori dettagli.
Molti dei filtri GEGL nel menu Colori e Filtri possono essere utilizzati in questo modo. La finestra di dialogo degli effetti livello è composta dalle seguenti parti:
- Elenco effetti livello
-
In alto c'è un elenco di tutti gli effetti livello che sono stati aggiunti a questo livello. Nota che gli effetti vengono applicati sopra il livello a partire dall'effetto in fondo all'elenco.
A sinistra di ogni effetto è presente un'icona a forma di occhio, su cui è possibile fare clic per nascondere o mostrare l'effetto specifico. Accanto si trova l'icona dell'effetto Filtro.
- Pulsanti
-
La barra dei pulsanti in basso offre le seguenti funzionalità:
-
Visibilità effetti livello
-
Questo pulsante controlla l'impostazione di «visibilità» per tutti gli effetti livello. Per impostazione predefinita, tutti gli effetti sono visibili. Facendo clic su questo pulsante, gli effetti vengono nascosti, consentendo di visualizzare il contenuto effettivo in pixel del livello.
-
 Modifica il filtro selezionato
-
Questo pulsante consente di aprire la finestra di dialogo dell'effetto livello selezionato per modificarne le impostazioni. In alternativa, è possibile fare doppio clic sull'effetto livello nell'elenco per aprire la finestra di dialogo.
-
 Alza effetto livello
-
Qui si può spostare l'effetto livello più in alto nell'elenco.
-
 Abbassa effetto livello
-
Qui si può spostare l'effetto livello più in basso nell'elenco.
-
 Fondi tutti i filtri attivi
-
Questo pulsante consente di unire tutti gli effetti livello attivi (visibili) con il contenuto del livello. In questo modo, gli effetti livello vengono rimossi dal livello dopo che sono stati applicati.
-
 Rimuovi il filtro selezionato
-
Questo pulsante rimuove l'effetto livello selezionato.
-
- Miniatura del livello
-
Il contenuto del livello è rappresentato da una miniatura. Tenendo premuto il tasto sinistro del mouse per un secondo su questa miniatura, la si ingrandisce. Il colore del bordo del livello varia a seconda che il livello sia attivo o meno.
- Nome livello
-
È possibile modificare il nome del livello facendo doppio clic su di esso. È anche possibile utilizzare la finestra di dialogo Modifica attributi livello nel menu contestuale che si apre facendo clic con il pulsante destro del mouse sul livello.
![[Nota]](images/note.png)
Nota Quando si lavora su un'animazione, il nome del livello può essere utilizzato per specificare determinati parametri. Per maggiori dettagli, vedere la sezione sull'esportazione di animazioni.
-
- Proprietà dei livelli
-
Sopra l'elenco dei livelli, è possibile specificare alcune proprietà per i livelli selezionati. I livelli selezionati sono evidenziati. Le proprietà sono:
- Modalità
-
La modalità determina come il livello interagisce con gli altri livelli. Dal menu a discesa si può accedere a tutte le modalità messe a disposizione da GIMP. Le modalità dei livelli sono descritte in dettaglio in Sezione 2, «Modalità del livello».
- Opacità
-
Spostando la barra di scorrimento si conferisce una maggiore o minore opacità al livello. Con un valore di opacità pari a 0 il livello è trasparente e completamente invisibile. Non va confusa con la maschera di livello che imposta la trasparenza pixel per pixel.
- Gestione dei livelli
-
Al di sotto della lista un insieme di pulsanti permette di eseguire alcune operazioni basilari sui livelli.
-
 Crea un nuovo livello
-
Qui è possibile creare un nuovo livello. Si apre una finestra di dialogo, la cui descrizione si trova in Nuovo livello.
Premere il tasto Maiusc per aprire un nuovo livello preimpostato con valori usati più recentemente.
-
 Crea nuovo gruppo livelli
-
Da qui si può creare un nuovo gruppo di livelli. Viene creato un nuovo livello, dove è possibile depositare i livelli.
I gruppi di livelli sono descritti in Gruppi di livelli.
-
Alza il livello
-
Da qui è possibile spostare in su il livello all'interno della lista. Tenendo premuto il tasto Maiusc il livello verrà spostato in cima alla lista.
-
Abbassa il livello
-
Da qui è possibile spostare in giù il livello all'interno della lista. Tenendo premuto il tasto Maiusc il livello verrà spostato in fondo alla lista.
Suggerimento Prima di poter spostare un livello in fondo alla lista, potrebbe essere necessario aggiungere al livello di sfondo il canale della trasparenza (chiamato anche canale alfa). Per fare ciò si deve fare clic con il tasto destro sul livello di sfondo e scegliere aggiungi canale alfa dal menu.
-
 Duplica livelli
-
Da qui si può creare una copia dei livelli selezionati. Al nome del nuovo livello viene aggiunto un "copia".
-
Fondi livelli
 Ancora livello
-
Il pulsante è visibile solo quando è presente una selezione fluttuante. Esso àncora la selezione mobile al livello attivo precedente.
Quando non c'è una selezione fluttuante, viene visualizzata l'icona
, con diverse possibilità: -
Fondi questi livelli con il primo livello visibile sotto di essi.
-
Premendo Maiusc: fonde i livelli del gruppo di livelli in un livello normale.
-
Premendo Ctrl: fonde tutti i livelli visibili in un livello normale.
-
Premendo Maiusc+Ctrl: fonde tutti i livelli visibili con gli ultimi valori usati.
-
-
 Aggiungi maschere ai livelli
-
Aggiungi maschere ai livelli selezionati.
-
Cancella livelli
-
Qui si può cancellare i livelli selezionati.
-
- Altre funzioni dei livelli
-
Altre funzioni riguardanti la dimensione del livello sono disponibili nel menu contestuale dei livelli che si ottiene facendo clic con il tasto destro nella finestra dei livelli. Si trovano anche nel sottomenu all'interno del menu della finestra principale.
Le funzioni di fusione dei livelli si trovano nel menu principale dell'immagine.
- Clic e trascinamento dei livelli
-
Fare clic e tenere premuto sulla miniatura del livello o sul nome del livello: la miniatura si ingrandisce e si può spostarla trascinandola con il mouse. È anche possibile selezionare e spostare più livelli.
-
Quindi si può posizionare questo livello o questi livelli da qualche altra parte nell'elenco dei livelli.
-
È possibile anche rilasciare il livello sulla barra degli strumenti: in questo modo viene creata una nuova immagine che contiene solo questo livello. Questa funzione non funziona se sono selezionati più livelli.
-
Infine, si può trascinare il livello in un'altra immagine: questo livello verrà aggiunto all'elenco dei livelli, sopra i livelli esistenti.
-
Facendo clic con il pulsante destro del mouse nella finestra di dialogo Livelli o aprendo il dal menu a schede, si aprirà un menu contestuale per la finestra di dialogo Livelli.
La maggior parte dei comandi in questo menu sono già stati documentati sopra o altrove:
- Modifica attributi di livello...
-
Ad eccezione di Larghezza, Altezza e Riempi con, questa finestra di dialogo è uguale alla Finestra di dialogo nuovo livello. Per informazioni sugli attributi del livello fare quindi riferimento alla documentazione di quella finestra di dialogo.
- Sottomenu tipo di fusione
-
Vedere Spazio fuso nella finestra di dialogo Nuovo livello.
- Sottomenu spazio composito
-
Vedere Spazio composito nella finestra di dialogo Nuovo livello.
- Sottomenu modalità composita
-
Vedere Modalità composita nella finestra di dialogo Nuovo livello.
- Sottomenu etichette colore
-
Vedere la documentazione sulla Etichetta colore nella finestra di dialogo Nuovo livello.
- Nuovo livello..., Nuovo gruppo livelli, Duplica livelli, Fondi in giu, Ancora livello, Cancella livelli
-
Questi comandi sono spiegati sopra, vedere le caratteristiche del livello.
- Nuovo dal visibile
-
Vedere la documentazione del comando da menu Nuovo dal visibile.
- Dimensione margini del livello...
-
Vedere la documentazione del comando da menu Dimensione margini del livello....
- Livelli a dimensione immagine
-
Vedere la documentazione del comando da menuLivello a dimensione immagine.
- Scala livello...
-
Vedere la documentazione del comando da menu Scala livello....
- Aggiungi maschere di livello..., Aggiungi maschere di livello, Cancella maschere di livello, Mostra maschere di livello, Modifica maschera di livello, Disabilita maschere di livello, Maschere a selezione
-
Vedere la documentazione per i comandi del Sottomenu maschera di livello.
- Aggiungi canale alfa, Rimuovi canale alfa
-
Solo uno di questi sarà abilitato. Se il livello corrente non ha un canale alfa, potrai aggiungerne uno. In tal caso, puoi rimuovere il canale alfa.
- Alfa a selezione
-
Vedere la documentazione del comando da menu Alfa a selezione.
- Fondi livelli visibili
-
Questo comando fonde tutti i livelli visibili in un livello.
- Appiattisci immagine
-
Questo comando unisce tutti i livelli in un unico livello e rimuove la trasparenza.
- Panoramica
-
A ogni livello è possibile aggiungere una maschera di trasparenza, che definisce quali parti del livello sono trasparenti o opache. Questa funzione è chiamata maschera di livello. Una maschera di livello ha le stesse dimensioni e lo stesso numero di pixel del livello a cui è associata. Ogni pixel della maschera può quindi essere accoppiato a un pixel nella stessa posizione nel livello. La maschera è un insieme di pixel in scala di grigi. I pixel con valore 0 sono neri e conferiscono piena trasparenza al pixel accoppiato nel livello. I pixel con valore massimo (1,0 o 255) sono bianchi e conferiscono piena opacità al pixel accoppiato nel livello.
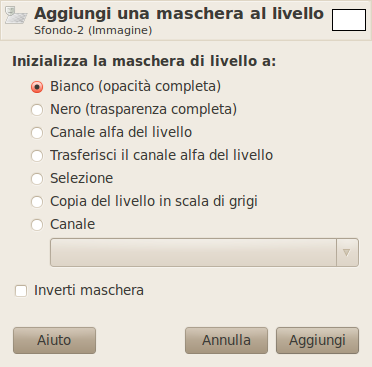
Per creare una maschera di livello, fare clic con il pulsante destro del mouse sul livello per richiamare il menu contestuale e selezionare . Apparirà una finestra di dialogo tramite la quale si potrà inizializzare il contenuto della maschera:
-
Bianco (opacità completa): la maschera è bianca nella finestra di dialogo Livelli. Perciò, tutti i pixel del livello saranno visibili nella finestra immagine, poiché dipingendo la maschera di bianco, i pixel del livello diventano completamente visibili. Dipingendo di nero, i pixel del livello saranno trasparenti.
-
Nero (trasparenza completa): la maschera è nera nella finestra di dialogo Livelli. Quindi, il livello è completamente trasparente, poiché dipingendo la maschera di nero i pixel del livello diventano trasparenti. Dipingendo di bianco la maschera verrà rimossa e i pixel del livello saranno visibili.
-
Canale alfa del livello: la maschera viene inizializzata secondo il contenuto del canale alfa.
-
Trasferimento canale alfa del livello: esegue la stessa operazione della voce precedente eccetto il fatto che inizializza anche il canale alfa del livello a totale opacità.
-
Selezione: la maschera viene inizializzata secondo il valore dei pixel trovati nella selezione corrente.
-
Copia del livello in scala di grigi: la maschera viene inizializzata in base a una rappresentazione in scala di grigi dei valori dei pixel del livello.
-
Canale: la maschera del livello viene inizializzata con una maschera di selezione che si è creata in precedenza, e memorizzata nel pannello dei canali.
-
Inverti maschera: questa casella di spunta permette di invertire; il nero diventa bianco e il bianco diventa nero.
Una volta creata, la maschera appare come miniatura accanto a quella del livello stesso. È possibile selezionare il livello o la maschera per la modifica facendo clic sulle rispettive miniature. L'elemento attivo ha un bordo bianco (che potrebbe non essere chiaramente visibile quando si utilizza una maschera bianca).
Quando si lavora con le maschere, è consigliabile tenere ben visibile la finestra di dialogo Livelli, perché guardando la superficie disegnabile non è possibile vedere se è attivo il livello o la maschera.
Premere Alt (o Ctrl+Alt e fare clic sulla miniatura della maschera di livello equivale al comando Mostra maschera di livello: il bordo della maschera di livello diventa verde. Se si preme Ctrl il bordo diventa rosso e il risultato è equivalente al comando Disattiva maschera di livello. Per tornare alla visualizzazione normale, ripetere l'ultima operazione. Queste opzioni sono per una maggiore praticità d'uso.
-
- Esempio di maschera di livello
-
Figura 15.4. Un livello con una maschera di livello

Immagine originale.

Questa immagine ha un livello di sfondo con un fiore e un altro livello blu, completamente opaco. Una maschera di livello bianca è stata aggiunta al livello blu. Il livello blu rimane visibile perché una maschera bianca rende visibili i pixel del livello.
Figura 15.5. Disegnare la maschera di livello

Colore di primo piano impostato su nero; Immagine risultante.

La maschera di livello è attiva. Disegnando di nero il livello diventa trasparente: il livello sottostante diventa visibile.


