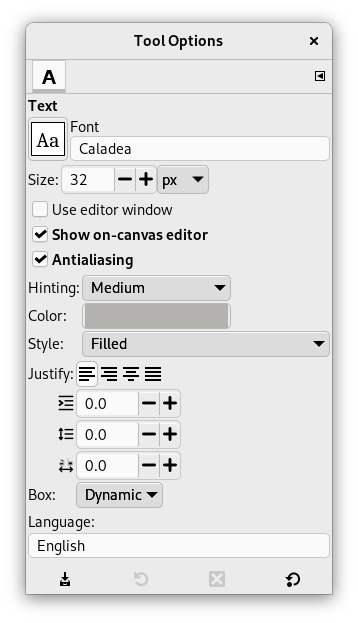
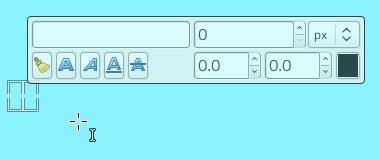
The Text tool adds text to your image in a new layer. Text can be edited directly on canvas. A text tool editor, which shows up on top of the canvas above the text box, allows you to quickly change some of the text characteristics (for selected text or newly typed text only).
As soon as you type your text, the text box appears on the canvas in a rectangular frame. If you draw the rectangular frame first, the text is automatically adapted to the frame size. You can enlarge this frame as you do with rectangular selections.
Right clicking on the text opens a context menu that allows you to copy, cut, paste, open a text file, change text orientation, and other text related commands.
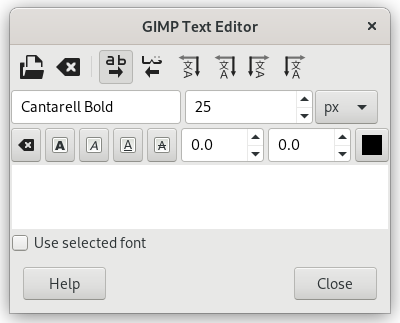
You can also use a separate Text Editor window by checking the Use editor window option in the Tool Options dialog. You can also use the Text Options dialog to change the font, color and size of your text, and justify it, interactively.
In this chapter, tool options will be described. To know how to use the Text tool, please refer to text management.
There are different possibilities to activate the tool:
-
From the main menu: → .
-
By clicking the tool icon
in the Toolbox.
-
By pressing the T keyboard shortcut.
Normally, tool options are displayed in a window attached under the Toolbox as soon as you activate a tool. If they are not, you can access them from the main menu through → → which opens the option window of the selected tool.
- フォント
-
Click on the fonts button to open the font selector of this tool, which offers you a list of installed X fonts.
フォント選択ウィンドウの底部のアイコンボタンでつぎの操作ができます。
-
フォント見本の大きさ変更
-
リストで表示 か グリッドで表示 かを選択
-
フォントダイアログ を開く
インストールされているフォントからいずれかを選択します。 テキストレイヤーを活性化してからフォントを変更すると直ちに画像にもそのフォントが適用されます。
![[ヒント]](images/tip.png)
ヒント ポインティングデバイス (マウスなど) についているスクロールホイールをフォントボタン上で回すとテキストに使われているフォントを素早く変更できます。 この操作ではクリックする必要はなく、 マウスホイールだけを使用します。
-
- サイズ
-
ここでフォントの大きさを調節できます。 単位も数種類から利用できます。
- Use editor window
-
画像に直接書き込み編集するのではなく画像ウィンドウの外にエディターウィンドウを開いてそこでテキストを編集します。
- Show on-canvas editor
-
Show a text tool editor on top of the canvas above the text box, which allows you to quickly change some of the text characteristics (for selected text or newly typed text only).
- なめらかに
-
When enabled, this will render the text with much smoother edges and curves. This is achieved by slight blurring and merging of the edges. This option can radically improve the visual appearance of the rendered typeface. Caution should be exercised when using anti-aliasing on images that are not in RGB color space.
- ヒンティング
-
小さな文字がつぶれたり歪んだりするのを防ぐ補正情報を利用します。
- 色
-
これから書く文字の色をあらかじめ指定します。 既定の色は黒です。 この色ボタンをクリックすると現れる「文字色」ダイアログで色を指定できます。
![[ヒント]](images/tip.png)
ヒント ツールボックスの色標識をクリックしてテキストレイヤー上までドラッグしてきて直接放っても文字色を変更できます。 [グラデーションやパターンを使って着色するときはレイヤーダイアログで 透明保護 を有効にしてから行なってください。 ただしこのときからテキストレイヤーとしての属性が一時的に失われます。 この文字列はテキストツールでクリックすれば再び編集できますが、 そのときは文字色が描画色一色に戻されます。]
- Style
-
This allows you to select how to style the text. The following choices are available.
- Filled
-
The inside of each character is filled with a solid color defined by the Color option. This is the default.
- Outlined
-
The edges of each character are painted based on the settings below, and the inside is left transparent.
- Outlined and filled
-
A combination of the above two settings. The inside of each character is painted using the fill color.
Outline Options
Settings for Outlined and Outlined and filled.
- Solid color
-
If this is selected, the outline is painted in the solid color chosen here. To choose a color click the color button.
- Pattern
-
If this is selected, the outline is filled with the pattern chosen here. To choose a pattern click the button showing the current pattern, or start typing a name in the text field next to it; it will show patterns starting with the letters you entered.
Patterns work best with larger size outlines. This can be set by changing Line width.
- なめらかに
-
Curves and lines at an angle may look jagged. When enabled, this setting makes this smoother.
- Line width
-
This sets the width of the text outline. By default, this is measured in pixels, but you can select a different measurement unit from the drop-down list.
- Cap style, Join style, Miter limit, Dash pattern, Dash preset
-
See Path stroking styles.
- 揃え位置
-
「左揃え」、 「右揃え」、 「中央揃え」、 「両端揃え」の 4 つのボタンから文字列の揃え方を選びます。
- インデント
-
一行目の字下げの幅を指定します。 単位はピクセルです。
- Adjust line spacing
-
複数行の文章の行間の幅を調節します。 単位はピクセルです。 変更は即座に画像のテキストレイヤーに反映します。 行送り間隔ではないので既定値は 0.0 です。 さらに近づけるには負の値を用います。
- Adjust letter spacing
-
文字と文字の間の幅を調節します。 これも文字幅ではないので既定値は 0.0 です。 文字を重ねるようにするには負の値が必要でしょう。
- テキストボックス
-
Concerns the text box. The associated drop-down list offers two options:
: これがデフォルトです。 テキストボックスの大きさは記入した文字の数に応じて拡大します。 場合によっては画像からはみ出るかもしれません。 行を増やすには Enter キーを押します。 インデントオプションは全部の行を字下げします。 テキストボックスの大きさを増すとこのオプションは「固定」に切り替わります。
: まず先にテキストボックスを拡げてやらねばなりません。 そのかわりいつものショートカットが健在です。 テキストはテキストボックスの横幅に遮られ次の行へ折り返します。 これは本来の新しい行ではありません。 改行するには Enter キーを押す必要があります。 文が画像の下辺を越えるかもしれません。 インデントオプションは最初の行だけを字下げします。
- Language
-
The text language may have an effect on the way the text is rendered. If you enter a letter in this field, you get a list of all available languages whose names begin with this letter. Select the language in which you are entering your text.
Right clicking on this field opens the context menu which allows you to paste language names from the clipboard.
This text editor is only available if the Use editor window option is checked in Tool Options.
語句や文章を書き込み始めるとすぐにレイヤーダイアログにテキストレイヤーが現れます。 こんなふうにレイヤーがある画像 (今実践されているのならその画像、 あるいは .xcf 画像) ならば、 テキストレイヤーを活性化してテキスト上でクリック (もしくはダブルクリック) すればテキスト編集を再開できます。 もちろん他の一般のレイヤーと同じように様々な機能を使ってテキストレイヤーを操作できます。
他に新たなテキストを画像に貼り付けたいときはテキストレイヤーのない領域をクリックしてください。 新たなテキストエディターが現れるとともに新しいテキストレイヤーが画像に加わります。 どれかのテキストを扱っていたあとで他のテキストの編集を行ないたい場合は、 そのテキストレイヤーを活性化したうえでテキストの枠内をクリックしてテキストエディターを開きます。
テキストエディターのオプション
All these options are also in the text context menu.
Vertical text (top-to-bottom writing) is supported and particularly useful for East-Asian writing systems, but also for anyone wishing to design fancy vertical text.
- Load text from file
-
テキストはテキストファイルの内容を利用できます。 テキストエディターにあるこのボタンをクリックして「テキストファイル (UTF-8) を開く」ダイアログからファイルを選んでください。 ファイル内のすべてのテキストが読み込まれます。
-
 文面を消去
文面を消去
-
Clear all the text.
- 左から右への書式 LTR
-
このオプションではテキストは左からはじまって右方向に書き連ねられます。 ほとんどの西洋諸語や東洋の一部の言語に適用されます。
- 右から左への書式 RTL
-
このオプションは右からはじまって左方向に書き連ねられるテキストのためのもので、 (アイコンにも示されているように) アラビア語のような東洋の一部の言語に適用されます。
![[注記]](images/note.png)
注記 現在のところテキストツールは縦書きには対応していません。 代わりにプラグインやスクリプトで実現可能です。 配布されているサイトをお探しください。
- Vertical, right to left (mixed orientation)
-
Text is written top-to-bottom in columns, from right to left, and is rotated 90° clockwise.
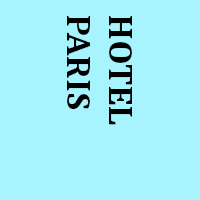
- Vertical, right to left (upright orientation)
-
Text is written top-to-bottom in columns, from right to left, upright.
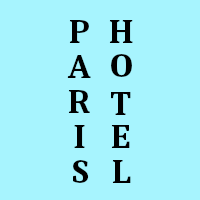
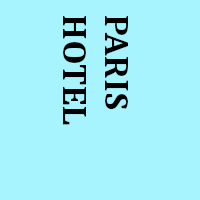
- Vertical, left to right (mixed orientation)
-
Text is written top-to-bottom in columns, from left to right, and is rotated 90° clockwise.
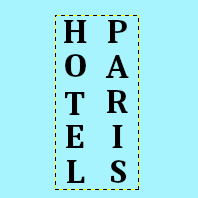
- Vertical, left to right (upright orientation)
-
Text is written top-to-bottom in columns, from left to right, upright.
- アクティブなフォントで表示
-
既定ではオプションダイアログで指定している書体をこのエディター上では使用しません。 使用するにはこのオプションにチェックを入れます。
![[注記]](images/note.png)
注記 See also 「テキスト」
