| 9장. 텍스트 관리 | ||
|---|---|---|

|
부 II. GIMP 마법사가 되려면? |  |
| 9장. 텍스트 관리 | ||
|---|---|---|
|
|
부 II. GIMP 마법사가 되려면? | |
차례
Text is managed with the Text tool. This tool creates a new layer containing the text, above the current layer in the Layers dialog, with the size of the text box. Its name is the beginning of the text.
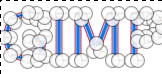
그림 9.1. 텍스트 예제
텍스트 레이어의 경계가 표시된 텍스트 예제(글꼴: Utopia Bold)
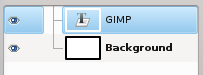
The Layers dialog, with the text layer above the layer which was current.
Text can be edited directly on canvas. A text tool box, which shows up on top of the canvas above the text box, allows you to quickly change some of the text characteristics.
![[참고]](images/note.png)
|
참고 |
|---|---|
|
The settings you change in this on canvas dialog only apply to the parts of the text that are selected, or any new text you type after the current cursor position. |
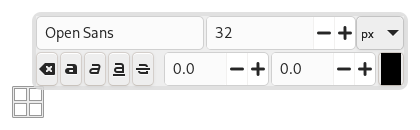
As soon as you click on the canvas with the Text tool, you get a closed text box and a semi-transparent tool box just above.
Text tool options are described in 5.3절. “Text”.
You can start typing text at once. The text box will enlarge gradually. Press Enter to add a new line.
You can also enlarge the text box by click-and-dragging, as you do with selections. The box size appears then in the status bar at the bottom of the image:

To edit text, you must, first, select the part you want to edit by click-and-drag, or Shift+arrow keys and then use the options of the 1.3절. “Text Toolbox”.
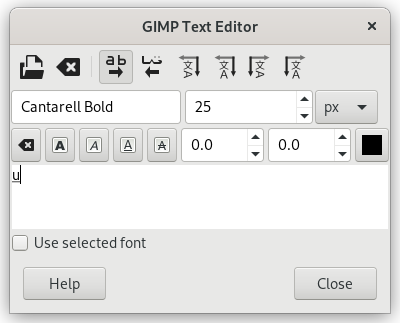
Instead of using the on-canvas text editing, you can use the text editor dialog described in 5.3.3절. “Text Editor”.
You can move the text on the image using the Move tool: you must click on a character, not on the background.
You can get Unicode characters with Ctrl+Shift+U plus hexadecimal Unicode code of the desired char, for example:
Of course this feature is more useful for entering special (even exotic) characters, provided that the required glyphs for these characters are supplied by the selected font — only few fonts support Klingon. ;-)
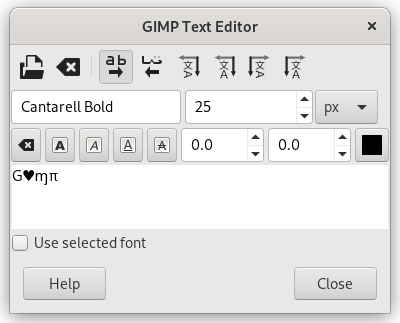
Unicode 0x47 (“G”), 0x2665, 0x0271, 0x03C0
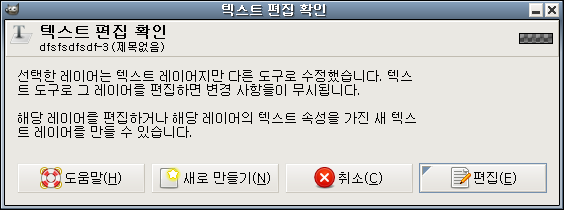
You can edit the text later, if the text layer still exists and has not been modified by another tool (see below): make the text layer active in theLayer dialog, select the Text tool and click on the text in the image window.
You can operate on a text layer in the same ways as any other layer, but doing so often means giving up the ability to edit the text without losing the results of your work.
텍스트 처리의 특징에 대해 이해하려면, 텍스트 레이어에는 눈에 보이는 픽셀외의 다른 정보가 포함되어 있음을 알아야합니다. 그리고 텍스트 편집기에서의 텍스트 표현에 관한 정보도 포함하고 있는데, 이것은 텍스트 도구를 사용할 때 호출되는 텍스트 편집기에서 볼 수 있습니다. 텍스트 편집기에서 텍스트를 고치는 즉시, 이미지 레이어는 그 변한 값이 레이어에 적용시킵니다.
이제 텍스트 레이어를 하나 만든 후, 회전시키기와 같은 텍스트 도구를 이용한 작업 이외의 다른 작업을 합니다. 그런 후에 다시 텍스트 도구로 텍스트를 수정하면 그 전에 작업한 결과들은 무시되고, 새롭게 고쳐진 텍스트가 텍스트 레이어에 표현됩니다.
Because this danger is not obvious, the Text tool tries to protect you from it. If you operate on a text layer, and then later try to edit the text, a message pops up, warning you that your alterations will be undone, and giving you three options:
edit the text anyway;
cancel;
create a new text layer with the same text as the existing layer, leaving the existing layer unchanged.
You get this box, which overlays canvas, as soon as you click on canvas with the Text Tool. It allows you to edit text directly on canvas.
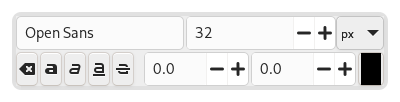
Apart from the usual text formatting features like font family, style and size selectors you get numeric control over baseline offset and kerning, as well as the ability to change text color for a selection.
Change font of selected text: as soon as you start editing the default font name, a drop-down list appears, allowing you to select a font.
Change size of selected text: self-explanatory.
Bold, Italic, Underline, Strikethrough : self-explanatory.
Change baseline of selected text: "In European typography and penmanship, baseline is the line upon which most letters "sit" and below which descenders extend" (Wikipedia). In HTML, there are several kinds of baselines (alphabetic, ideographic, bottom…). Here, consider that baseline is "bottom" and determines the place for descenders. The default baseline "0" gives place for descenders. You can use it to increase space between two lines only, while “Adjust line spacing” in tool options increases space between all lines.
Change kerning of selected text: "In typography, kerning… is the process of adjusting the spacing between characters in a proportional font." (Wikipedia). You will probably use this setting to adjust letter spacing of a selected part of text.
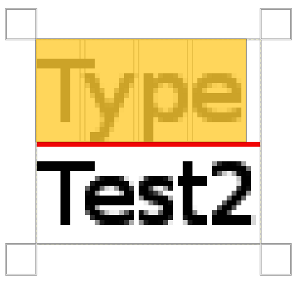
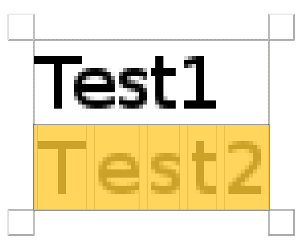
Let us look at a selected text (zoomx800 to see pixels):
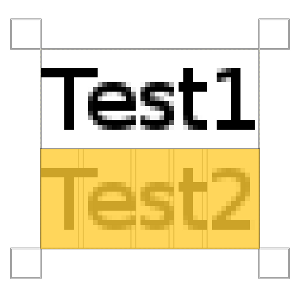
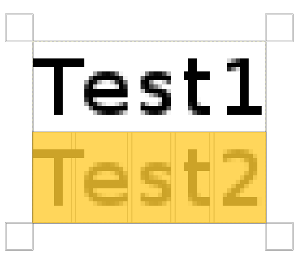
We can see that the Sans font is a proportional font: letters widths are different, and “T” glyph comes over the “e”. Letters widths are marked with thin vertical lines and left borders of letter width cover preceding letters by one pixel. Now we set “Change kerning of selected text” to 2 pixels:
Blank spaces, 2 pixels wide, are added between all selected characters and letter widths are preserved. If no text is selected, a blank space is added at the place of the mouse pointer between two characters.
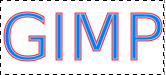
Here is a comparison with the Adjust letter spacing option of the Text tool:
The option applies to the whole text, not only to the selected text. Blank spaces are added inside letters widths and letter widths are not respected.
You can also use Alt+arrow keys to change baseline offset and kerning.
Change color of selected text: this command opens a color dialog where you choose a color for the selected text.
Clear style of selected text: using this command, you can get rid of all new settings you applied to the selected text.
The context menu can be brought up by right-clicking on text. It is somewhat different from that of the Text Editor dialog.
The context menu offers the following options:
Cut, Copy, Paste, Delete: these commands work with selected text. Except for Paste, they are disabled as long as no text is selected. Paste is enabled when the clipboard contains text.
Open text file…: this command opens a file dialog where you can select a text file. The contents of this file will be opened in the current text layer.
Clear: this command deletes all the text, selected or not.
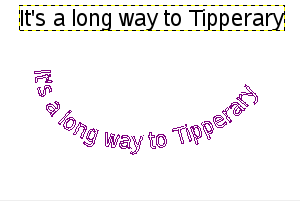
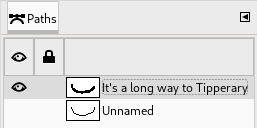
Text to Path: this command creates a path from the outlines of the current text. The result is not evident. You have to open the Paths dialog and make path visible. Then select the Path tool and click on the text. Every letter is now surrounded with a path component. So you can modify the shape of letters by moving path control points.
This command is similar to → .
This option is enabled only if a path exists. When your text is created, then create or import a path and make it active. If you create your path before the text, the path becomes invisible and you have to make it visible in the Paths dialog.
The Text along path command is also available from the menu in the main menu.
The commands , , and only appear in the menu if a text layer is selected.
Select the option. The text is wrapped along the path. Letters are represented with their outline. Each of them is a component of the new path that appears in the Paths dialog.
By converting a text item to a selection or a path, you can fill it, stroke the outlines, transform it, or generally apply the whole panoply of GIMP tools to get interesting effects.
From left to right, From right to left, Vertical, right to left (mixed orientation), Vertical, right to left (upright orientation), Vertical, left to right (mixed orientation), Vertical, left to right (upright orientation): These commands let you adjust the writing direction of the text.