| 3.4. 채우기 도구 | ||
|---|---|---|

|
3. Paint Tools |  |
| 3.4. 채우기 도구 | ||
|---|---|---|
|
|
3. Paint Tools | |
This tool fills a selection with the current foreground color. If you Ctrl+click and use the Bucket tool, it will use the background color instead. Depending on how the tool options are set, the Bucket Fill tool will either fill the entire selection, or only parts whose colors are similar to the point you click on. The tool options also affect the way transparency is handled.
The amount of fill depends on what Fill Threshold you have specified. The fill threshold determines how far the fill will spread (similar to the way in which the Fuzzy Select tool works). The fill starts at the point where you click and spreads outward until the color or alpha value becomes “too different”.
텍스트 레이어 같은 투명한 레이어에서 기존 색과 다른 색으로 개체를 채우면 개체 주변으로 이전 색의 경계가 나타나는 것을 볼 수 있습니다. 이는 채우기 도구의 채우기 임계값이 낮아서 발생하는 현상입니다. 채우기 임계값이 낮으면 채우기 도구는 반투명한 픽셀을 채우지 않습니다. 이에 따라 반투명한 픽셀은 기존 색을 유지하게 되는 것입니다.
만약 완전히 투명한 영역을 채우려고 한다면, 레이어 대화 상자의 “잠그기”가 체크해제되어 있는지 확인하십시오. 이 옵션이 체크되어 있으면 투명하지 않은 부분만 채워집니다.
다음과 같은 방법들을 이용해 혼합 도구를 사용할 수 있습니다.:
From the main menu: → → .
By clicking the tool icon
![]() in the Toolbox.
in the Toolbox.
By pressing the Shift+B keyboard shortcut.
Ctrl, similarly to paint tools, allows you to pick surrounding colors on canvas without having to switch to Color Picker tool.
Shift 키는 비슷한 색상 채우기와 전체 선택 채우기를 전환합니다.
Alt toggles Fill type between FG and BG colors.
Normally, tool options are displayed in a window attached under the Toolbox as soon as you activate a tool. If they are not, you can access them from the main menu through → → which opens the option window of the selected tool.
모든 도구에 공통적인 옵션은 그리기 도구에 설명되어 있습니다. 여기서는 채우기 도구에만 해당되는 특수한 옵션에 대해서만 설명할 것입니다.
김프GIMP 에는 세 가지의 채우기 형식이 있습니다.
채우기 색상을 현재 전경색으로 설정합니다.
채우기 색상을 현재 배경색으로 설정합니다.
sets the fill color to the currently selected pattern. You can select the pattern to use in a drop-down list.
이 무늬 목록에 있는 무늬들을 이용해 채우기를 할 수 있습니다. 목록 아래쪽에 있는 네 개의 버튼을 누르면 목록의 보기 형식이 바꿀 수 있습니다.
Fill whole selection makes GIMP fill a pre-existent selection or the whole layer. A quicker approach to do the same thing could be to click and drag the foreground, background or pattern color, leaving it onto the selection. Also, pressing Ctrl key allows you to pick a color on the image as foreground color.
Fill similar colors: this is the default setting: the tool fills the area with a color near the pixel onto you have clicked. The color similarity is defined by options in Finding Similar Colors. Click and drag to fill.
Fill by line art detection: This allows you to fill areas surrounded by “line arts”, trying to leave no unfilled pixels near the lines, and closing potential zones.
Line art detection is also known as Smart Colorization. The author describes clearly problems he met in https://girinstud.io/news/2019/02/smart-colorization-in-gimp/. Options are described below.
These options appear when the Fill similar colors option is checked:
투명 영역 채우기 옵션은 불투명도가 낮은 영역을 채웁니다.
표본 합치기 옵션은 모든 레이어에서 표본을 추출하여 병합합니다. 따라서 표본 합치기 옵션이 활성화되면, 색상 정보에 대한 임계값을 다른 레이어에도 적용을 시킵니다. 쉽게 말해 보이는 모든 레이어에 대해 임계값을 적용하는 것입니다.
To understand what diagonal neighbors are, please refer to Diagonal-neighbors in Fuzzy Select tool.
Please refer to Antialiasing in Glossary.
The Threshold slider sets the level at which color weights are measured for fill boundaries. A higher setting will fill more of a multi colored image and conversely, a lower setting will fill less area.
With the Fill by option you can choose which component of the image GIMP shall use to calculate the similarity and to determine the borders of filling.
The components you can choose from are , , , , , , , , , , , .
이 옵션은 이해하기 어려운 부분입니다. 예를 들어 빨강 채널을 선택하고 픽셀을 클릭하면, 빨강 채널 에서 임계값에 따른 비슷한 색상을 찾습니다.
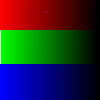
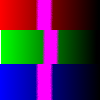
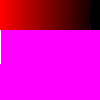
원본 이미지: 빨강(255;0;0), 초록(0;255;0), 파랑(0;0;255), 세 가지 원색의 색상으로 된 그라디언트. 임계값을 15로 주고 채우기 도구로 밝은 자주색을 채워 보겠습니다.
이미지 1: 채우기 = 합성. 각각의 줄을 클릭하면 임계값에 따라 각 줄의 일부가 채워집니다.
이미지 2: 채우기 = 빨강. 빨간색 줄을 클릭하면, 채우기 도구는 빨강 채널에서 임계값을 기준으로 비슷한 색상을 가진 연속적인 영역을 찾습니다. 단지 조그만 부분만이 이러한 기준에 부합됩니다. 빨강 채널에서 초록과 파란색 줄에 있는 픽셀의 값은 0입니다. 따라서 클릭한 픽셀의 값과 차이가 크므로 채워지지 않습니다.
이미지 3: 채우기 = 빨강. 이번에는 초록색 줄을 클릭했습니다. 빨강 채널에서 초록색 부분 픽셀의 값은 0입니다. 그리고 파란색 줄 부분 역시 0 값을 가집니다. 따라서 파란색과 초록색 부분이 전부 채워집니다.
These options appear when the Fill by line art detection option is checked:
그림 14.51. “Fill by line art detection” example

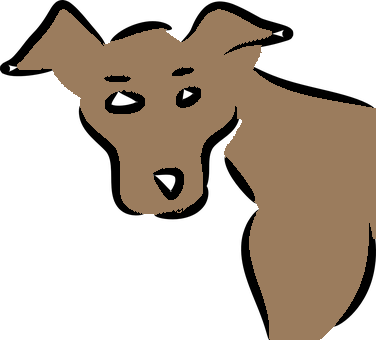
Bucket fill tool applied by click-and-drag with default options. They don't well fit this image, especially on eyebrows that are almost wiped off.
Source: by default, information for line art computation is taken from All visible layers. You can also select the Selected layer, the Layer below the selected one, or the Layer above the selected one as the source.
Detect opacity rather than grayscale: fills completely transparent regions.
Line art detection threshold: threshold to detect contour (higher values will detect more pixels).
These options appear when the Fill by line art detection option is checked:
Automatic closure: When this option is enabled, Maximum gap length defines the maximum gap (in pixels) in line art which can be closed.
These options appear when the Fill by line art detection option is checked:
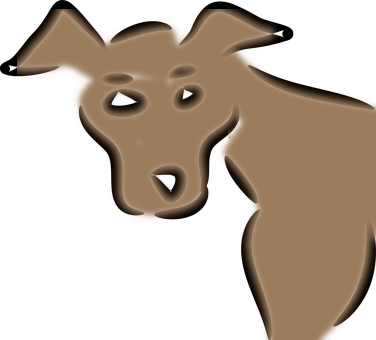
Maximum growing size: maximum number of pixels grown under the line art. Increasing this value makes lines thinner.

To improve eyebrows in the example, Maximum growing size is reduced to 1.
Feather edges: feathers fill edges.
Stroke borders: stroke fill borders with the stroke options of the paint tool selected in the dropdown below.