| 3.5. 그라디언트 | ||
|---|---|---|

|
3. Paint Tools |  |
| 3.5. 그라디언트 | ||
|---|---|---|
|
|
3. Paint Tools | |
This tool fills the selected area with a gradient from the foreground and background colors by default, but there are many options. To make a gradient, drag the cursor in the direction you want the gradient to go and you release the mouse button when you feel you have the right position and size of your gradient. The softness of the gradient depends on how far you drag the cursor. The shorter the drag distance, the sharper it will be.
If you click and drag outside the selection, only a part of the gradient will appear in the selection.
이 도구를 이용해 할 수 있는 것들은 정말 많습니다. 먼저 가장 중요한 그라디언트와 모양에 관한 두 가지 옵션이 있습니다. 도구 옵션에서 그라디언트 아이콘을 클릭하면 그라디언트 선택창이 나옵니다. 이 창에서 김프에서 제공하는 수많은 그라디언트 중에 하나를 선택할 수 있습니다. 그리고 직접 그라디언트를 만들고 저장할 수 있습니다. 그라디언트에 대한 더 자세한 사항은 6절. “그라디언트” 과 그라디언트 대화 상자 섹션을 참고하십시오.
모양 부분에는 11 개의 옵션이 있습니다. 선형, 이중 선형, 원형, 사각형, 원뿔형(대칭), 원뿔형(비대칭), 모양대로(각지게), 모양대로(구형), 모양대로(물결), 나선형(시계방향), 나선형(시계 반대방향) 등. 각 옵션에 대한 설명은 아래에서 할 것입니다. 이 중에 모양대로 옵션은 독특한 옵션입니다. 이는 선택의 모양이 어떻든 간에 그 모양대로 그라디언트를 만듭니다. 그리고 다른 옵션과 다르게 드래그하는 방향이나 길이에 영향을 받지 않습니다. 다른 옵션들은 클릭하는 위치나 방향, 길이에 따라 그라디언트의 모양이 달라지는데 반해, 모양대로 옵션은 클릭한 위치나 움직임과는 무관하게 동일한 그라디언트를 만듭니다.
![[작은 정보]](images/tip.png)
|
작은 정보 |
|---|---|
|
모드 메뉴에서 차이점 모드를 선택하고 그라디언트를 실행하면 환상적인 모양이 만들어집니다. 그리고 새로 클릭하고 드래그할 때마다 모양이 변합니다. |
다음과 같은 방법들을 이용해 혼합 도구를 사용할 수 있습니다.:
From the main menu: → → .
By clicking the tool icon
![]() in the Toolbox.
in the Toolbox.
By pressing the G keyboard shortcut.
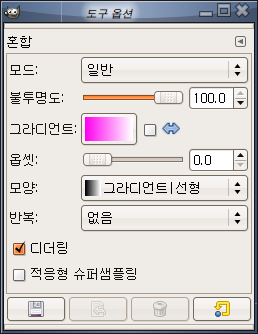
Normally, tool options are displayed in a window attached under the Toolbox as soon as you activate a tool. If they are not, you can access them from the main menu through → → which opens the option window of the selected tool.
A variety of gradient patterns can be selected from the drop-down list. The tool causes a shading pattern that transitions from foreground to background color or introduces others colors, in the direction the user determines by drawing a line in the image. For the purposes of drawing the gradient, clicking on the reverses the gradient direction with the effect, for instance, of swapping the foreground and background colors.
On the right hand, a button to open the Gradient Editor dialog.
Perceptual RGB: When this option is chosen, the Blend Color Space is sRGB. This is the default.
Linear RGB: When this option is chosen, the Blend Color Space is linearized sRGB (defined by the sRGB primaries and a linear tone reproduction curve). This results in gradients that resemble the physical behavior of light. This option should be used if the color, as measured with a colorimeter, should change linearly with the distance from the color stops within the gradient.
CIE Lab: When this option is chosen, the Blend Color Space is CIE L*a*b*. This perceptionally uniform color space is used to model human perception of color blending.
GIMP provides 11 shapes, which can be selected from the drop-down list. Details on each of the shapes are given below.
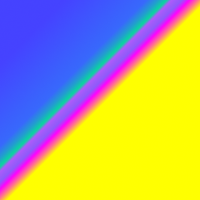
이 그라디언트는 시작 지점에서 그려진 직선을 따라 끝 지점까지 전경색과 배경색을 선형으로 변화시킵니다.
이 모양은 시작점을 중심으로 양쪽으로 같은 무늬를 만듭니다. 그라디언트의 길이는 드래그한 길이의 두 배가 되며, 마치 실린더와 비슷한 모양을 만듭니다.
이 그라디언트는 시작점을 기준으로 원형의 그라디언트를 만듭니다. 시작점에서부터 바깥쪽으로 전경색이 배경색으로 바뀝니다.
사각형, 모양대로 (각지게), 모양대로 (구형), 모양대로 (물결) 은 비슷하면서도 약간씩 다릅니다. 이 모두는 시작점을 중점으로 하여 그린 선의 길이를 대각선의 절반 길이로 하고 사각형을 만듭니다. 그리고 중앙에 전경색이 놓이고 바깥쪽으로 배경색이 위치합니다. 이 네 가지는 계산법에 따라 다른 모습들을 보여줍니다.
원뿔형 (대칭) 모양은 원뿔을 위에서 내려다보는 느낌의 모양입니다. 그리고 배경색으로 조명 효과와 비슷한 효과를 만듭니다.
원뿔형 (비대칭) 은 드래그한 선을 따라 선이 생긴다라는 것을 제외하면 원뿔형 (대칭) 과 유사합니다.
나선형 모양은 드래그한 길이를 너비로 하는 나선을 그립니다.
None (extend) as default.
None (truncate): areas before and after endpoints are truncated.
Sawtooth wave: the Sawtooth pattern is achieved by beginning with the foreground, transitioning to the background, then starting over with the foreground.
Triangular wave: starts with the foreground, transitions to the background, then transitions back to the foreground.
오프셋 값은 그라디언트의 “기울기” 를 증가시킵니다. 이는 시작점에서 어느 정도의 거리에서 그라디언트를 시작할 것인가를 결정하는 옵션입니다. 모양대로 옵션은 이 옵션에 영향을 받지 않습니다.
Dithering is explained in the Glossary
This is a more sophisticated means of smoothing the "jagged" effect of a sharp transition of color along a slanted or curved line. To find out what works best in your case, you will have to test this yourself.
![[주의]](images/warning.png)
|
주의 |
|---|---|
|
The option must be activated (with Shift also) before starting drawing gradient. |
When this option is checked, the gradient line disappears as soon as you release the mouse button. You can't edit color stops before applying the gradient fill.
When this option is checked, the custom gradient is not created automatically and must be created manually. The option can be activated before starting drawing gradient or if the active gradient is not the custom gradient. Allows changing user-writable gradients directly rather than creating copies of them.
All the Gradient Editor dialog features are available directly on canvas. You can create and delete color stops, select and shift them, assign colors to color stops, change blending and coloring for segments between color stops, create color stops from midpoints.
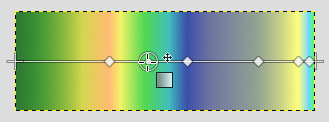
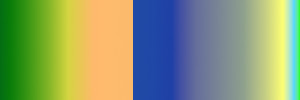
Select a gradient in the gradient dialog. Click and drag on canvas. A line is drawn and the gradient is displayed. You can edit this gradient by moving the mouse pointer on this line. As soon as you try to edit gradient, GIMP creates a custom gradient, which is a copy of the selected gradient. It becomes the active gradient and will be preserved across sessions. Here, we use the Abstract3 gradient.
The Abstract3 gradient, with endpoints
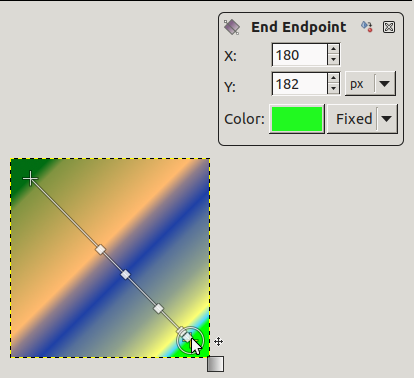
At both ends of the line, you can see a Start endpoint and an End endpoint. Click and drag an endpoint (the mouse pointer is accompanied with a moving cross) to move it where you want on your screen. A small window appears showing data about the selected endpoint: the position of the mouse (coordinate origin is the upper left corner of image or selection), the starting (left) and the ending (right) color of the gradient.
End point moved
![[참고]](images/note.png)
|
참고 |
|---|---|
|
In you only move endpoints, the custom gradient is not created yet. |
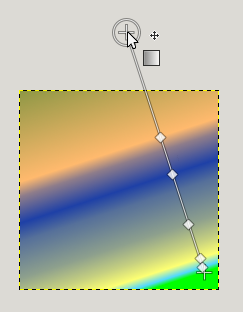
On the line, you can see several small squares. These are Stops that divide gradient into segments. You can edit segments separately. Click and drag stops to move them (the active endpoint takes a yellow color). As soon as you move a stop, the custom gradient is created. The small data window shows a button that allow you to remove the active stop.
Stop point moved and data window
If you move the mouse pointer on the line, a
Midpoint shows up. Then, the small data window
has two buttons:
![]() to create a new stop at midpoint, and
to create a new stop at midpoint, and
![]() to center midpoint.
to center midpoint.

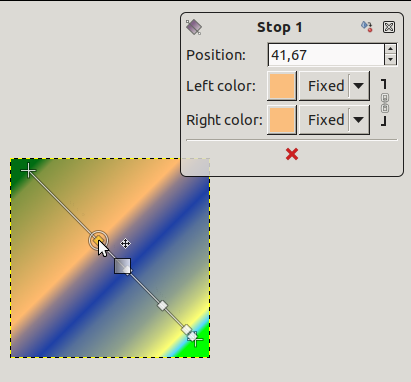
For Stops and Midpoints, Position refers to the gradient line: 0 is start endpoint, 100 is end endpoint.
Blending: you can change the blending mode between two stops, using the drop-down list. The Step option creates a hard-edge transition between the two adjacent color stops at the midpoint.
Changing color: in stop and end data windows, you have color buttons with a drop-down list. The default option is Fixed; this means that color choice will be independent from foreground and background colors. Click on a color button to open a color selector.
Ctrl 키는 15도 각도로 제한된 직선을 그리는데 사용됩니다. 클릭한 뒤에 Ctrl 키를 누르고 마우스를 움직이면 15도 단위로 움직이는 직선을 볼 수 있습니다.
Alt or Ctrl+Alt to move the whole line.