| 4.4. Bijsnijden | ||
|---|---|---|

|
4. Gereedschap Transformeren |  |
Het gereedschap Bijsnijden wordt gebruikt om een afbeelding bij te snijden of te knippen. Het werkt op alle lagen van de afbeelding, zichtbaar en onzichtbaar. Dit gereedschap wordt vaak gebruikt om randen te verwijderen, of om ongewenste gebieden te elimineren om u een meer gefocust werkgebied te verschaffen. Het is ook nuttig als u een specifieke afbeeldingsgrootte nodig hebt die niet overeenkomen met de originele dimensies van uw afbeelding.
Klik en sleep met de muis om het gebied voor bijsnijden te definiëren. Een geaccentueerd gebied zal verschijnen dat de grenzen voor het bijsnijden aangeeft. Klik in het midden en sleep de rechthoek om het gehele gebied voor bijsnijden te verplaatsen. De grootte wijzigen kan door dicht naar de randen te verplaatsen. De muiscursor zal wijzigen en u kunt ofwel aan een kant slepen, als u in het midden bent, of aan twee kanten, als u in een hoek staat. Terwijl u het sleepgebied wijzigt, worden de grootte van het bijgesneden gebied en de verhouding ervan weergegeven op de statusbalk.
Wanneer de muis het dradenkruis voor verplaatsen wordt, kunt u de pijltoetsen op het toetsenbord gebruiken om de rechthoek voor bijsnijden te verplaatsen. Ingedrukt houden van de Shift-toets maakt verplaatsen in stappen van 25 pixels mogelijk.
Klik binnen de rechthoek voor bijsnijden, of druk op de Enter-toets, om het bijsnijden te voltooien.
![[Opmerking]](images/note.png)
|
Opmerking |
|---|---|
|
Standaard wordt de grootte van het afbeeldingscanvas niet gewijzigd na het bijsnijden. De gereedschapsopties van het gereedschap Bijsnijden hebben een instelling Bijgesneden beeldpunten verwijderen, die kan worden geselecteerd, om ervoor te zorgen dat de grootte van het canvas ook wordt aangepast aan het bijgesneden gebied. |
![[Tip]](images/tip.png)
|
Tip |
|---|---|
|
U kunt Hulplijnen gebruiken om het bij te snijden gebied te plaatsen. Zorg ervoor dat de optie → is geselecteerd. |
U kunt het gereedschap op verschillende manieren activeren:
Vanuit het hoofdmenu: → → .
Door te klikken op het pictogram van het gereedschap
in de Gereedschapskist.
Door te drukken op de sneltoets Shift+C.
Wanneer u de muisknop ingedrukt houdt op de rechthoek voor bijsnijden, verdwijnen de handvatten en
als u dan de Ctrl-toets ingedrukt houdt, schakelt u in op de optie Uitbreiden vanuit het midden om,
als u de Shift-toets ingedrukt houdt, schakelt u naar de optie Vast, die sommige dimensies vastzet.
Normaal gesproken worden gereedschapsopties weergegeven in een venster dat is gekoppeld onder de Gereedschapskist, zodra u een gereedschap activeert. Als dat niet zo is, kunt u er toegang toe krijgen vanuit het hoofdmenu met → → , dat het venster met de gereedschapsopties voor het geselecteerde gereedschap opent. De beschikbare gereedschapsopties kunnen ook worden bereikt door te dubbelklikken op het corresponderende pictogram van het gereedschap in de Gereedschapskist.
Deze optie zal het bijsnijden onmiddellijk de geselecteerde lagen laten beïnvloeden.
Indien geselecteerd wordt de grootte van het canvas aangepast aan het bijgesneden gebied. Standaard is dit niet geselecteerd, wat betekent dat na het bijsnijden de lagen zijn aangepast, maar de grootte van het canvas is nog steeds hetzelfde. Dat is om ervoor te zorgen dat u niet per ongeluk iets verwijdert.
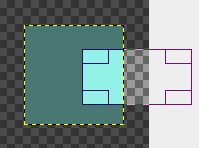
Met deze optie kan het bijsnijden of het formaat worden gewijzigd buiten de afbeelding (of laag) en zelfs buiten het canvas. U kunt dus de gewenste grootte aan de resulterende afbeelding geven. Het nieuwe gebied dat nog geen kleur had zal transparant worden.
Afbeelding 14.98. Voorbeeld voor “Canvas mag vergroten”

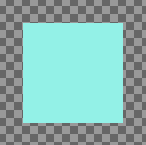
Een afbeelding op een groot doek

De optie is geselecteerd. De rechthoek voor bijsnijden strekt zich uit tot buiten het canvas.

Het resulterende beeld.
Wanneer deze optie is ingeschakeld, wordt de bij te snijden rechthoek naar alle kanten verkleind vanuit het midden. U kunt deze optie ook in-/uitschakelen met Ctrl terwijl u de rechthoek tekent of verandert.
U kunt deze optie ook inschakelen met de Ctrl-toets terwijl u de rechthoek bijsnijdt. Deze optie biedt u een keus uit verschillende eigenschappen om vast te houden tijdens het tekenen van de rechthoek:
Beeldverhouding: dat is de standaardinstelling. De verhouding tussen breedte en hoogte van het resultaat blijft dezelfde als in de oorspronkelijke afbeelding.
Breedte / Hoogte: Alleen Breedte of Hoogte zullen vast blijven staan. De waarde van deze dimensie kan worden ingesteld in het tekstvak eronder; het staat standaard op 100 pixels.
Grootte: Zowel Breedte als Hoogte zullen vast blijven staan. Hun waarden kunnen worden ingesteld in het tekstvak eronder, bijvoorbeeld in de vorm “150×100”. De rechthoek voor bijsnijden zal deze waarden overnemen, zodra u in de afbeelding klikt. Aan de rechterkant laten twee knoppen u kiezen uit een indeling (breed) of (staand) voor de rechthoek voor bijsnijden.
Deze twee tekstvelden bevatten de huidige horizontale en verticale coördinaten van de linkerbovenhoek van de selectie. U kunt deze velden gebruiken om de positie van de selectie precies aan te passen.
Deze twee tekstvelden bevatten de huidige breedte en hoogte van de selectie. U kunt deze velden gebruiken om de grootte van de selectie precies aan te passen.
Als u deze optie inschakelt, wordt het geselecteerde gebied benadrukt door een donker masker van de omgeving om visuele selectie veel eenvoudiger te maken.
De dekking van het donkere gebied kan worden ingesteld met de schuifbalk.
Met dit menu kunt u een type hulplijnen selecteren om binnen de selectie weer te geven, om het maken van een selectie gemakkelijker te maken, waaronder de regels voor fotocompositie.
Er zijn zes opties beschikbaar:
Geen hulplijnen
Middellijnen
Regel van derden
Regel van vijfden
Gulden snede
Diagonalen
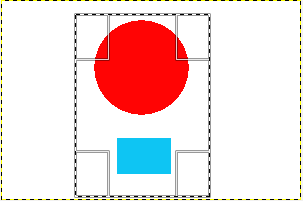
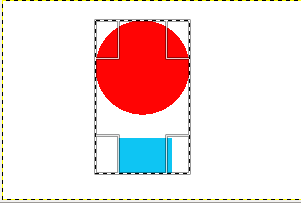
De knop Automatisch krimpen zal proberen een rand te vinden, in de actieve laag, van waaruit de dimensies kunnen worden getekend. Deze optie werkt alleen goed met geïsoleerde objecten die scherp contrasteren met de achtergrond.
Afbeelding 14.99. Voorbeeld van automatisch krimpen

Een afbeelding met een scherpe grens erin en een rechthoek voor bijsnijden.

Na het klikken op de knop Automatisch krimpen is de rechthoek voor bijsnijden verkleind naar de scherpe grenzen.
Deze optie werkt hetzelfde, met of zonder Automatisch krimpen. Het gebruikt de informatie over beeldpunten uit alle zichtbare lagen, in plaats van slechts uit de actieve laag.