| 2.6. Fuzzy Selection (Magic wand) | ||
|---|---|---|

|
2. Selectie Gereedschappen |  |
| 2.6. Fuzzy Selection (Magic wand) | ||
|---|---|---|
|
|
2. Selectie Gereedschappen | |
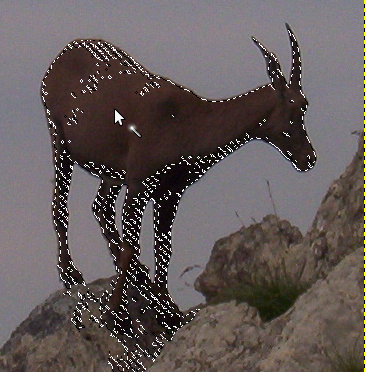
The Fuzzy Select tool is designed to select areas of the current layer or image based on color similarity.
Bij het gebruik van dit gereedschap is het erg belangrijk om het juiste startpunt te kiezen. Als u de verkeerde plek selecteert, krijgt u mogelijk iets heel anders dan wat u wilt, of zelfs het tegenovergestelde.
Fuzzy Select is a good tool for selecting objects with sharp edges. It is fun to use, so beginners often start out using it a lot. You will probably find, however, that the more you use it, the more frustrated you become with the difficulty of selecting exactly what you want, no more, no less. More experienced users find that the Path and Color Select tools are often more efficient, and use the Fuzzy Select tool less. Still, it is useful for selecting an area within a contour, or touching up imperfect selections. It often works very well for selecting a solid-colored (or nearly solid-colored) background area.
Merk op dat naarmate het geselecteerde gebied zich vanuit het midden naar buiten uitbreidt, het niet alleen uitbreidt naar pixels die elkaar raken: het kan over kleine openingen springen, afhankelijk van de optie Diagonale buren. Om de drempelwaarde te verhogen/verlagen, sleept u tijdens het gebruik van de toverstaf na de eerste druk op de knop de aanwijzer naar beneden (of naar rechts) respectievelijk naar boven (of naar links).
There are different possibilities to activate the tool:
From the main menu: → → .
By clicking the tool icon
![]() in the Toolbox.
in the Toolbox.
By pressing the U keyboard shortcut.
De toverstaf heeft geen speciale hulptoetsen, alleen de toetsen die alle selectiegereedschappen op dezelfde manier beïnvloeden. Zie Paragraaf 2.1, “Algemene Eigenschappen” voor de uitleg daarvan.
Het selecteren begint wanneer u op een plek in de afbeelding klikt en breidt zich naar buiten uit als water dat laag liggende gebieden overstroomt, waarbij aaneengesloten pixels worden geselecteerd waarvan de kleuren vergelijkbaar zijn met de beginpixel. U kunt de drempel van gelijkenis regelen door de muis naar beneden of naar rechts te slepen: hoe verder u deze sleept, hoe groter u het geselecteerde gebied krijgt. En u kunt de selectie verkleinen door naar boven of naar links te slepen.
U kunt de gehele selectie verplaatsen met de muis en/of de pijltoetsen door de Alt toets ingedrukt te houden.
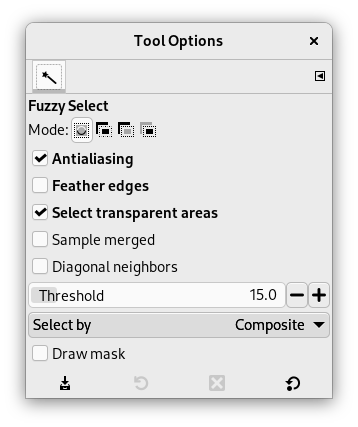
Normally, tool options are displayed in a window attached under the Toolbox as soon as you activate a tool. If they are not, you can access them from the main menu through → → which opens the option window of the selected tool.
![[Opmerking]](images/note.png)
|
Opmerking |
|---|---|
|
See Selection Tools Options for help with options that are common to all these tools. Only options that are specific to this tool are explained here. |
These options affect the way Fuzzy Select expands the selection out from the initial point.
This option gives Fuzzy Select the ability to select areas that are completely transparent. If this option is not checked, transparent areas will never be included in the selection.
This option becomes relevant when you have several layers in your image, and the active layer is either semi-transparent or is set to another Layer Mode than Normal. If this is the case, the colors present in the layer will be different from the colors in the composite image. If the “Sample Merged” option is unchecked, the Fuzzy Selection will only react to the color in the active layer when it creates a selection. If it is checked it will react to the composite color of all visible layers. For further information, see the glossary entry Sample Merged.
Wanneer dit is geactiveerd, beschouwt het gereedschap diagonaal naburige pixels als verbonden bij het berekenen van het te selecteren gebied. Met andere woorden, in plaats van naar de vier rechte buren van elke pixel te kijken, kijkt het naar alle acht pixels
Afbeelding 14.20. Voorbeeld voor diagonale buren
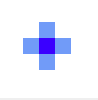
Een pixel met 4 rechte buren
Een pixel met 4 diagonale buren

Een pixel met alle 8 buren
Deze schuifregelaar bepaalt het kleurenbereik dat wordt geselecteerd op het moment dat u op de aanwijzer op het beginpunt klikt voordat u deze sleept: hoe hoger de drempel, hoe groter de resulterende selectie. Na de eerste druk op de knop, door de aanwijzer naar beneden of naar rechts te slepen, wordt de selectie groter; als u naar boven of naar links sleept, neemt deze af. U kunt zo de drempelinstelling nauwkeurig afstellen om het gewenste resultaat te krijgen.
Met deze optie bepaalt u welke component van de afbeelding GIMP gebruikt om de gelijkenis in kleur te berekenen.
U kunt daarbij kiezen uit , , , , , , , , , , .
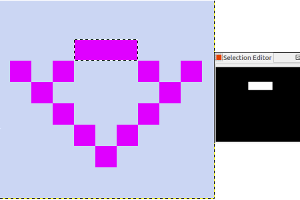
This option can help to visualize the selection. Selected areas marked with marching ants may not be evident when selecting with Fuzzy Select. If this option is checked, selected areas will be filled with a magenta color as long as you keep pressing on the left mouse button, and this mask will disappear as soon as you release this button.
Afbeelding 14.22. Voorbeeld van Masker tekenen
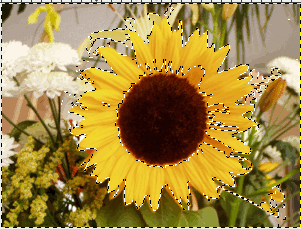
De toverstaf in gebruik zonder Masker tekenen
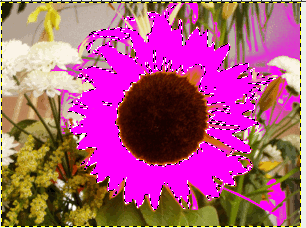
De toverstaf in gebruik met Masker tekenen, linkermuisknop ingedrukt.