Het gereedschap Paden stelt u in staat complexe selecties te maken, genaamd Bézier-bogen, een beetje zoals het gereedschap Vrije selectie, maar met alle aanpasbaarheid van vectoriale bogen. U kunt uw boog bewerken, u kunt tekenen met uw boog, of zelfs de boog opslaan, importeren and exporteren. U kunt ook paden gebruiken om geometrische figuren te maken. Paden hebben hun eigen dialoogvak: Paden.
Bekijk het concept Pad.
U kunt het gereedschap op verschillende manieren activeren:
-
Vanuit het hoofdmenu: → .
-
Door te klikken op het pictogram van het gereedschap
in de Gereedschapskist.
-
Door te drukken op de sneltoets B.
![[Opmerking]](images/note.png)
|
Opmerking |
|---|---|
|
Hulpberichten worden onder de afbeelding getoond om u te informeren over al deze toetsen. |
- Shift
-
Deze toets heeft verscheidene functies, afhankelijk van de context. Bekijk Opties voor meer details.
- Ctrl ; Alt
-
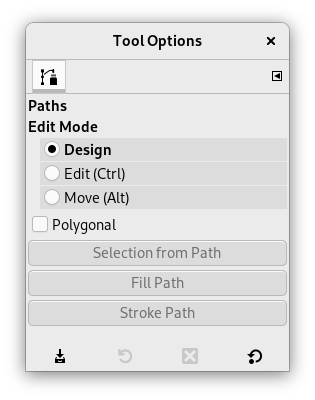
Drie modi zijn beschikbaar om te werken met het gereedschap Paden: Ontwerpen,Bewerken en Verplaatsen. Ctrl-toets schakelt tussen Ontwerpen en Bewerken. Alt-toets (of Ctrl+Alt-toets) schakelt tussen Ontwerpen en Verplaatsen.
Normaal gesproken worden gereedschapsopties weergegeven in een venster dat is gekoppeld onder de Gereedschapskist, zodra u een gereedschap activeert. Als dat niet zo is, kunt u er toegang toe krijgen vanuit het hoofdmenu met → → , dat het venster met de gereedschapsopties voor het geselecteerde gereedschap opent.
- Modus Bewerken
-
- Ontwerpen
-
Standaard staat dit gereedschap in de modus Ontwerpen. U tekent een pad door achtereenvolgend te klikken. U kunt controlepunten verplaatsen door te erop te klikken en ze te slepen. Tussen controlepunten staan segmenten.

De nummers zijn stappen om een recht pad te maken met twee segmenten.

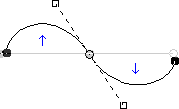
Gebogen segmenten zijn gemakkelijk te bouwen door een segment te slepen of een nieuwe knoop. Blauwe pijlen geven de boog aan. Twee kleine handvatten verschijnen waaraan u kunt slepen om de boog te buigen.
![[Tip]](images/tip.png)
Tip Klik, om de boog snel te sluiten, op het initiële controlepunt. Als u de beginknoop wilt verplaatsen, houdt Shift ingedrukt en klik om de eindknoop te deselecteren en verplaats dan de beginknoop.
U kunt de knop gebruiken of
de knop Pad naar selectie in het dialoogvenster Paden om het pad te converteren naar een selectie.
![[Tip]](images/tip.png)
Tip Wanneer u twee handvatten heeft, werken zij standaard symmetrisch. Laat de druk op de muisknop los om de handvatten afzonderlijk te verplaatsen. De Shift-toets zal de handvatten forceren om weer symmetrisch te worden.
Verscheidene functies zijn beschikbaar in de modus Ontwerpen:
Invoegen van een nieuwe knoop: Wanneer u drukt op Ctrl en met de muisaanwijzer over een bestaand pad gaat, wijzigt de muisaanwijzer naar een teken '+'. Klikken zal een nieuwe knoop voor het pad maken op het punt waar over het pad wordt gegaan.
Een of verschillende knopen verplaatsen: Op een knoop wordt de muisaanwijzer een kruis met 4-pijlen. U kunt erop klikken en het slepen. U kunt meerdere knopen selecteren met Shift en klikken en ze verplaatsen met klikken en slepen. Drukken op Ctrl+Alt maakt het mogelijk het hele pad te verplaatsen, als een selectie.
Handvatten aanpassen: U moet eerst een knoop bewerken. Er verschijnt een handvat. Sleep het om de boog te buigen. Drukken op Shift schakelt naar symmetrische handvatten.
Segment aanpassen: Wanneer de muisaanwijzer over een segment gaat, wijzigt die naar een kruis met 4-pijlen. Klik en sleep om het segment te buigen. Zodra u het verplaatst, verschijnen handvatten aan beide einden van het segment. Drukken op de Shift-toets schakelt naar symmetrische handvatten.
Een nieuw subpad toevoegen: Wanneer u drukt op Shift en met de muis buiten het bestaande pad gaat, gaat de muis een vierkant weergeven. Klikken zal een subpad beginnen dat niet is verbonden met andere bogen, maar het wordt beschouwd als een deel van het pad.
- Bewerken (Ctrl)
-
Bewerken voert functies uit die niet beschikbaar zijn in de modus Ontwerpen. Met deze modus kunt u alleen op het bestaande pad werken. Wanneer de muisaanwijzer niet op het pad is, wijzigt de aanwijzer naar een kleine gekruiste cirkel en u kunt geen pad bewerken.
Segment toevoegen tussen twee knopen: Klik op een knoop aan een einde van het pad om het te activeren. De aanwijzer ziet eruit als een symbool voor vereniging. Klik op een andere knoop om beide knopen te verbinden. Dit is nuttig als u niet gesloten componenten moet verbinden.
Segment uit een pad verwijderen: Wijs, tijdens het drukken op de toetscombinatie Shift+Ctrl, naar een segment. De muisaanwijzer wijzigt naar een teken "-". Klik om het segment te verwijderen.
Knoop aan een pad toevoegen: wijs naar een segment. Aanwijzer wijzigt naar een "+". Klik waar u het nieuwe controlepunt wilt plaatsen.
Een knoop verwijderen: Tijdens het ingedrukt houden van de toetscombinatie Shift+Ctrl, wijs naar een knoop. Aanwijzer wijzigt naar een "-". Klik om de knoop te verwijderen.
Een handvat toevoegen aan een knoop: Wijs naar een knoop. Aanwijzer wijzigt naar een kleine hand. Sleep de knoop: handvat verschijnt. Drukken op Shift schakelt naar symmetrische handvatten.
Een handvat van een knoop verwijderen: Tijdens het ingedrukt houden van de toetscombinatie Shift+Ctrl, wijs naar een handvat. De aanwijzer wijzigt niet naar de verwachte "-" en blijft een hand. Klik om het handvat te verwijderen.
![[Let op]](images/caution.png)
Let op Er komt geen waarschuwing bij het verwijderen van een knoop, segment of handvat.
- Verplaatsen (Alt)
-
Modus Verplaatsen stelt u in staat een of alle componenten van een pad te verplaatsen. Klik eenvoudigweg op het pad en sleep eraan.
Als u verschillende componenten hebt, wordt alleen de geselecteerde verplaatst. Als u klikt en sleept buiten het pad, worden alle componenten verplaatst. Ingedrukt houden van de Shift-toets schakelt tussen het verplaatsen van alle componenten en alleen de geselecteerde componenten.
- Veelhoek
-
Met deze optie zijn segmenten alleen lineair. Handvatten zijn niet beschikbaar en segmenten worden niet gebogen bij het verplaatsen ervan.
- Selectie uit pad
-
Deze knop maakt het mogelijk een selectie te maken die is gebaseerd op het pad in zijn huidige status. Deze selectie wordt gemarkeerd met de “marcherende mieren”. Onthoud dat het pad nog steeds aanwezig is: het huidige gereedschap is nog steeds het gereedschap Paden en u kunt dit pad aanpassen zonder de selectie aan te passen, die onafhankelijk is geworden. Als u van gereedschap wisselt, wordt het pad onzichtbaar, maar het blijft bestaan in het dialoogvenster Paden en u kunt het opnieuw activeren.
Als het pad niet gesloten was zal GIMP het eerst sluiten met een rechte lijn.
Zoals de hulppop-up al zegt, ingedrukt houden van Shift tijdens het klikken op de knop zal de nieuwe selectie toevoegen aan een reeds bestaande. Ingedrukt houden van Ctrl zal de selectie aftrekken van de eerder bestaande selectie, en de toetscombinatie Shift+Ctrl zal de twee selecties doorsnijden.
- Pad vullen
-
Dit laat u een omsloten pad vullen met een effen kleur of patroon.
- Pad belijnen
-
Bekijk Paragraaf 3.19, “Paden belijnen” en Paragraaf 4, “ Paden ”.
Bij het met rechts klikken op elementen van een pad, zoals ankers of segmenten, zal een contextmenu verschijnen, waarvan de inhoud afhankelijk is van waar u op hebt geklikt. De volgende opdrachten zouden in het contextmenu kunnen worden weergegeven.
- Anker verwijderen
-
Deze opdracht verwijdert het geselecteerde anker en verbindt de segmenten ervoor en erachter met elkaar.
- Verschuiving begin
-
Deze opdracht verschuift het begin-anker naar het geselecteerde anker. Het begin-anker is waar de belijning begint. Het begin-anker heeft een puntige kant die de richting van de belijning aangeeft. Dit kan handig zijn als u Tekst langs pad wilt laten doorlopen.
Verschuiven van het begin-anker op geopende lijnen zou een nieuw segment kunnen invoegen dat de vorige eindpunten verbindt en het segment verwijdert dat leidt naar het nieuwe begin-anker.
- Anker invoegen
-
Deze opdracht voegt een nieuw anker in op de geselecteerde plek op het segment.
- Segment verwijderen
-
Deze opdracht verwijdert het geselecteerde segment. Dat zal een opening in uw pad maken.
- Belijning omkeren
-
Dit draait de richting van de belijning om. De vorm van het begin-anker zal de richting van de belijning reflecteren. De puntige kant is de richting waarin de belijning zal gaan.


