| 2.8. Scissors Select | ||
|---|---|---|

|
2. Selectie Gereedschappen |  |
| 2.8. Scissors Select | ||
|---|---|---|
|
|
2. Selectie Gereedschappen | |
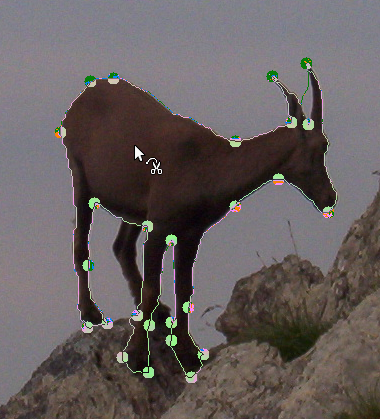
The Scissors Select tool is an interesting piece of equipment: it has some features in common with Free Select, some features in common with the Path tool, and some features all its own. It is useful when you are trying to select a region defined by strong color-changes at the edges. To use the Scissors, you click to create a set of "control nodes", also referred to as anchors or control points, at the edges of the region you are trying to select. The tool produces a continuous curve passing through these control nodes, following any high-contrast edges it can find. If you are lucky, the path that the tool finds will correspond to the contour you are trying to select.
Unfortunately, there seem to be some problems with the edge-following logic for this tool, with the result that the selections it creates tend to be pretty crude in a lot of cases. A good way to clean them up is to switch to Quick Mask mode, and use paint tools to paint in the problematic parts. On the whole, most people find the Path tool to be more useful than the Scissors, because, even though it does not have the intelligent edge-finding capability, the paths it produces persist until you delete them, and can be altered at any time.
There are different possibilities to activate the tool:
From the main menu: → → .
By clicking the tool icon
![]() in the Toolbox.
in the Toolbox.
By pressing the I keyboard shortcut.
Het standaardgedrag van de toetsen Shift, Ctrl en Alt wordt beschreven in Paragraaf 2.1.1, “Toetsencombinaties (Standaard instellingen)” voor alle selectiegereedschappen.
Maar er is één hulptoets die een speciaal gedrag heeft als u deze gebruikt tijdens het bewerken van een selectie, dat is nadat u het eerste knooppunt hebt gemaakt:
Standaard is de functie automatisch uitlijnen ingeschakeld: telkens wanneer u op de muisaanwijzer klikt en sleept, vindt het gereedschap Schaar het punt met het maximale verloop (waarbij de kleurverandering maximaal is) voor het plaatsen van een nieuw besturingsknooppunt of het verplaatsen van een bestaand knooppunt.
Als u deze toets ingedrukt houdt tijdens het klikken en slepen, wordt deze functie uitgeschakeld en wordt het knooppunt precies op de positie van de muisaanwijzer geplaatst.
Backspace verwijdert het laatst getekende segment, Escape annuleert alle selectiesegmenten.
Telkens wanneer u met de muis met de linkermuisknop klikt, maakt u een nieuw besturingspunt, dat met het laatste besturingspunt wordt verbonden door een curve die de randen in de afbeelding probeert te volgen. Om te eindigen, klikt u op het eerste punt (de cursor verandert om aan te geven wanneer u zich op de juiste plek bevindt). U kunt de curve aanpassen door de besturingsknooppunten te slepen of door te klikken om nieuwe besturingsknooppunten te maken. Als u tevreden bent, klikt u ergens in de curve om deze om te zetten in een selectie.
As said above when you click with this tool you drop points. The
selection boundary is driven by these control points. During creation you
can move each one by clicking and dragging, except the first and the last
one. The selection is closed when you are clicking the last point over
the first one. When the selection is closed the pointer shape
changes according to its position: inside
 ,
on the boundary
,
on the boundary
 ,
and outside
,
and outside
 .
You can adjust the selection creating new points by clicking on the
boundary or by moving each control points (merged first and last
point). The selection is validated when you click inside.
.
You can adjust the selection creating new points by clicking on the
boundary or by moving each control points (merged first and last
point). The selection is validated when you click inside.
Merk op dat u maar één selectie kunt maken; als u een tweede selectie probeert te maken wordt de eerste selectie gewist.
![[Waarschuwing]](images/warning.png)
|
Waarschuwing |
|---|---|
|
Zorg ervoor dat u niet in de curve klikt totdat u helemaal klaar bent met het aanpassen ervan. Zodra u hem hebt omgezet in een selectie, brengt ongedaan maken u terug naar ongeselecteerd en moet u de curve opnieuw helemaal opnieuw opbouwen als u die toch wil. Zorg er ook voor dat u niet overschakelt naar een andere tool, anders gaan al uw zorgvuldig gemaakte besturingsknooppunten verloren. (Maar u kunt uw selectie nog steeds omzetten in een pad en deze uitvoeren met het gereedschap Pad.) |
Als u de selectie wilt verplaatsen raadpleegt u Selecties verplaatsen.
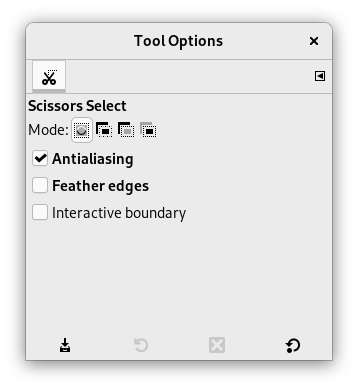
Normally, tool options are displayed in a window attached under the Toolbox as soon as you activate a tool. If they are not, you can access them from the main menu through → → which opens the option window of the selected tool.
![[Opmerking]](images/note.png)
|
Opmerking |
|---|---|
|
See Selection Tools Options for help with options that are common to all these tools. Only options that are specific to this tool are explained here. |
Als u deze optie inschakelt geeft het slepen van een knooppunt tijdens het plaatsen het pad aan dat de selectiegrens zal volgen. schakelt u hem uit dan wordt het knooppunt in een rechte lijn verbonden met het vorige knooppunt weergegeven terwijl u het rondsleept en ziet u het resulterende pad pas nadat u de aanwijzerknop loslaat. Op trage systemen, als uw besturingsknooppunten ver uit elkaar liggen, kan dit een beetje een versnelling geven.