Het dialoogvenster Kanalen is de belangrijkste interface voor het bewerken aanpassen en beheren van uw kanalen. Kanalen worden dubbel gebruikt. Dat is waarom het dialoogvenster is opgedeeld in twee delen: het eerste deel voor kleurkanalen en het tweede deel voor selectiemaskers.
Kleurkanalen zijn van toepassing op de afbeelding en niet op een specifieke laag. In de basis zijn drie primaire kleuren nodig om het brede bereik van natuurlijke kleuren te renderen. Net als andere digitale software, gebruikt GIMP rood, groen en blauw als primaire kleuren. De eerste en primaire kanalen geven de waarden Rood, Groen en Blauw voor elke pixel in uw afbeelding weer.
Naast de kanaalnaam staat een miniatuur dat een weergave in grijswaarden weergeeft van elk kanaal, waar wit 100% is en zwart 0% van de primaire kleur. Als alternatief, als uw afbeelding geen kleuren heeft maar een afbeelding in grijswaarden is, is er slechts een primair kanaal, genaamd Grijs. Voor een geïndexeerde afbeelding met een vast aantal bekende kleuren is er ook slechts een primair kanaal, genaamd Geïndexeerd.
Dan is er nog een optioneel kanaal, genaamd alfa. Dit kanaal geeft waarden weer voor de transparantie van elke pixel in uw afbeelding (bekijk Alfakanaal in de woordenlijst). Voor dit kanaal staat een miniatuur dat een weergave in grijswaarden weergeeft met de transparantie, waar wit ondoorzichtig is en zichtbaar en zwart is transparant en niet zichtbaar. Als u uw afbeelding maakt zonder transparantie, dan is het alfakanaal niet aanwezig, maar u kunt het toevoegen vanuit het contextmenu van het dialoogvenster Lagen. Ook, als u meer dan een laag in uw afbeelding heeft, maakt GIMP automatisch een alfakanaal.
![[Opmerking]](images/note.png)
|
Opmerking |
|---|---|
|
GIMP ondersteunt geen kleurmodellen CMYK of YUV. |
Afbeelding 15.7. Weergave van een afbeelding met kanalen

Rood kanaal

Groen kanaal
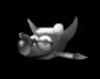
Blauw kanaal
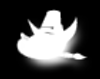
Alfakanaal
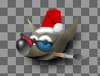
Alle kanalen
De rechter afbeelding is opgedeeld in drie kleurkanalen (rood, groen en blauw) en het alfakanaal voor transparantie. In de rechter afbeelding wordt de transparantie weergegeven als een grijs dambord. In het kleurkanaal is wit altijd wit, omdat alle kleuren aanwezig zijn en zwart is zwart. De rode hoed is zichtbaar in het rode kanaal, maar vrijwel onzichtbaar in de andere kanalen. Hetzelfde geldt voor vlak groen en blauw, die alleen zichtbaar zijn in hun eigen kanalen en onzichtbaar in andere.
Dit dialoogvenster is een dokbaar dialoogvenster; zie het gedeelte Paragraaf 2.3, “Koppelen van dialoogvensters” voor hulp bij het manipuleren ervan.
U kunt het openen:
-
Vanuit het hoofdmenu: → → .
-
Vanuit het menu Tab in elk dokbaar dialoogvenster door op
 te klikken en → te selecteren.
In het menu staat een lijst met dokbare vensters, die alleen bestaat als er ten minste een dialoogvenster geopend blijft. In dat geval kunt u het dialoogvenster “Kanalen” oproepen vanuit het hoofdmenu: → .
- Overzicht
-
Het dialoogvenster Kanalen bestaat uit een lijst kleurkanalen en het optionele alfakanaal. Daaronder staat een lijst met kanalen voor selectiemaskers. Een klik met rechts op een item in de lijst met kanalen opent het contextmenu Kanaal.
De kleurkanalen zijn altijd op in dezelfde volgorde vermeld. Zij kunnen niet worden verwijderd. U kunt alleen hun zichtbaarheid wijzigen en ze selecteren of deselecteren. Standaard zijn al deze kanalen zichtbaar en geselecteerd.
Klik, om een kanaal te selecteren, op een kleurkanaal in de lijst. Dit schakelt met de selectie van het kanaal, wat betekent dat een geselecteerd kanaal niet meer geselecteerd wordt en vice versa. De geselecteerde kleurkanalen verschijnen geaccentueerd in het dialoogvenster.
![[Let op]](images/caution.png)
Let op Deselecteren van een van de kleurkanalen rood, blauw of groen heeft ernstige consequenties. Als u bijvoorbeeld het blauwe kanaal uitschakelt, zullen vanaf nu alle pixels in de afbeelding geen blauwe component meer hebben, en dus zal een witte pixel de aanvullende kleur geel hebben.
Onzichtbaar maken van een van de kleurkanalen beïnvloedt niet hoe gereedschappen werken en alleen wijzigen wat momenteel op uw scherm wordt weergegeven. Een penseel zal, bijvoorbeeld, doorgaan met tekenen als gewoonlijk en de gum zal de alfawaarde van beeldpunten wijzigen, ook als het alfakanaal is ingesteld op niet meer zichtbaar.
De geselecteerde kleurkanalen definiëren welke delen van de actie van een gereedschap op de laag worden toegepast. De gum zal bijvoorbeeld niet uw afbeelding wijzigen als het alfakanaal niet is geselecteerd.
Opmerking De opdrachten dupliceren en selecteren, die hieronder zijn gedocumenteerd, kunnen ook worden gebruikt voor kleurkanalen. Dit werkt echter alleen door de opdracht te activeren vanuit het contextmenu met rechts klikken en slechts voor een kanaal per keer.
- Meerdere kanalen selecteren
-
GIMP stelt u in staat om meerdere kanalen voor selectiemaskers te selecteren en daarop acties uit te voeren. U kunt ze bijvoorbeeld verplaatsen naar een andere locatie in de stapel met kanalen en ze converteren naar selecties. Selecteren van meerdere kanalen wordt gedaan met de muis en de Shift-toets, voor het toevoegen van een bereik aan kanalen, of Ctrl-toets, voor het toevoegen of verwijderen van het aangeklikte kanaal.
- Kop lijst met kanalen
-
Direct boven de lijst met selectiemaskers staat de kopbalk. Aan de linkerkant daarvan ziet u de pictogrammen die de zichtbaarheid en de vergrendelde kolommen identificeren. In het midden zal een tekstlabel u vertellen hoeveel kanalen er momenteel zijn geselecteerd, als dat er meer dan een is.
- Kanaalattributen
-
Elk kanaal wordt in de lijst weergegeven met zijn eigen kenmerken, die sterk lijken op de laagkenmerken:
-
 Zichtbaarheid van het kanaal
-
Standaard zijn alle kleurkanalen zichtbaar en kleurmaskerkanalen zijn niet zichtbaar. Klikken op het symbool Oog, of de lege ruimte als het kanaal niet zichtbaar is, zal de zichtbaarheid van het kanaal schakelen. Shift-klikken op het pictogram zorgt ervoor dat alle andere kanalen worden verborgen.
-
 Attributen vergrendelde kanalen
-
Elk kanaal van een selectiemasker heeft attributen voor vergrendelen. Als een van die attributen is ingesteld, zal het respectievelijke pictogram voor de vergrendeling worden weergegeven in het miniatuur.
Als meerdere attributen zijn ingesteld, zal hier een dubbel pictogram van vergrendeling worden weergegeven. Klikken op deze kolom stelt u in staat deze attributen te wijzigen.
-
 Beeldpunten vergrendelen
-
Dit pictogram geeft aan wanneer “Beeldpunten vergrendelen” is ingeschakeld voor het huidige kanaal. Wanneer dit is ingeschakeld is het kanaal vergrendeld voor elke actie die pixels verandert, wat betekent dat er aan dit kanaal geen wijzigingen kunnen worden gemaakt.
-
 Positie en afmeting vergrendelen
-
Dit pictogram wordt weergegeven wanneer “Positie en afmeting vergrendelen” is ingeschakeld voor het huidige kanaal. Wanneer dit is ingeschakeld, is dit kanaal vergrendeld voor elke actie die zijn positie of afmeting wijzigt.
-
 Zichtbaarheid vergrendelen
-
Deze schakelknop beheert de instelling “Zichtbaarheid vergrendelen” voor de zichtbaarheid van het kanaal. Als dit is ingeschakeld, kan de zichtbaarheid van het kanaal niet worden gewijzigd, totdat u de vergrendeling uitschakelt.
-
- Miniatuur
-
Een klein voorbeeldpictogram geeft het effect voor het kanaal weer. Dit voorbeeld kan worden vergroot door de linkermuisknop erop ingedrukt te houden.
- Kanaalnaam
-
De naam van het kanaal, die uniek moet zijn binnen de afbeelding. Dubbelklikken op de naam van een kanaal van een selectiemasker zal u in staat stellen het te bewerken. De namen van de primaire kanalen (Rood, Groen, Blauw, alfa) kunnen niet worden gewijzigd. Dubbelklikken op het voorbeeldpictogram zal een dialoogvenster openen waar u alle attributen voor het kanaal kunt instellen.
-
- Kanalen beheren
-
De knoppenbalk aan de onderzijde biedt de volgende functionaliteiten:
-
 Nieuw kanaal
-
Een nieuw kanaal aanmaken Een dialoogvenster zal openen waar u de Kanaalnaam kunt instellen, het Kleurlabel, de kanaalattributen en de attributen voor vergrendelen, en tenslotte de Dekking en gebruikte kleur voor het masker in het afbeeldingsvenster. Een klik op de kleurknop geeft de GIMP kleurkiezer weer, waar u de kleur voor het masker kunt wijzigen.
Als u de Shift-toets indrukt tijdens het klikken op de knop , zal het dialoogvenster Nieuw kanaal niet worden geopend. In plaats daarvan zal het nieuwe kanaal worden gemaakt met dezelfde instellingen als die welke eerder werden gebruikt. Dit nieuwe kanaal is een selectiemasker dat is toegepast op de gehele afbeelding. Bekijk voor meer details Selectiemasker.
-
 Kanalen omhoog
-
Dit verplaatst de geselecteerde kanalen naar boven in de lijst. Druk op de Shift-toets om de geselecteerde kanalen tot bovenin de lijst te verplaatsen.
-
 Kanalen omlaag
-
Dit verplaatst de geselecteerde kanalen naar beneden in de lijst. Druk op de Shift-toets om de geselecteerde kanalen tot onderaan in de lijst te verplaatsen.
-
 Kanaal dupliceren
-
Dit maakt een kopie van de geselecteerde kanalen. De naam van de nieuwe kanalen wordt gevolgd door een getal.
![[Tip]](images/tip.png)
Tip U kunt ook kleurkanalen of het alfakanaal dupliceren. Het is een gemakkelijke manier om er een kopie van te behouden en ze later als een selectie in een afbeelding te gebruiken. Onthoud dat u slechts een kleurkanaal per keer kunt dupliceren, en alleen met het contextmenu van met rechts klikken.
-
 Selectie vervangen door de geselecteerde kanalen
-
Dit transformeert de geselecteerde kanalen om een selectie te worden. Standaard vervangt de selectie, die is afgeleid van kanalen, de actieve selectie. U kunt dat veranderen met aanpassingstoetsen.
-
Shift: de selectie, afgeleid van een kanaal, wordt toegevoegd aan de actieve selectie. De uiteindelijke selectie wordt samengesteld uit beide.
-
Ctrl: de uiteindelijke selectie is het aftrekken van de selectie, afgeleid van een kanaal, van de actieve selectie.
-
Shift+Ctrl: de uiteindelijke selectie is de doorsnede van de selectie, afgeleid van een kanaal, met de actieve. Alleen de geselecteerde delen die gemeenschappelijk voor beide zijn worden behouden.
-
-
 Kanaal verwijderen
-
Dit verwijdert de geselecteerde kanalen.
-
- Overzicht
-
U krijgt het contextmenu van Kanalen door met rechts op een kanaal te klikken. Verscheidene bewerkingen voor kanalen zijn ook beschikbaar met de knoppen aan de onderzijde van de lijst met kanalen. Deze bewerkingen zijn hier gedocumenteerd.
Deze opdrachten, uitgezonderd Kanaalattributen bewerken…, werken ook als meerdere kanalen zijn geselecteerd.
- Kanaalattributen bewerken…
-
Alleen beschikbaar voor selectiemaskers. Hier kunt u de Kanaalnaam wijzigen, het Kleurlabel, de kanaalattributen en de attributen voor vergrendelen, en tenslotte de Dekking en gebruikte kleur voor het masker in het afbeeldingsvenster. Een klik op de kleurknop geeft de GIMP kleurkiezer weer, waar u de kleur voor het masker kunt wijzigen.
- Kleurlabels
-
Alleen beschikbaar voor selectiemaskers. Dit stelt u in staat een kleurlabel toe te wijzen aan een of meer geselecteerde kanalen. Als u heel veel kanalen hebt, kan dit het gemakkelijker maken om ze te identificeren door gerelateerde kanalen hetzelfde kleurlabel te geven. Kies, om het kleurlabel te verwijderen, Geen.
- Nieuw kanaal…, Kanalen omhoog, Kanalen omlaag, Kanaal dupliceren, Kanaal verwijderen
-
Zie Kanalen beheren.
- Kanalen naar selectie
-
De selectie die is afgeleid van de geselecteerde kanalen vervangt de eerder actieve selectie.
- Kanalen toevoegen aan selectie
-
De selectie, die is afgeleid van de geselecteerde kanalen, wordt toegevoegd aan de actieve selectie. De uiteindelijke selectie wordt samengesteld uit beide.
- De geselecteerde kanalen van de selectie aftrekken
-
De uiteindelijke selectie is het aftrekken van de selectie, die is afgeleid van de geselecteerde kanalen, van die van de actieve selectie.
- Doorsnede kanalen met selectie
-
De uiteindelijke selectie is de doorsnede van de selectie, die is afgeleid van de geselecteerde kanalen, met die van de actieve. Alleen de geselecteerde delen die gemeenschappelijk voor beide zijn worden behouden.


Kanalen kunnen worden gebruikt om uw selecties op te slaan en terug te zetten. In het dialoogvenster Kanalen kunt u een miniatuur zien dat de selectie weergeeft. Selectiemaskers zijn een grafische manier om selecties te bouwen in een kanaal voor grijswaarden, waar witte pixels worden geselecteerd en zwarte pixels niet worden geselecteerd. Daarom worden grijze pixels gedeeltelijk geselecteerd. U kunt aan ze denken als aan het vervagen van de selectie, een gladde overgang tussen geselecteerd en niet geselecteerd. Dit is belangrijk om het lelijke effect van pixelisatie te vermijden als u de selectie vult of als u de inhoud ervan verwijdert na een onderwerp van de achtergrond te hebben geïsoleerd.
- Selectiemaskers maken
-
Er zijn verschillende manieren om een selectiemasker te initialiseren.
-
Uit het hoofdmenu → als er een actieve selectie is.
-
In het afbeeldingsvenster maakt de knop linksonder
 een Snelmasker; de inhoud zal dan worden geïnitialiseerd met de actieve selectie.
 -
Uit het dialoogvenster Kanalen, als u klikt op de knop Nieuw kanaal of uit het contextmenu. Indien gemaakt verschijnt dit Selectiemasker in het dialoogvenster Kanalen, genaamd “Selectiemasker kopiëren” met een volgnummer. U kunt dat wijzigen met het contextmenu dat u krijgt door met rechts te klikken op het kanaal.
-
Als het kanaal eenmaal is geïnitialiseerd, geselecteerd (blauw geaccentueerd), zichtbaar (pictogram oog in het dialoogvenster) en weergegeven zoals u wilt (attributen voor kleur en doorzichtbaarheid), kunt u beginnen met het werken met alle tekengereedschappen. De gebruikte kleuren zijn belangrijk. Als u tekent met een andere kleur dan wit, grijs of zwart, zal de Waarde (lichtheid) van de kleur worden gebruikt om een grijs te definiëren (medium, licht of donker). Wanneer uw masker is getekend, kunt u het transformeren naar een selectie door te klikken op de knop
![]() (Kanaal naar selectie) of uit het contextmenu.
(Kanaal naar selectie) of uit het contextmenu.
U kunt niet alleen in selectiemaskers werken met de tekengereedschappen, maar ook met andere gereedschappen. U kunt bijvoorbeeld de gereedschappen voor selecteren gebruiken om gebieden uniform te vullen met kleurverlopen of patronen. Door selectiemaskers toe te voegen in uw lijst kunt u heel gemakkelijk heel complexe selecties samenstellen. Men kan zeggen dat een selectiemasker voor een selectie is als een laag voor een afbeelding.
|
|
Let op |
|---|---|
|
Zo lang als een selectiemasker is geactiveerd, werkt u in het masker en niet op de afbeelding. U moet alle selectiemaskers deactiveren om op de afbeelding te kunnen werken. Vergeet niet om te stoppen met het weergeven van maskers in de afbeelding door het pictogram oog te verwijderen. Controleer ook of alle kanalen RGB en Alfa zijn geactiveerd en worden weergegeven in de afbeelding. |
Een Snelmasker is een Selectiemasker, bedoeld om tijdelijk te worden gebruikt om een selectie te kleuren. Tijdelijk betekent dat, anders dan met een normaal selectiemasker, het uit de lijst met kanalen zal worden verwijderd na zijn transformatie naar de selectie. De gereedschappen voor selecteren laten soms hun beperkingen zien als zij moeten worden gebruikt voor het uitvoeren van het complex tekenen van selecties, als progressief. In dat geval is het gebruiken van het Snelmasker een goed idee, dat heel goede resultaten kan geven.
Het Snelmasker kan op verschillende manieren worden geactiveerd:
-
Vanuit het hoofdmenu: → .
-
Door te klikken op de knop
linksonder, geaccentueerd in de schermafdruk. -
Door de Shift+Q snelkoppeling te gebruiken.
Klik, om een Snelmasker te initialiseren, op de knop
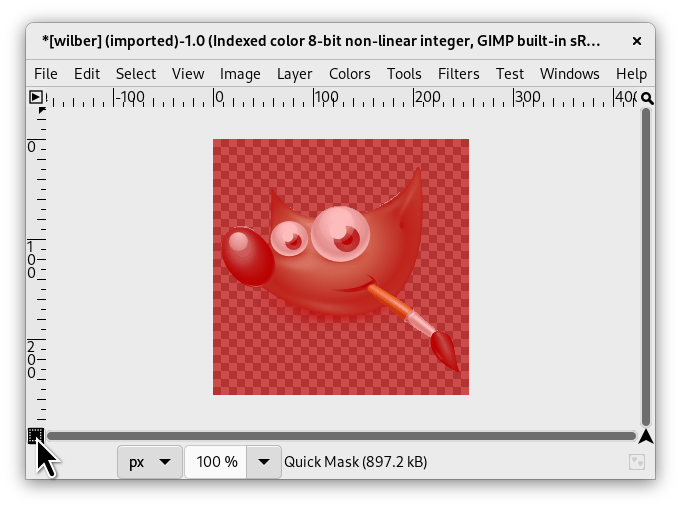
![]() linksonder in het afbeeldingsvenster. Als er een selectie actief was in uw afbeelding, dan verschijnt de inhoud daarvan ongewijzigd, terwijl de rand wordt bedekt door een doorzichtige rode kleur. Indien er geen selectie actief was, dan wordt de gehele afbeelding bedekt met een doorzichtige rode kleur. Een volgende klik op de knop linksonder zal het snelmasker uitschakelen.
linksonder in het afbeeldingsvenster. Als er een selectie actief was in uw afbeelding, dan verschijnt de inhoud daarvan ongewijzigd, terwijl de rand wordt bedekt door een doorzichtige rode kleur. Indien er geen selectie actief was, dan wordt de gehele afbeelding bedekt met een doorzichtige rode kleur. Een volgende klik op de knop linksonder zal het snelmasker uitschakelen.
Vanuit het dialoogvenster Kanalen kunt u dubbelklikken op de naam of de miniatuur om de attributen van QMask te bewerken. Dan kunt u de Dekking van opvulling wijzigen en de vulkleur. U kunt het masker op elk moment verbergen door te klikken op het pictogram oog
![]() voor het snelmasker.
voor het snelmasker.
Het masker is gecodeerd in grijswaarden, dus u moet wit of grijs gebruiken om het door het masker beperkte gebied te verkleinen en zwart om het te vergroten. De gebieden die in licht- of donkergrijs zijn getekend zullen de overgangsgebieden voor de selectie zijn, zoals vervagen van randen. Wanneer uw masker gereed is, klik opnieuw op de knop linksonder in het afbeeldingsvenster en het snelmasker zal worden verwijderd uit de lijst met kanalen en worden geconverteerd naar een selectie.
Het doel van snelmasker is om een selectie en zijn overgangen te tekenen met de gereedschappen voor tekenen, zonder u zorgen te hoeven maken over het beheren van de selectiemaskers. Het is een goede manier om een onderwerp in een afbeelding te isoleren, omdat, als eenmaal de selectie is gemaakt, u alleen de inhoud ervan hoeft te verwijderen (of te inverteren als het onderwerp in de selectie staat).
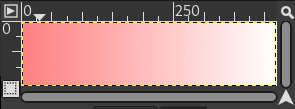
Schermafdruk van het afbeeldingsvenster met geactiveerd Snelmasker. Zolang het Snelmasker is geactiveerd, worden alle bewerkingen daarop uitgevoerd. Een verloop van zwart (links) naar wit (rechts) is toegepast op het masker.
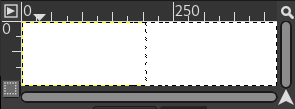
Het Snelmasker is nu uitgeschakeld. De selectie bezet nu het rechter halve gedeelte van de afbeelding (marcherende mieren), omdat de grens van de selectie in het midden van de afbeelding ligt.
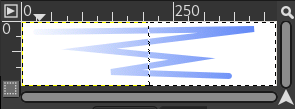
Een penseelstreek wordt nu toegevoegd met de selectie ingeschakeld. Raar! Het verloop, hoewel niet zichtbaar, blijft actief over de gehele afbeelding, in geselecteerde en niet geselecteerde gebieden!
Nadat op de knop Snelmasker is gedrukt, genereert de opdracht een tijdelijk 8-bit (0-255) kanaal, waarin het progressieve selectiewerk wordt opgeslagen. Als een selectie al aanwezig is, wordt het masker geïnitialiseerd met de inhoud van de selectie. Als Snelmasker eenmaal is geactiveerd, wordt de afbeelding bedekt door een rode semi-transparante sluier. Dat geeft de niet geselecteerde pixels weer. Elk gereedschap voor tekenen mag worden gebruikt om de selectie voor het Snelmasker te maken. Zij zouden alleen de kleuren van grijswaarden moeten gebruiken, conform de eigenschappen van de kanalen, wit ingeschakeld om de toekomstige geselecteerde plaats te definiëren. De selectie zal worden weergegeven zodra het Snelmasker zal worden geschakeld, maar zijn tijdelijke kanaal zal niet meer beschikbaar zijn.
|
|
Tip |
|---|---|
|
Selecteer in het hoofdmenu, om de selectie die is gemaakt met een Snelmasker op te slaan in een kanaal, → . |
-
Open een afbeelding of begin een nieuw document.
-
Activeer het Snelmasker met de knop linksonder in het afbeeldingsvenster. Als een selectie aanwezig is, zal het masker worden geïnitialiseerd met de inhoud van de selectie.
-
Kies een tekengereedschap en gebruik het met kleuren in grijswaarden op het Snelmasker.
-
Deactiveer het Snelmasker met de knop linksonder in het afbeeldingsvenster.


