| 2.3. Banedialogvindauget | ||
|---|---|---|

|
2. Dialogvindauge relaterte til biletstruktur |  |
| 2.3. Banedialogvindauget | ||
|---|---|---|
|
|
2. Dialogvindauge relaterte til biletstruktur | |
Banedialogvindauget vert brukt når du skal arbeida på banar. Frå dette dialogvindauget kan du oppretta eller fjerna banar, lagra dei, omforma dei til og frå utval osv. Sjå Del 4, « Banar » for meir om banar.
Dette er eit dokkpanel som kan limast inn i andre dokkpanel. Sjå nærare om dette i Del 2.3, «Dialogvindauge og dokkpanel».
Du har tilgang til det:
Frå hovudmenyen via → → .
Frå fanemenyen i eit dokkpanel ved å klikka på fanen
![]() og velja → .
og velja → .
I menyen finn du ei liste over løyste vindauge viss minst eitt dialogvindauge er ope. Du kan i tilfelle løfta «banedialogvindauget» frå hovudmenyen: → .
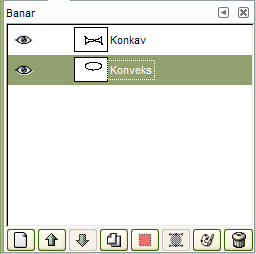
Dette dialogvindauget viser ei liste over alle banane brukte i det gjeldande biletet. For kvar bane kan du setja opp innstillingane slik det er forklart nedanfor. Du kan også utføra bestemte handlingar ved å bruka knappane nedst i dialogvindauget eller ved å bruka sprettoppmenyen.
I multivindaugemodus kan du visa namnet på det gjeldande biletet øvst i vindauget ved å velja ➻Vis opne bilete i fanemenyen. Dette gjer at du raskt kan sjå kva biletet banane høyrer til i.
Dersom det finst namn i lista, vil eit av dei vera markerte for å visa kva for bane som er den gjeldande banen i biletet. Det er denne banen alle operasjonane vert utførte på når du brukar dialogmenyen eller knappane nedst i dialogvindauget. Du kan klikka på lista for å gjera ønskt bane til den gjeldande.
Høgreklikkar du på ei av oppføringane i lista, vil du få opp den lokale banemenyen. Du har også tilgang til banemenyen frå fanemenyen i dialogvindauget.
I GIMP kan du merkja fleire banar og utføra handlingar på dei som å streka dei opp eller fylla dei. Du merkjer fleire banar ved å halda nede Shift-tasten medan du brukar musepeikaren for å leggja til fleire banar, eller Ctrl-tasten for å leggja til eller fjerna banen du klikka på.
Du finn overskriftslinja like over banelista. Til venstre finn du ikona som identifiserer om banen er synleg eller låst. I midten ein tekst som fortel kor mange banar som er merkte viss det er meir enn éin.
Kvar bane vert vist i lista saman med attributta for banen. Dette er nokså likt det som er brukt for lagattributta:
I standardoppsettet er banane usynlege. Dette ikonet vert vist når banane er synlege. Du slår av og på visinga ved å klikka på ikonet. Når ein bane er «synleg», vert det teikna ei ramme rundt kvart banesegment i biletvisinga. Dette endrar ikkje pikseldataa i biletet. Held du nede Shift-tasten medan du klikkar, vert alle dei andre banane gøymde.
Kvar bane kan låsast. Viss éin av banane er låst, vert låsikonet vist framføre miniatyren.
Når det er sett fleire attributt, vert det sett eit dobbelt låsikon her. Du kan endra attributta ved å klikka på dette ikonet.
Dette ikonet viser om «lås pikslar» er slått på for den gjeldande banen. Når dette er slått på, er banen låst for alt som endrar han, noko som betyr at det ikkje vert gjort nokre endringar i denne banen. Klikk på ikonet for å veksla mellom å slå banen av og på.
Dette ikonet viser om «lås baneposisjonen» er slått på for den gjeldande banen. Når slått på, er banen låst for alle handlingar som vil endra plasseringa. Klikking på dette ikonet vekslar mellom å slå av og på.
Denne vekselbrytaren styrar «låsinga» for om banen er synleg eller ikkje. Viss denne er slått på, kan visinga av banen ikkje endrast før du slår låsen av igjen.
Effekten av banen vert vist i ei lita førehandsvising. Du kan forstørra førehandsvisinga ved å halde nede den venstre museknappen over ho. Viss du drar miniatyren inn i lagdialogvindauget vert det laga eit nytt lag med ein rastert kopi av banen.
Namnet på banen må vera unikt. Dersom du gjev banen eit namn som er i bruk frå før, vert det lagt til eit tal, t.d. «#1» for å gjera namnet eineståande.
Det er tre knappar nedst har desse funksjonane:
Desse knappane samsvarar med tilsvarande oppføringar i sprettoppmenyen som dukkar opp når du høgreklikkar på ei oppføring i lista. Nokre av knappane har likevel nokre tilleggsfunksjonar som vert tilgjengelege når du held nede ein kontrolltast medan du klikkar på ein av knappane.
Sjå Ny bane. Held du nede Shift-tasten, vert det laga ein ny, tom, bane med dei sist brukte innstillingane utan å opna dialogvindauget for «Ny bane».
Sjå Lyft bane. Held du nede Shift-tasten, vert den valde banen flytt til øvst i lista.
Sjå Senk banane. Held du nede Shift-tasten, vert den valde banen flytt til nedst i lista.
Sjå Dupliser banar.
Omformar den gjeldande banen til eit utval. Sjå meir om denne prosessen under bane til utval. Du kan bruka kontrolltastane for å bestemma korleis det nye utvalet skal leggjast inn i høve til utvala som finst:
| Tast | Handling |
|---|---|
| Ingen | Byt med eksisterande utval |
| Forskyv | Legg til i utvalet |
| Ctrl | Trekk frå utvalet |
| Forskyv+Ctrl | Snitt med utvalet. |
Held du nede Shift-tasten medan du klikkar, kjem dialogvindauget Avanserte innstillingar opp. Her kan du bestemma korleis utvalet skal konverterast til ein bane.
Sjå Strek opp banar. Held du nede Shift-tasten, vert banen streka opp med dei sist brukte verdiane utan å opna dialogvindauget for «Strek opp bane».
slettar dei merkte banane.
Den enklaste måte å få fram banemenyen er å høgreklikka på ei vising av ein bane i banedialogvindauget. Men du kan også klikka på fanemenyen og velja banemenyen derifrå. Banemenyen gjev tilgang til dei aller fleste funksjonane du kan bruka på ein bane.
Dette er berre ein annan måte å få tilgang til baneverktøyet på. Dette verktøyet vert brukt for å oppretta og forandra banar. Du kan også opna det frå verktøykassa eller med snartasten B.
Denne menyoppføringa lovar nok meir enn ho kan halda, for det einaste du kan bruka ho til, er å gje banen eit nytt namn i dialogvindauget som dukkar opp. Du kan oppnå det same ved å dobbeltklikka på banenamnet i banedialogvindauget.
Fargetagg opnar ein undermeny, lik den i dialogvindauget for lag, der du kan velja fargetagg for dei valde banane.
«Ny bane» opprettar ein ny bane og legg denne til lista i banedialogvindauget og gjer han til den gjeldande banen. Du får også opp dialogvindauget for å gje den nye banen eit namn. Den nye banen har ingen former for ankerpunkt, så du må bruka baneverktøyet for å leggja inn slike punkt før du kan bruka banen til noko som helst.
Kopier banarflyttar dei gjeldande banane eitt hakk opp i banedialogvindauget.
Kva plass banen har i lista betyr ingenting for bruken av han, men det kan vera til litt hjelp for å halda oversynet.
Senk banar flyttar dei merkte banane eitt hakk lågare i banedialogvindauget.
Kva plass banen har i lista betyr ingenting for bruken av han, men det kan vera til litt hjelp for å halda oversynet.
Dupliser banane lagar ein kopi av dei merkte banane, gjev kopiane unike namn, legg dei til i lista i banedialogvindauget og gjer dei til dei gjeldande banane i biletet. Kopiane vert synlege berre viss dei opphavlege banane var synlege.
slettar dei merkte banane.
Dersom du klikkar på denne, vert alle synlege banar i biletet, dvs. banar som har synleg augesymbol i banedialogvindauget, henta fram og sett saman til delar i ein og same bane. Dette kan vera nyttig dersom du ønskjer å streka dei opp med t.d. det same strekmønsteret.
Desse kommandoane omformar dei gjeldande banane til eit utval og kombinerer dette med utvalet som finst frå før på dei spesifiserte måtane. (Unntaket er Bane til utval byter ut utvalet som finst frå før med eit utval laga av banane). Eventuelle opne banar vert lukka med ei rett linje mellom det første og det siste ankerpunktet. Dei «marsjerande maura» som markerar grensa for utvalet, vil følgja nokså nøyaktig der banen var, men vent ikkje at resultatet skal verta perfekt.
Du har tilgjenge til denne operasjonen på fleire måtar:
Frå hovudmenyen via →
Frå banedialogvindauget via .
Frå knappen
![]() nedst i banedialogvindauget.
nedst i banedialogvindauget.
Utval til bane lagar ein ny bane frå omrisset av det gjeldande utvalet. Som oftast vil banen følgja «dei marsjerande maura» som viser omrisset, men ofte kan det verta små avvik.
Konverteringa av ei todimensjonalt utvalsmaske til ein eindimensjonal bane treng litt spesiell matematikk. Du kan forandra måten dette vert gjort på ved å opna dialogvindauget Avanserte innstillingar. Denne får du tilgang til ved å halde nede Shift-tasten medan du trykkjer på knappen
![]() nedst i banedialogvindauget. Dette vil opna dialogvindauget for Avanserte innstillingar der du kan bestemme mange av innstillingane. Som oftast vil utval til bane gjera det du ventar, utan at du treng bry deg med å endra dei avanserte innstillingane.
nedst i banedialogvindauget. Dette vil opna dialogvindauget for Avanserte innstillingar der du kan bestemme mange av innstillingane. Som oftast vil utval til bane gjera det du ventar, utan at du treng bry deg med å endra dei avanserte innstillingane.
Du har tilgjenge til denne operasjonen på fleire måtar:
Frå hovudmenyen via →
Frå banedialogmenyen via .
Frå knappen i innstillingane for baneverktøyet.
Fyll banar fyller alle områda avgrensa av dei valde banane med den gjeldande forgrunnsfargen eller det gjeldande mønsteret. SjåFyll bane for meir om dette.
Du har tilgjenge til denne operasjonen på fleire måtar:
Frå hovudmenyen via →
Frå banedialogmenyen via .
Frå knappen
![]() nedst i banedialogvindauget.
nedst i banedialogvindauget.
Frå knappen i innstillingane for baneverktøyet.
Strek opp banane teiknar dei merkte banane på det gjeldande biletlaget ved hjelp av ulike linjestilar og teiknemåtar. Sjå Strek opp banane og Strok for meir informasjon.
Kopier banarkopierer dei gjeldande banane over i utklippstavla for banar slik at du kan lima dei inn i eit anna bilete.
![[Tips]](images/tip.png)
|
Tips |
|---|---|
|
Du kan også kopiera og lima inn banar ved å dra ikona deira i banedialogvindauget over til eit biletvindauge. |
![[Notat]](images/note.png)
|
Notat |
|---|---|
|
Når du kopierer ein bane til eit biletet, er banen usynleg. Du må gjere han synleg i banedialogvindauget. |
Lim inn banelagar ein ny bane frå den som ligg i utklippstavla, legg han inn i lista i banedialogvindauget og gjer han til den gjeldande banen i biletet. Dersom det ikkje finst ein bane i utklippstavla, er denne menykomponeneten slått av.
Eksporter banar … gjer at du kan lagra ein bane i ei fil. Du får opp eit dialogvindauge der du kan velja filnamn og plasseringa. Denne banen kan du seinare leggja inn i kva GIMP-bilete som helst ved å bruka Importer bane. Lagringsformatet for banefiler er SVG. Dette betyr at banefilene kan opnast i program for vektorgrafikk som t.d. Inkscape. Sjå meir om SVG-filer og korleis dei kan brukast i GIMP i banar.
Importer bane … lagar ein ny bane frå ei SVG-fil. Du får opp eit dialogvindauge der du kan finna fram til fila. Sjå meir om SVG-filer og korleis dei kan brukast i GIMP i banar .