| 2.8. Sakseverktøyet | ||
|---|---|---|

|
2. Utvalsverktøya |  |
| 2.8. Sakseverktøyet | ||
|---|---|---|
|
|
2. Utvalsverktøya | |
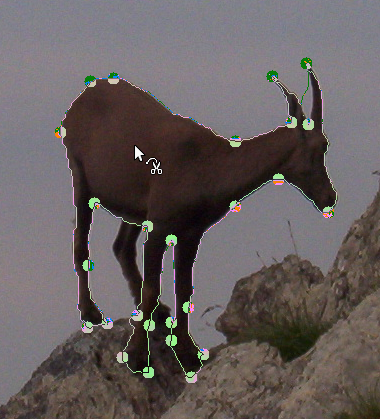
«Den intelligente saksa» er eit interessant stykke verktøy. Ho kan likna litt på «lassoen», men har også ein del av eigenskapane til baneverktøyet, i tillegg til nokre som er spesielle for dette verktøyet. Saksa er særleg nyttig for å velja ut område som er avgrensa med sterke fargekontrastar. Når du brukar saksa, klikkar du av for eit sett med «kontrollpunkt» rundt kanten av det området du ønskjer å velja ut. Saksa vil setja opp ei kurve som går gjennom desse kontrollpunkta. Mellom desse punkta vil kurva følgja mest mogleg dei fargekantane som måtte finnast. Dersom du er heldig, vil dette også vera konturen av det området du ønskjer å markera.
Diverre ser det ut til at verktøyet har problem med å følgja kantane slik som tiltenkt, noko som fører til at utvalet kan verta nokså grovt til sine tider. Skulle dette skje, kan du retta opp dette ved hjelp av snarmaska og teikna over problemområda med eit teikneverktøy. Som oftast vil baneverktøyet vera betre eigna enn saksa til denne typen arbeid. Baneverktøyet har ikkje evne til å følgja kantar, men banane kan endrast når du måtte ønskje, og vert ståande til du fjernar dei.
Du kan slå på verktøyet på mange måtar:
Frå hovudmenyen via → → .
Ved å klikka på verktøysymbolet
![]() i verktøykassen.
i verktøykassen.
Ved å bruka snarvegen I.
Normalinnstillingane for tastane Shift, Ctrl og Alt er omtalet i Del 2.1.1, «Valtastane (normalinnstillinga)» for alle utvalsverktøya.
Ein av valtastane har likevel ein noko spesiell funksjon dersom du brukar han medan du redigerer eit utval etter at du har lagt til den første noden:
Saksa er normalt sett opp slik at når du klikkar med musepeikaren vil saksa plassere det nye kontrollpunktet der fargeskiftinga er maksimal.
Held du nede denne tasten, vert denne funksjonen kopla ut. Kontrollnoden vert plassert der musepeikaren er når du klikkar.
Rettetasten fjernar det segmentet som vart teikna sist. Escape kansellerer alle utvalssegmenta.
Kvar gong du venstreklikkar med museknappen, set du av eit kontrollpunkt. Dette vert bunde til det førre kontrollpunktet med ei kurve som prøver å følgja fargeskilnadane i biletet. For å avslutta, klikkar du på det første punktet. (Markøren endrar utsjånad for å visa at du har funne det første punktet). Du kan justera kurva ved å dra i kontrollpunkta, eller setja inn nye punkt. Når resultatet er slik du vil ha det, klikkar du ein eller annan stad innføre området for å laga kurvene om til eit utval.
Som sagt tidlegare, lagar du markeringa ved å klikka inn punkt på høvelege stader. Desse punkta bestemmer omrisset for markeringa. Med unnatak for det første og det siste punktet, kan du flytta punkta ved å dra og sleppe dei der du måtte ønskje. Markeringa vert lukka ved å klikka det siste punktet over det første. Når markeringa vert lukka, vil markøren skifta utsjånad for å visa kor han er i høve til markeringa: innføre
 , på kanten
 og på utsida
 . Du kan finjustera markeringa ved å oppretta nye kontrollpunkt ved å klikka på omrisset av markeringa eller ved å flytta punkt som finst frå før. Når alt er som det skal vera, klikkar du på innsida av markeringa for å gjera ho om til eit utval.
Det er berre råd å laga eitt utval på denne måten. Prøver du å laga ei ny markering, vil det første utvalet forsvinna når du omformar den nye markeringa til eit utval.
![[Åtvaring]](images/warning.png)
|
Åtvaring |
|---|---|
|
Ikkje klikk innføre området før du er sikker på at markeringa er slik du vil ha ho. Angreloggen registrerer ikkje kvart enkelt klikk. Klikkar du på «Angra», vert du ført tilbake til biletet slik det var før du byrja å bruka saksa, og du må byrja heilt frå nytt igjen. Klikkar du deg over til eit anna verktøy, vil også alle punkta du har prikka inn forsvinna. Du kan likevel omforma markeringa til ein bane og arbeida vidare på denne med baneverktøyet. |
Korleis du kan flytta dette utvalet er nærare omtalt i avsnittet å flytta utval. (Du kan flytta omrisset for utvalet med piltastane, men ikkje med musepeikaren).
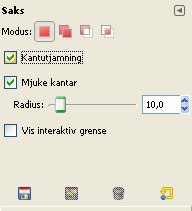
Normalt vert innstillingane for det valde verktøyet vist under verktøykassa så snart som du slår på verktøyet. Dersom dette ikkje er tilfelle, kan du få tilgang til dei frå biletmenyen via → → som vil opna verktøyinnstillingane for det valde verktøyet.
![[Notat]](images/note.png)
|
Notat |
|---|---|
|
Mange av innstillingane er felles for alle utvalsverktøya og er nærare omtalte i Innstillingar for utvalsverktøy. Berre innstillingar som er spesifikke for dette verktøyet er omtalte her. |
Dersom du har slått på dette valet, vil GIMP visa stien som grensemarkeringa vil ta frå det førre markeringspunktet og til det nye. Dersom dette valet ikkje er slått på, vil GIMP visa ei rett linje frå det førre markeringspunktet og til det nye. Først når du slepp museknappen vert den valde grensa markert. Dersom du har ein treg maskin og store avstandar mellom kontrollpunkta, kan det vera litt hjelp i å ikkje bruka dette valet.