| 2.2. New… | ||
|---|---|---|

|
2. O menu “Arquivo” |  |
| 2.2. New… | ||
|---|---|---|
|
|
2. O menu “Arquivo” | |
Using the “Create a New Image” dialog, you can create a new empty image and set its properties. The image is shown in a new image window. You may have more than one image on your screen at the same time.
You can access this command from the main menu through → ,
ou usando o atalho de Ctrl+N.
Em vez de digitar todos os valores à mão, você pode selecionar alguns valores pré-definidos para a sua imagem a partir de um menu de modelos, que representam os tipos de imagens que são geralmente mais úteis. Os modelos definem valores para o tamanho, resolução, comentários, etc Se houver um tamanho de imagem em particular que você use com frequência e ele não aparece na lista, você pode criar um novo modelo, usando o diálogo de Modelos.
Aqui você definir a Largura e a Altura da nova imagem. As unidades padrão são pixels, mas você pode escolher uma unidade diferente, se preferir, utilizando o menu ao lado. Se você fizer isso, note que o tamanho em pixels resultante é determinado pela resolução X e Y (que você pode mudar nos Opções Avançadas), e definindo “Um ponto por pixel” no menu .
Se nenhuma imagem está aberta, a “Nova” imagem é aberta na janela de imagem vazia, com o tamanho que você determinou. Se você abrir a nova imagem enquanto outra estiver aberta, então ela será aberta em outra janela, ou outra guia no modo de janela única, com o mesmo tamanho da primeira imagem.
These buttons toggle between Portrait and Landscape mode. Their effect is to exchange the values for Width and Height. If the X and Y resolutions are different (in Advanced Options), then these values are also exchanged. On the right, image size, image resolution and color space are displayed.
The Advanced Options are mostly of interest to more advanced GIMP users. You can display these options by clicking on the small triangle on the lower edge of the dialog window. Note that you will need to scroll down to see all the available options.
Os valores na resolução X e resolução Y campos referem-se principalmente à impressão: elas não afetam o tamanho da imagem em pixels, mas podem determinar o seu tamanho físico, quando se é impresso. Os valores de resolução X e Y pode determinar como os pixels são traduzidos para outras unidades de medida, como milímetros ou polegadas.
![[Dica]](images/tip.png)
|
Dica |
|---|---|
|
If you want to display the image on the screen at the correct dimensions, select → Set the zoom factor to 100% to see the image at its true screen size. The calibration of the screen size is normally done when GIMP is installed, but if the image does not display at the correct size, you may have to adjust the screen parameters in GIMP. You can do this in the Preferences dialog. |
Você pode criar a nova imagem em diferentesmodos de cor, seja uma imagem RGB ou uma imagem em Tons de cinza.
A imagem é criada no sistema Vermelho, Verde, e Azul, que é a usada pelo monitor ou tela da televisão.
The image is created in black and white, with various shades of gray. Aside from your artistic interests, this type of image may be necessary for some plug-ins. Nevertheless, GIMP allows you to change an RGB image into grayscale, if you would like.
Você não pode criar uma imagem indexada diretamente deste diálogo, mas é claro que você sempre pode converter a imagem para o modo indexado após ela ter sido criada. Para isso, use o comando → →
This setting lets you define the encoding used to store pixel information. For more details, please see the Image Encoding section.
Five options are available:
8-bit integer
16-bit integer
32-bit integer
16-bit floating point
32-bit floating point
If you wonder what the difference is between integer and floating point (in the graphics area): If you have an image with 16-bit integer precision per channel, then you have 65,536 shades of different red, green and blue color tones – all of them equally stepped to each other (equal color distance). If you have it in floating point, then there are no equal-wide steps – so you can distribute the possible color values over selected ranges. For example: if you know that you have a very dark image with many shades of dark red color tones then you would benefit from floating point because you can decrease the importance of the brighter color tones and get most color detail out of only the darker reds.
Figura 16.4. Precision example
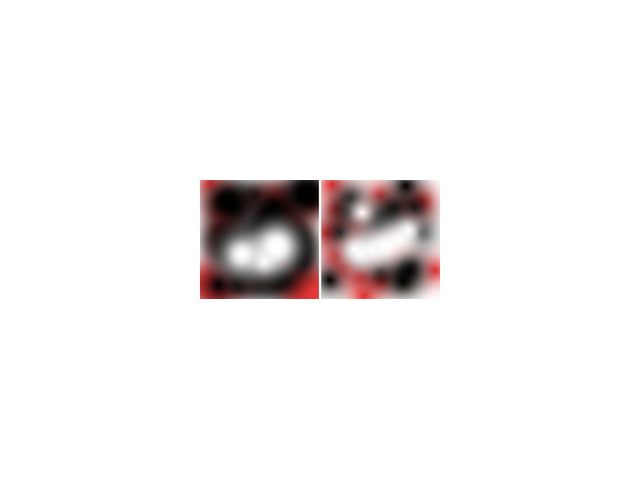
Left image is 8-bit, right is 32-bit. You can see that there are much more available colors between color transitions on the right image.
Here you can choose the channel encoding for your image. Choices are Non-linear and Linear light. For 8-bit integer precision the default is Non-linear, and for 32-bit floating point precision it is Linear light. For more information see which precision options should you choose.
Here you can choose a color profile to be used for your image. The default is GIMP's standard color profile based on Color space, Precision, and Gamma. If you prefer to use a different color profile you can select an ICC color profile file from a location on your computer by choosing Select color profile from disk….
You can attach a CMYK color profile to the image with this option. This profile will be used to create a soft-proofed display of the image when the Proof Colors option is enabled in the View menu. As with the Color Profile, if you prefer to use a different color profile you can select an ICC color profile file from a location on your computer by choosing Select color profile from disk….
This option lets you select the rendering intent that will be used to convert the colors from the soft-proofed image to your display device when → → is enabled. The four intents are “Perceptual”, “Relative colorimetric”, “Saturation” and “Absolute colorimetric”. See Seção 6.4, “Color Management” and Seção 6.8, “ Color Management ” for more information.
When enabled, the BPC algorithm attempts to adjust the display of darker areas in the image when the Proof Colors option is enabled in the View menu.
Here, you specify the background color that is used for your new image. It is certainly possible to change the background of an image later, too. You can find more information about doing that in the Layers Dialog.
Existem várias opções:
Preencha a imagem com a Cor de frente atual, como mostrada na Caixa de ferramentas.
Note que você pode mudar a cor de Frente enquanto o diálogo de “Nova Imagem” está aberto, antes de clicar em OK.
Preenche a imagem com a Cor de fundo atual, como mostrada na caixa de ferramentas. (Você pode alterar a cor de fundo também, enquanto a janela de diálogo está aberta).
Fill the image with Middle Gray (CIELAB). This will create a layer with a gray color that is 50% of perceptual lightness in the selected color mode.
Preencha a imagem com Branco.
Preencher a imagem com Transparência. Se você escolher esta opção, a imagem é criada com um canal alfa e o fundo é transparente. As partes transparentes da imagem da imagem são exibidos com um padrão xadrez para indicar a transparência.
Fill the image with a Pattern. If you choose this option, the image is filled with the currently active pattern (which you can change while this dialog is open).
Você pode escrever um comentário descritivo aqui. O texto é anexado à imagem como um parasita, e é exportado junto com a imagem em alguns formatos de arquivo (PNG, JPEG, GIF).
![[Nota]](images/note.png)
|
Nota |
|---|---|
|
Você pode visualizar e editar este comentário no diálogo de Propriedades da Imagem. |