| Cap. 12. Enrich my GIMP | ||
|---|---|---|

|
Parte II. How do I Become a GIMP Wizard? |  |
| Cap. 12. Enrich my GIMP | ||
|---|---|---|
|
|
Parte II. How do I Become a GIMP Wizard? | |
Cuprins
Vi s-a întâmplat, probabil, de multe ori să aveți nevoie de a plasa ceva într-o imagine foarte precis, și ați constatat că nu este ușor de făcut cu ajutorul unui maus. De multe ori puteți obține rezultate mai bune utilizând tastele săgeți de pe tastatură (care mută obiectul în cauză cu un pixel la un moment dat, sau 25 pixeli dacă țineți apăsat tasta Shift), dar GIMP oferă, de asemenea, alte două ajutoare pentru a face poziționare mai ușoară: grile și ghidaje.
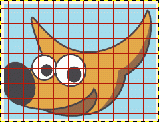
Each image has a grid. It is always present, but by default it is not visible until you activate it by toggling → in the main menu. If you want grids to be present more often than not, you can change the default behavior by checking Show grid in the Image Windows Appearance page of the Preferences dialog. (Note that there are separate settings for Normal Mode and Fullscreen Mode.)
The default grid appearance, set up when you install GIMP, consists of solid lines, spaced every 10 pixels both vertically and horizontally. You can customize the default grid using the Default Image Grid page of the Preferences dialog. If you only want to change the grid appearance for the current image, you can do so by choosing → from the main menu: this brings up the Configure Grid dialog.
Not only can a grid be helpful for judging distances and spatial relationships, it can also permit you to align things exactly with the grid, if you toggle → in the main menu: this causes the pointer to "warp" perfectly to any grid line located within a certain distance. You can customize the snap distance threshold by setting "Snap distance" in the Tool Options page of the Preferences dialog, but most people seem to be happy with the default value of 8 pixels. (Note that it is perfectly possible to snap to the grid even if the grid is not visible. It isn't easy to imagine why you might want to do this, though.)
![[Notă]](images/note.png)
|
Notă |
|---|---|
|
To create a grid that is actually part of the image, use the Grid plug-in. |
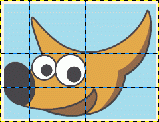
În plus față de grila de imagine, GIMP vă oferă, de asemenea, un tip mai flexibil de ajutor de poziționare: ghidajele. Acestea sunt linii orizontale sau verticale pe care le puteți afișa temporar pe o imagine în timp ce lucrați la aceasta.
Pentru a crea un ghidaj, pur și simplu apăsați clic pe una dintre rigle în fereastra de imagine și trageți un ghid, cu menținere apăsată a al mausului. Ghidajul este apoi afișat ca o linie albastră, punctată, care urmează indicatorul. De îndată ce creați un ghidaj, instrumentul „Mutare” este activat și indicatorul mausului se modifică în pictograma Mutare.
Puteți crea, de asemenea, un ghidaj cu comanda Ghidaj nou, care vă permite să plasați cu exactitate Ghidajul pe imagine, cu comanda Ghidaj nou (în procente), sau cu comanda Ghidaj nou din selecție.
You can create as many guides as you like, positioned wherever you like. To move a guide after you have created it, activate the Move tool in the Toolbox (or press the M key), you can then click and drag a guide; click-and-drag the intersection of two guides to move them together. To delete a guide, simply drag it outside the image. Holding down the Shift key, you can move everything but a guide, using the guides as an effective alignment aid.
Comportamentul ghidajelor depinde de modul de mutare(afectare) al instrumentului „Mutare”. Când este selectat modul Strat, indicatorul mausului se transformă într-o mână mică, de îndată ce se apropie de un ghidaj. Apoi, Ghidajul este activat și se colorează în roșu, și-l puteți muta sau șterge prin mutarea lui înapoi în riglă. Dacă este selectat modul Selecție, puteți poziționa un ghidaj, dar pe urmă nu se poate muta.
As with the grid, you can cause the pointer to snap to nearby guides, by toggling → in the main menu. If you have a number of guides and they are making it difficult for you to judge the image properly, you can hide them by toggling → . It is suggested that you only do this momentarily, otherwise you may get confused the next time you try to create a guide and don't see anything happening.
Dacă vă este mai ușor, puteți schimba comportamentul implicit pentru ghidaje în Aspect fereastră de imaginedin pagina de dialog Preferințe. Dezactivarea pentru Arată ghidajele este, probabil, o idee proastă, totuși, trebuie menționată .
Puteți elimina ghidajele cu comanda → → .
|
|
Notă |
|---|---|
|
Another use for guides: the Slice Using Guides plug-in can use guides to slice an image into a set of sub-images. |