| Kapitel 12. Berika mitt GIMP | ||
|---|---|---|

|
Del II. Hur blir jag en GIMP-gud? |  |
| Kapitel 12. Berika mitt GIMP | ||
|---|---|---|
|
|
Del II. Hur blir jag en GIMP-gud? | |
Innehållsförteckning
You will probably have it happen many times that you need to place something in an image very precisely, and find that it is not easy to do using a mouse. Often you can get better results by using the arrow keys on the keyboard (which move the affected object one pixel at a time, or 25 pixels if you hold down the Shift key), but GIMP also provides you with two other aids to make positioning easier: grids and guides.
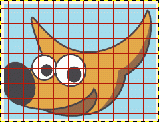
Each image has a grid. It is always present, but by default it is not visible until you activate it by toggling → in the main menu. If you want grids to be present more often than not, you can change the default behavior by checking Show grid in the Image Windows Appearance page of the Preferences dialog. (Note that there are separate settings for Normal Mode and Fullscreen Mode.)
The default grid appearance, set up when you install GIMP, consists of solid lines, spaced every 10 pixels both vertically and horizontally. You can customize the default grid using the Default Image Grid page of the Preferences dialog. If you only want to change the grid appearance for the current image, you can do so by choosing → from the main menu: this brings up the Configure Grid dialog.
Not only can a grid be helpful for judging distances and spatial relationships, it can also permit you to align things exactly with the grid, if you toggle → in the main menu: this causes the pointer to "warp" perfectly to any grid line located within a certain distance. You can customize the snap distance threshold by setting "Snap distance" in the Tool Options page of the Preferences dialog, but most people seem to be happy with the default value of 8 pixels. (Note that it is perfectly possible to snap to the grid even if the grid is not visible. It isn't easy to imagine why you might want to do this, though.)
![[Notera]](images/note.png)
|
Notera |
|---|---|
|
To create a grid that is actually part of the image, use the Grid plug-in. |
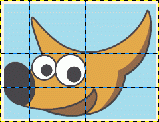
In addition to the image grid, GIMP also gives you a more flexible type of positioning aid: guides. These are horizontal or vertical lines you can temporarily display on an image while you are working on it.
To create a guide, simply click on one of the rulers in the image window and pull out a guide, while holding the mouse pressed. The guide is then displayed as a blue, dashed line, which follows the pointer. As soon as you create a guide, the ”Move” tool is activated and the mouse pointer changes to the Move icon.
You can also create a guide with the New Guide command, which allows you to precisely place the guide on the image, the New Guide (by Percent) command, or the New Guides from Selection command.
You can create as many guides as you like, positioned wherever you like. To move a guide after you have created it, activate the Move tool in the Toolbox (or press the M key), you can then click and drag a guide; click-and-drag the intersection of two guides to move them together. To delete a guide, simply drag it outside the image. Holding down the Shift key, you can move everything but a guide, using the guides as an effective alignment aid.
The behavior of the guides depends upon the Move (Affect) mode of the ”Move” tool. When Layer mode is selected, the mouse pointer turns into a small hand as soon as it gets close to a guide. Then the guide is activated and it turns red, and you can move the guide or delete it by moving it back into the ruler. If Selection mode is selected, you can position a guide, but you cannot move it after that.
As with the grid, you can cause the pointer to snap to nearby guides, by toggling → in the main menu. If you have a number of guides and they are making it difficult for you to judge the image properly, you can hide them by toggling → . It is suggested that you only do this momentarily, otherwise you may get confused the next time you try to create a guide and don't see anything happening.
If it makes things easier for you, you can change the default behavior for guides in the Image Windows Appearance page of the Preferences dialog. Disabling Show guides is probably a bad idea, though, for the reason just given.
You can remove the guides with the → → command.
|
|
Notera |
|---|---|
|
Another use for guides: the Slice Using Guides plug-in can use guides to slice an image into a set of sub-images. |