| 3.3. Relleno de cubeta | ||
|---|---|---|
 |
3. Paint Tools |  |
| 3.3. Relleno de cubeta | ||
|---|---|---|
| |
3. Paint Tools | |
This tool fills a selection with the current foreground color. If you Ctrl+click and use the Bucket tool, it will use the background color instead. Depending on how the tool options are set, the Bucket Fill tool will either fill the entire selection, or only parts whose colors are similar to the point you click on. The tool options also affect the way transparency is handled.
La cantidad de relleno depende del umbral de relleno especificado. El umbral de relleno determina qué tan lejos se esparcirá el color (es similar a la forma en que trabaja la selección difusa). El relleno empieza en el punto en que se hace clic y se esparce hasta que el valor del color o del alfa se vuelve “demasiado diferente”.
Cuando rellene objetos en una capa transparente (como letras en una capa de texto) con un color diferente al anterior, puede encontrar que todavía queda un borde del color antigüo alrededor de los objetos. Esto se debe a que hay un bajo umbral de relleno colocado en el diálogo de opciones del Relleno de cubeta. Con un umbral bajo, el relleno de cubeta no llenará píxeles semitransparentes, y se notará la diferencia con el área rellena porque conservarán su color. Si desea llenar áreas que son completamente transparentes, debe seleccionar clic-derecho|Seleccionar|Todos, y asegurarse de que el botón “Mantener transparencia” (en el diálogo de capas) esté desactivado. Si el botón se encontrara activado, sólo las partes opacas de la capa serán rellenadas, y si no utiliza el comando Seleccionar todos, sólo la “isla opaca” en la que haga clic será rellenada.
If you want to fill areas that are totally transparent, you have to make sure that the “Lock” option (in the Layers dialog) is unchecked. If this option is checked, only the non-transparent parts of the layer will be filled.
You can find the Bucket Fill tool from the image-menu through: → →
You can also call it by clicking the tool icon:
 in the toolbox.
or by pressing the Shift+B keys.
Ctrl cambia el uso del color de fondo o del color de frente.
Shift cambia el uso de Rellenar colores similares a Rellenar la selección completamente.
Normally, tool options are displayed in a window attached under the Toolbox as soon as you activate a tool. If they are not, you can access them from the image menu bar through → → which opens the option window of the selected tool.
See Paint Tools for help with options that are common to all these tools. Only options that are specific to the Bucket Fill tool are explained here.
GIMP provee tres tipos de relleno:
Define el color de relleno usando el actual color de frente.
Define el color de relleno usando el actual color de fondo.
Define el color de relleno usando el patrón seleccionado. Se puede seleccionar el patrón para usar desde la lista.
This drop-down list allows the user to select one of many fill patterns to use on the next fill operation. The manner in which the list is presented is controlled by the four buttons at the bottom of the selector.
Esta opción hace que el GIMP rellene toda la selección existente. Si no hay una selección definida se rellena toda la imagen. Una alternativa más rápida para realizar la misma tarea consiste en arrastrar el color de frente, de fondo o el patrón hasta la selección.
Ésta es la opción por omisión: la herramienta rellena el área que tenga el color parecido al píxel en que haya clicado. La similitud del color es definida por el umbral de brillo, que puede cambiar dando un valor o dando una posición del cursor.
Bajo esta sección puede encontrar dos opciones:
La opción Rellenar áreas transparentes ofrece la posibilidad de rellenar áreas con baja opacidad.
La opción Muestra combinada activa el muestreo para todas las capas. Si esta opción se encuentra activa, el relleno puede hacerse sobre una capa más baja, mientras la información de color usada para determinar el área de relleno está en las capas superiores. Simplemente seleccione la capa baja y asegúrese de que una capa superior esté visible.
El control de umbral determina el nivel en que el peso del color es mesurado para rellenar el espacio. Un nivel alto rellenará área de una imagen con color más variado, mientras que un nivel bajo rellenará menos área.
With this option you can choose which component of the image GIMP shall use to calculate the similarity and to determine the borders of filling.
The components you can choose from are , , , , , and .
This option is not easy to understand. You have chosen, for example, the Red channel. When you click on any pixel, the tool searches for contiguous pixels similar for the red channel to the clicked pixel, according to the set threshold. Here is an example:
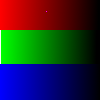
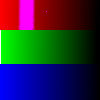
Original image: three strips with gradients of pure colors. Red (255;0;0), Green (0;255;0), Blue (0;0;255). We are going to use the Bucket-fill tool with the magenta color and a Threshold set to 15.
Image 1: Fill By = Composite. We successively clicked in the three color strips. Every strip is filled according to the threshold.
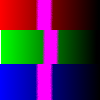
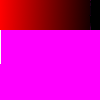
Image 2: Fill By = Red. We clicked in the red strip. The tool searches for contiguous pixels which have a similar value in the red channel, according to the set threshold. Only a narrow area corresponds to these standards. In the green and the blue strip, the value of pixels in the red channel is 0, very much different from the red channel value of the clicked pixel: the color doesn't spread to them.
Image 3: Fill By = Red. We clicked in the green strip. There, the value of the clicked pixel in the red channel is 0. All pixels in the green and the blue strips have the same red channel value (0): they are all painted.