| 8. La caja de diálogo GIH | ||
|---|---|---|
 |
Capítulo 7. Pintar con el GIMP |  |
| 8. La caja de diálogo GIH | ||
|---|---|---|
| |
Capítulo 7. Pintar con el GIMP | |
Cuando crea una brocha nueva animada, se muestra en la ventana de la imagen y le gustaría guardarla en formato gih. Seleccione el menú → nombre su trabajo con la extensión GIH en el campo de la nueva ventana y presione el botón guardar, se mostrará la siguiente ventana:
Figura 7.18. The dialog to describe the animated brush
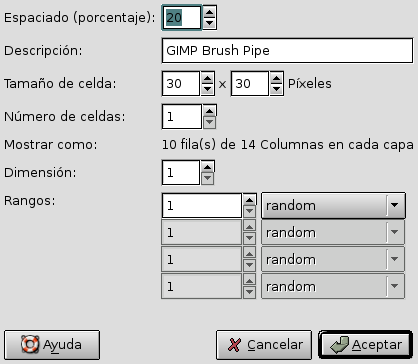
Esta caja de diálogo aparece, si guarda una imagen como GIH
Esta caja de diálogo tiene muchas opciones que no son fáciles de entender. Permiten determinar la manera de animar sus brochas.
“Spacing” is the distance between consecutive brush marks when you trace out a brushstroke with the pointer. You must consider drawing with a brush, whatever the paint tool, like stamping. If Spacing is low, stamps will be very close and stroke look continuous. If spacing is high, stamps will be separated: that's interesting with a color brush (like “green pepper” for instance). Value varies from 1 to 200 and this percentage refers to brush “diameter”: 100% is one diameter.
Es el nombre de la brocha que aparece arriba en el diálogo de brochas (modo rejilla) cuando la brocha está seleccionada.
Ese tamaño de celdas, se separan en capas... Por defecto, una celda por capa y el tamaño es el de la capa. Entonces hay un solo aspecto de brocha por capa.
Podriamos tener, solo, una gran capa y separarla en celdas que fueran usadas para las diferentes apariencias de la brocha animada.
Por ejemplo, queremos una brocha, de 100 x 100 píxeles, con 8 aspectos diferentes. Podemos tener 8 aspectos de una capa de 400 x 200 píxeles, o de una capa de 300 x 300 pero con una celda sin uso.
Es el número de celdas (una por aspecto), que será separado en capas. Por defecto, es el número de capas ya que hay una capa por aspecto.
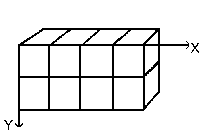
This tells how cells have been arranged in layers. If, for example,
you have placed height cells at the rate of two cells per layer on
four layers, GIMP will display:
1 rows of 2 columns on each layer.
Las cosas se complican. Las explicaciones son necesarias para entender como se disponen las celdas y las capas.
GIMP starts retrieving cells from each layer and stacks them into a
FIFO stack (First In First Out: the first in is at the top of the
stack and so can be first out). In our example 4 layers with 2 cells
in each, we'll have, from top to bottom: first cell of first layer,
second cell of first layer, first cell of second layer, second cell
of second layer..., second cell of fourth layer. With one cell per
layer or with several cells per layer, result is the same. You can
see this stack in the Layer Dialog of the resulting
.gih image file.
Entonces, el GIMP crea una tabla informática de esta fila con la Dimensión que se habia seleccionado. Se pueden usar cuatro dimensiones.
In computer science an array has a “myarray(x,y,z)” form for a 3 dimensions array (3D). It's easy to imagine a 2D array: on a paper it's an array with rows and columns
With a 3d array we don't talk rows and columns but Dimensions and Ranks. The first dimension is along x axis, the second dimension along y axis, the third along z axis. Each dimension has ranks of cells.
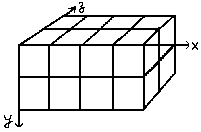
Para rellenar esta tabla, el GIMP recupera las celdas de arriba de la fila. La forma de rellenar la tabla recuerda la de un cuenta kilómetros: los dígitos del rango derecho ruedan primero y cuando llegan al máximo, los del rango izquierdo empiezan a andar. Si recuerda la programación Basic tendrá con una tabla (4,2,2), la siguiente sucesión: (1,1,1),(1,1,2),(1,2,1),(1,2,2),(2,1,1),(2,1,2),(2,2,2),(3,1,1).... (4,2,2). Veremos esto más tarde en un ejemplo.
Besides the rank number that you can give to each dimension, you can also give them a Selection mode. You have several modes that will be applied when drawing:
GIMP selects a rank from the concerned dimension according to the order ranks have in that dimension.
GIMP selects a rank at random from the concerned dimension.
GIMP selects a rank in the concerned dimension according to the moving angle of the brush.
The first rank is for the direction 0°, upwards. The other ranks are affected, clockwise, to an angle whose value is 360/number of ranks. So, with 4 ranks in the concerned dimension, the angle will move 90° clockwise for each direction change: second rank will be affected to 90° (rightwards), third rank to 180° (downwards) and fourth rank to 270° (-90°) (leftwards).[2]
These options are for sophisticated drawing tablets.
Ejemplos
Bién, ¿es útil todo esto?. Lo veremos gradualmente con ejemplos. Puede situar en cada dimensión cajas que darán a su brocha una acción particular.
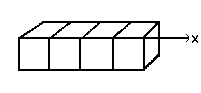
Let us start with a 1D brush which will allow us to study selection modes action. We can imagine it like this:
Follow these steps:
Open a new 30x30 pixels image, RGB with Transparent fill type. Using the Text tool create 4 layers “1”, “2”, “3”, “4”. Delete the “background” layer.
Save this image first with
.xcf extension to keep
its properties then save it as
.gih.
The Save As Dialog is opened: select a destination for your image. OK. The GIH dialog is opened: Choose Spacing 100, give a name in Description box, 30x30 for Cell Size, 1 dimension, 4 ranks and choose “Incremental” in Selection box. OK.
You may have difficulties to save directly in the GIMP Brush
directory. In that case, save the
.gih file manually into
the /usr/share/gimp/gimp/2.0/brushes
directory. Then come back into the Toolbox, click in the brush
icon to open the Brush Dialog then click on
 icon button. Your new brush appears in the
Brush window. Select it. Select pencil tool for instance and
click and hold with it on a new image:
icon button. Your new brush appears in the
Brush window. Select it. Select pencil tool for instance and
click and hold with it on a new image:
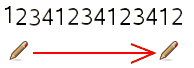
You see 1, 2, 3, 4 digits following one another in order.
Take your .xcf image file
back and save it as .gih
setting Selection to “Random”:
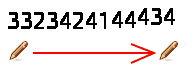
Digits will be displayed at random order.
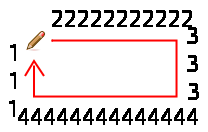
Now select “Angular” Selection:
Ahora vamos a crear una brocha animada 3D: su orientación variará según la dirección de la brocha, alternando, regularmente, izquierda y derecha y su color cambiará aleatoriamente entre negro y azul.
The first question we have to answer to is the number of images that is necessary. We reserve the first dimension (x) to the brush direction (4 directions). The second dimension (y) is for Left/Right alternation and the third dimension (z) for color variation. Such a brush is represented in a 3D array “myarray(4,2,2)”:
There are 4 ranks in first dimension (x), 2 ranks in second dimension (y) and 2 ranks in third dimension (z). We see that there are 4x2x2 = 16 cells. We need 16 images.
Creating images of dimension 1 (x)
Open a new 30x30 pixels image, RGB with Transparent Fill Type.
Using the zoom draw a left hand with fingers upwards.[3]
Save it as handL0k.xcf (hand Left 0°
Black).
Abrir el diálogo de capas. Pulsar dos veces sobre la capa para abrir el diálogo atributos de la capa y renombrarla como handL0k.
Duplicate the layer. Let visible only the duplicated layer, select it and apply a 90° rotation (Layer/Transform/ 90° rotation clockwise). Rename it to handL90k.
Repeat the same operations to create handL180k and handL-90k (or handL270k).
Creating images of dimension 2 (y)
This dimension in our example has two ranks, one for left hand and the other for right hand. The left hand rank exists yet. We shall build right hand images by flipping it horizontally.
Duplicar la capa handL0k. La dejamos visible y la seleccionamos. Aplicar Capa/Transformar/Voltear horizontalmente
Repetir la misma operación en las capas de las otras manos izquierdas para crear sus equivalentes manos derechas.
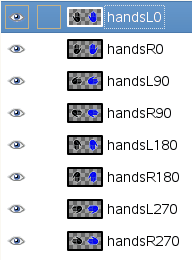
Re-order layers to have a clockwise rotation from top to bottom, alternating Left and Right: handL0k, handR0k, handL90k, handR90k, ..., handR-90k.
Creating images of dimension 3 (z)
Crear imágenes de la dimension 3 (z): La tercera dimensión tiene dos rangos, uno para el color negro y otro para el color azul. El primer rango, negro, ya existe. Vemos que las imágenes de la dimensión 3 serán una copia, en azul, de las imágenes de la dimensión 2. Así que tendremos 16 imágenes. Pero una fila de 16 capas no es fácil de gestionar: usaremos capas con dos imágenes.
Seleccionar la capa handL0k la dejamos visible, sola. Usar Imágen/Tamaño de lienzo para cambiar el tamaño del lienzo a 60x30 píxeles.
Duplicar la capa hand0k. Sobre la copia, rellenar la mano con azul usando la herramienta cubo
Now, select the Move tool. Double click on it to accede to its properties: check Move the Current Layer option. Move the blue hand into the right part of the layer precisely with the help of .
Make sure only handL0k and its blue copy are visible. Right click on the Layer Dialog: Apply the command with the option Expand as Necessary. You get a 60x30 pixels layer with the black hand on the left and the blue hand on the right. Rename it to “handsL0”.
Repetir la misma operación sobre las otras capas.
Set layers in order
Layers must be set in order so that GIMP can find the required image at some point of using the brush. Our layers are yet in order but we must understand more generally how to have them in order.There are two ways to imagine this setting in order. The first method is mathematical: GIMP divides the 16 layers first by 4; that gives 4 groups of 4 layers for the first dimension. Each group represents a direction of the brush. Then, it divides each group by 2; that gives 8 groups of 2 layers for the second dimension: each group represents a L/R alternation. Then another division by 2 for the third dimension to represent a color at random between black and blue.
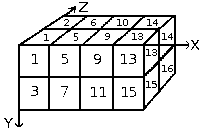
El otro método es visual, mediante la representación de la tabla. La correlacción entre los dos métodos está representada en la siguiente imagen:
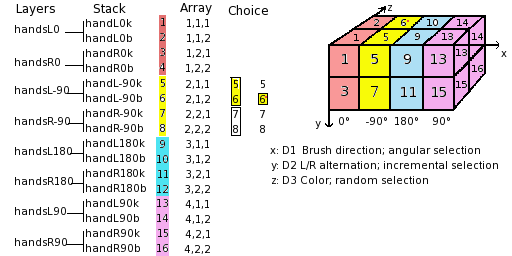
How will GIMP read this array?: GIMP starts with the first dimension which is programmed for “angular”, for instance 90°. In this 90° rank, in yellow, in the second dimension, it selects a L/R alternation, in an “incremental” way. Then, in the third dimension, in a random way, it chooses a color. Finally, our layers must be in the following order:
Voilà. Your brush is ready. Save it as
.xcf first, then as
.gih with the following
parameters:
Spacing: 100
Description: Hands
Tamaño de celdas: 30x30
Número de celdas: 16
Dimensions: 3
Dimension 1: 4 rangos Selección: Angular
Dimension 2: 2 rangos Selección: Incremental
Dimension 3: 2 rangos Selección: Aleatoria
Place your .gih file into
GIMP brush directory and refresh the brush
box. You can now use your brush.
Figura 7.19. Aquí está el resultado de trazar una selección elíptica con la brocha:
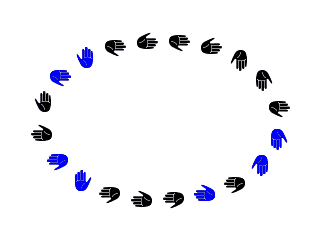
This brush alternates right hand and left hand regularly, black and blue color at random, direction according to four brush directions.
[2] For previous GIMP versions you may have to replace “clockwise” with “counter-clockwise”.
[3] Ok, we are cheating here: our hand is borrowed from http://commons.wikimedia.org/wiki/File:Stop_hand.png.

