| Глава 5. Загрузка изображений в GIMP | ||
|---|---|---|
 |
Часть II. Как стать профессионалом в GIMP? |  |
| Глава 5. Загрузка изображений в GIMP | ||
|---|---|---|
| |
Часть II. Как стать профессионалом в GIMP? | |
Содержание
Эта глава о загрузке изображений вGIMP. В ней объясняется, как создавать новые изображения, как загружать изображения из файлов, как их сканировать и как создавать снимки экрана.
Но первым делом мы хотим познакомить вас с общей структурой изображений в GIMP.
It is tempting to think of an image as something that corresponds with a single display window, or to a single file such as a JPEG file. In reality, however, a GIMP image is a a complicated structure, containing a stack of layers plus several other types of objects: a selection mask, a set of channels, a set of paths, an "undo" history, etc. In this section we take a detailed look at the components of a GIMP image, and the things that you can do with them.
The most basic property of an image is its mode. There are three possible modes: RGB, grayscale, and indexed. RGB stands for Red-Green-Blue, and indicates that each point in the image is represented by a «red» level, a «green» level, and a «blue» level; representing a full-color image. Each color channel has 256 possible intensity levels. More details in Color Models
В изображении, в режиме градаций серого, каждая точка представлена уровнем яркости в диапазоне от 0 (чёрный) до 255 (белый), с промежуточными значениями, представляющими различные уровни серого.
Рисунок 5.1. Компонента цветовых моделей RGB и CMY

In the RGB Color Model, mixing Red, Green and Blue gives White, which is what happens on your screen.
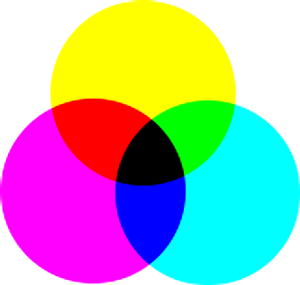
In the CMY(K) color model, mixing Cyan, Magenta and Yellow gives Black, which is what happens when you print on a white paper. The printer will actually use the black cartridge for economical reasons and better color rendering.
Conceptually, the difference between a grayscale image and an RGB image is the number of «color channels»: a grayscale image has one; an RGB image has three. An RGB image can be thought of as three superimposed grayscale images, one colored red, one green, and one blue.
Actually, both RGB and grayscale images have one additional color channel called the alpha channel, which represents opacity. When the alpha value at a given location in a given layer is zero, the layer is completely transparent (you can see through it), and the color at that location is determined by what lies underneath. When alpha is maximal (255), the layer is opaque (you cannot see through it), and the color is determined by the color of the layer. Intermediate alpha values correspond to varying degrees of transparency / opacity: the color at the location is a proportional mixture of color from the layer and color from underneath.
Рисунок 5.2. Пример изображения в RGB и в Сером режиме
Изображение в режиме RGB, с каналами красного, зелёного и синего.
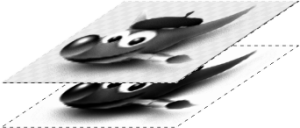
Изображение в режиме серого с каналом яркости.
In GIMP, every color channel, including the alpha channel, has a range of possible values from 0 to 255; in computing terminology, a depth of 8 bits. Some digital cameras can produce image files with a depth of 16 bits per color channel. GIMP cannot load such a file without losing resolution. In most cases the effects are too subtle to be detected by the human eye, but in some cases, mainly where there are large areas with slowly varying color gradients, the difference may be perceptible.
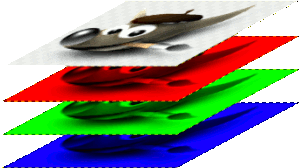
Рисунок 5.3. Пример изоражения с каналом альфа

Канал красного

Канал зелёного

Канал синего

Канал альфа показывает прозрачную область изображения.

Цветное изображение в режиме RGB в каналом альфа.
The third type, indexed images, is a bit more complicated to understand. In an indexed image, only a limited set of discrete colors are used, usually 256 or less. These colors form the «colormap» of the image, and each point in the image is assigned a color from the colormap. Indexed images have the advantage that they can be represented inside a computer in a way which consumes relatively little memory, and back in the dark ages (say, ten years ago), they were very commonly used. As time goes on, they are used less and less, but they are still important enough to be worth supporting in GIMP. (Also, there are a few important kinds of image manipulation that are easier to implement with indexed images than with continuous-color RGB images.)
Some very commonly used types of files (including GIF and PNG) produce indexed images when they are opened in GIMP. Many of GIMP's tools don't work very well on indexed images–and many filters don't work at all–because of the limited number of colors available. Because of this, it is usually best to convert an image to RGB mode before working on it. If necessary, you can convert it back to indexed mode when you are ready to save it
GIMP makes it easy to convert from one image type to another, using the Mode command in the Image menu. Some types of conversions, of course (RGB to grayscale or indexed, for example) lose information that cannot be regained by converting back in the other direction.
![[Примечание]](images/note.png)
|
Примечание |
|---|---|
|
Если вы пробуете применить к изображению фильтр, и он недоступен и отображается в меню серым цветом, обычно это означает, что изображение, с которым вы работаете (или более конкретно, слой) неправильного типа. Многие фильтры не могут быть использованы на индексированных изображениях. Некоторые также предполагают наличие или отсутствие альфа канала. Обычно решение проблемы заключается в преобразовании изображения в другой тип, чаще всего в RGB. |

