| 3.5. Palettes Dialog | ||
|---|---|---|

|
3. Image-content Related Dialogs |  |
| 3.5. Palettes Dialog | ||
|---|---|---|
|
|
3. Image-content Related Dialogs | |
A palette is a set of discrete colors, in no particular order. See the Palettes section for basic information on palettes and how they can be created and used.
The “Palettes” dialog is used to select a palette, by clicking on it in a list or grid view. A few dozen more or less randomly chosen palettes are supplied with GIMP, and you can easily add new palettes of your own. The “Palettes” dialog also give you access to several operations for creating new palettes or manipulating the ones that already exist.
![[注意]](images/note.png)
|
注意 |
|---|---|
|
The “Palettes” dialog is not the same thing as the Index Palette dialog, which is used to manipulate the colormaps of indexed images. |
The “Palettes” dialog is a dockable dialog; see the section 第 2.3 节 “Dialogs and Docking” for help on manipulating it.
You can access it:
from the image menu: → → ;
from the Tab menu in any dockable dialog by clicking on
 and selecting
→ .
and selecting
→ .
Clicking on a palette in the dialog selects this palette and brings up the Palette Editor, which allows you to set GIMP's foreground or background colors by clicking on colors in the palette display. You can also use the arrow keys to select a palette.
Double-clicking on a palette name (in List View mode) lets you to edit the name. Note that you are only allowed to change the names of palettes that you have added yourself, not those that are supplied with GIMP. If you edit a name that you are not allowed to change, it will revert back to its previous value as soon as you hit return or move the pointer focus elsewhere.
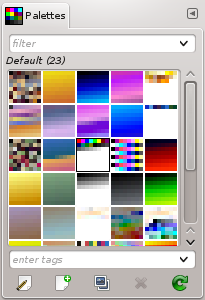
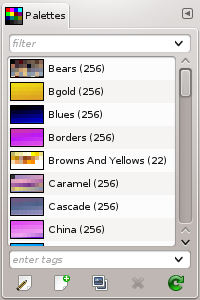
In the Tab menu, you can choose between and . In Grid mode, the palettes are laid out in a spectacular rectangular array, making it easy to see many at once and find the one you are looking for. In List mode (the default), the palettes are lined up in a list, with the names beside them.
The option Preview Size allows you to adapt the size of color cell previews to your liking.
You can use tags to reorganize the palettes display. See 第 3.6 节 “Tagging”.
The buttons of the Palettes Dialog
Below the palettes view, at the bottom of the dialog window, there are several buttons:
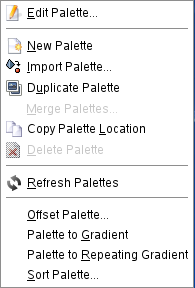
 Edit Palette
This button brings up the 第 3.5.4 节 “Palette Editor”.
For more information on this button please refer to New Palette.
 Duplicate Palette
For more information on this button please refer to Duplicate Palette.
For more information on this button please refer to Delete Palette.
 Refresh Palettes
For more information on this button please refer to Refresh Palettes.
The “Palettes” pop-menu can be accessed by right-clicking
in the Palettes dialog, or by choosing the top item from the dialog Tab
menu
().
|
|
注意 |
|---|---|
|
Some of the listed pop-menu entries are installation dependend and need the Python language interpreter to be installed. This includes at the time of writing: Offset Palette..., Palette to gradient, Palette to Repeating Gradient and Sort Palette.... |
“Edit Palette” is an alternative way of activating
the
Palette Editor:
it can also be activated by double-clicking on a palette in the
Palettes dialog, or by pressing the “Edit Palette”
button at the bottom of the dialog.
“New Palette” creates a new, untitled palette,
initially containing no color entries, and pops up the Palette
Editor so that you can add colors to the palette. The result
will automatically be saved in your personal
palettes folder when you quit GIMP, so it
will be available from the Palettes dialog in future sessions.
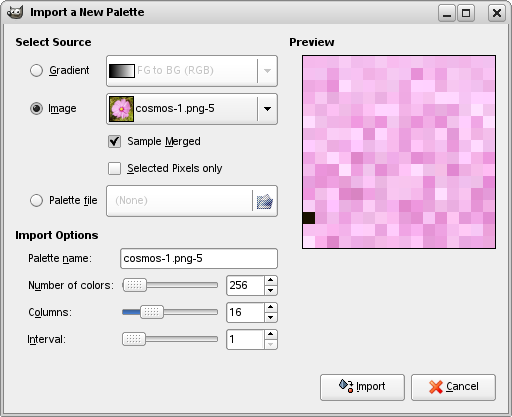
“Import Palette” allows you to create a new palette from the colors in a gradient, an image or a palette file. Choosing it brings up the “Import Palette” dialog, which gives you the following options:
|
|
注意 |
|---|---|
|
Former versions of GIMP had a “Save palette” command. It no longer exists. To save the palette of an image, indexed or not, you must import it in fact from the image. |
You can import a palette either from any of GIMP's
gradients (choosing one from the adjoining menu), or from
any of the currently open images (chosen from the adjoining
menu). Since GIMP 2.2, you can also import a RIFF palette
file (with extension .pal), of the
type used by several Microsoft Windows applications.
Two options concerning image as source, available for RGB images only:
Sample merged: When this option is checked, colors are picked from all visible layers. If unchecked, pixels are picked from the active layer only, even though not visible.
Selected pixels only: As the name says, pixels are picked from the selected area only, in the active layer or all visible layers according to the status of the previous option.
You can give a name to the new palette here. If the name you choose is already used by an existing palette, a unique name will be formed by appending a number (e. g., "#1").
Here you specify the number of colors in the palette. The default is 256, chosen for three reasons: (1) every gradient contains 256 distinct colors; (2) GIF files can use a maximum of 256 colors; (3) GIMP indexed images can contain a maximum of 256 distinct colors. You can use any number you like here, though: GIMP will try to create a palette by spacing the specified number of colors even across the color range of the gradient or image.
Here you specify the number of columns for the palette. This only affects the way the palette is displayed, and has no effect on the way the palette is used.
Even setting “Number of colors” to maximum, the number of colors can't exceed 10000 in the palette. RGB images have much more colors. Interval should allow to group similar colors around an average and so get a better palette. This problem doesn't exist with 256 colors indexed images: Interval to 1 allows picking 256 colors (this option is grayed out with more than 256 colors indexed palettes too).
The imported palette will be added to the Palettes dialog, and
automatically saved in your personal
palettes folder when you
quit GIMP, so it will be available in future
sessions.
Duplicate Palette creates a new palette by copying the palette
that is currently selected, and brings up a Palette Editor so that
you can alter the palette. The result will automatically be saved
in your personal palettes
folder when you quit GIMP, so it will be available from the
Palettes dialog in future sessions.
Currently this operation is not implemented, and the menu entry will always be insensitive.
This command allows you to copy the palette file location to clipboard. You can then paste it in a text editor.
Delete Palette removes the palette from the “Palettes ”dialog, and deletes the disk file in which it is stored. Before it acts, it asks you confirm that you really want to do these things. Note that you cannot remove any of the palettes that are supplied with GIMP, only palettes you have added yourself.
Refresh Palettes rescans all of the folders in your palette search path, and adds any newly discovered palettes to the list in the Palettes dialog. This may be useful if you obtain palette files from some external source, copy them into one of your palettes folders, and want to make them available during the current session.
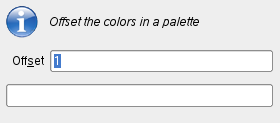
This command opens a dialog window:
This command takes the last color of the palette and puts it at the first place. The Offset parameter lets you set how many times this action must be performed.
With negative “Offsets” colors are put from the first position to the end of the colors list.
With this command, all the colors of the palette are used to form the current gradient which is saved in the Gradient Dialog. The created gradient is build with segments just as much as the number of colors on the given palette.
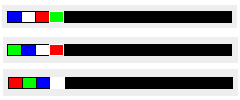
This command creates a repeating gradient, using all the colors of the palette. This gradient appears in the Gradient Dialog and becomes the current gradient. The gradient is created with segments one more than the number of colors on the given palette. The left side color at the leftmost segment will be the same color on the right side at the rightmost segment.
图 15.55. “Palette to repeating gradient” examples
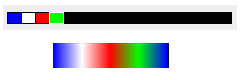
Top: palette. Bottom: the gradient created with the command.
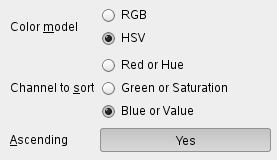
This command opens a dialog window which allows you to sort the colors of the palette according to certain criterions:
Color model: you can choose between RGB and HSV
Channel to sort: you can choose between the three RGB channels if the RGB model is selected, or the three HSV channels if the HSV channel is selected.
Ascending (default is Yes): values are sorted from the lower to the upper. By clicking on this you can toggle to and values will be sorted in descending order.
The Palette Editor is used mainly for two purposes: first, for setting GIMP's foreground or background colors (as shown in the Color Area of the Toolbox) to selected colors from the palette; second, for modifying the palette. You can activate the Palette Editor for any palette in the Palettes dialog, but you can only modify palettes that you have created yourself, not the palettes that are supplied when you install GIMP. (You can, however, duplicate any palette and then edit the newly created copy.) If you modify a palette, the results of your work will automatically be saved when you exit from GIMP.
The Palette Editor is only accessible from the Palettes dialog: you
can activate it by double-clicking on a palette, or by pressing the
“Edit Palette” button at the bottom, or by choosing
“Edit Palette” from the “Palettes” Menu.
The Palette Editor is a dockable dialog; see the section on Dialogs and Docking for help on manipulating it.
If you click on a color box in the palette display, GIMP's foreground color will be set to the selected color: you can see this in the Color Area of the Toolbox. If you hold down the Ctrl key while clicking, GIMP's background color will be set to the selected color.
If the palette is a custom palette, double-clicking on a color not only sets the foreground, it also brings up a color editor that allows you to modify the selected palette entry.
Right-clicking in the palette display area brings up the Palette Editor menu. It's functions are mainly the same as those of the buttons at the bottom of the dialog.
Below the palette display area, at the left, appears a text entry area that shows the name of the selected color (or “Untitled ” if it does not have one). This information has no functional significance, and is present only to serve you as a memory aid.
To the right of the name entry is a spinbutton that allows you to set the number of columns used to display the palette. This only affects the display, not how the palette works. If the value is set to 0, a default will be used.
At the bottom of the dialog are a set of buttons, which mostly match the entries in the Palette Editor menu, accessible by right-clicking in the palette display area. Here are the buttons:
 Save
Save
This button causes the palette to be saved in your personal
palettes folder. It
would be saved automatically when GIMP exits
in any case, but you might want to use this button if you are
concerned that GIMP might crash in the
meantime.
 Revert
This operation has not yet been implemented.
Edit Color
Pops up a color editor allowing you to alter the color. If the palette is one you aren't allowed to alter, this button will be insensitive. See below
For more information on this button please refer to below.
For more information on this button please refer to below.
 Zoom Out
For more information on this button please refer to below.
 Zoom In
For more information on this button please refer to below.
 Zoom All
For more information on this button please refer to below.
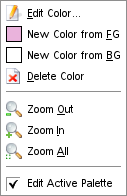
The Palette Editor Menu can be accessed by right-clicking on the palette display in the Palette Editor, or by choosing the top entry from the dialog Tab menu. The operations in it can also be executed using the buttons at the bottom of the Palette Editor dialog.
“Edit Color” brings up a color editor that allows you to modify the color of the selected palette entry. If the palette is one that you are not allowed to edit (that is, one supplied by GIMP when it is installed), then the menu entry will beinsensitive.
These commands each create a new palette entry, using either GIMP's current foreground color (as shown in the Color Area of the Toolbox), or the current background color.
“Delete Color” removes the selected color entry from the palette. If the palette is one that you are not allowed to edit, then the menu entry will be insensitive.
“Zoom Out” reduces the vertical scale of the entries in the palette display.
“Zoom In” increases the vertical scale of the entries in the palette display.
“Zoom All” adjusts the vertical size of the entries in the palette display so that the entire palette fits into the display area.
When this option is checked (default), you can edit another palette by clicking on it in the “Palettes” dialog.