| 6.7. Precision | ||
|---|---|---|

|
6. The “Image” Menu |  |
| 6.7. Precision | ||
|---|---|---|
|
|
6. The “Image” Menu | |
The submenu contains commands which let you change the precision of the image. The Precision options affect the precision and channel encoding used for storing the image in RAM during processing.
The Precision Menu is divided into two parts: precision and channel encoding.
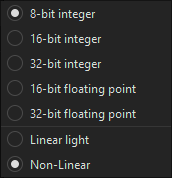
The precision at which image data is stored is a function of the bit depth (8-bit vs 16-bit vs 32-bit) and whether the data is stored as integer data or floating point data. The Precision menu offers the following precision options:
Integer Precision Options
![[Note]](images/note.png)
|
Note |
|---|---|
|
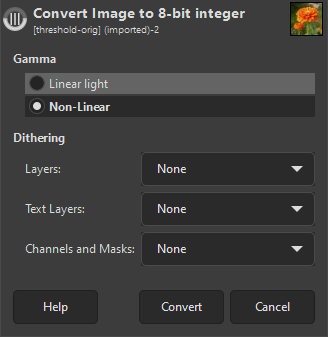
When choosing to convert an image which has a 32-bit floating point precision to 8-bit integer, a conversion dialog will open that will ask you to choose dithering settings. |
The Precision menu also allows you to choose a channel encoding for the image data. Currently there are two choices:
, which encodes the channel data using the linear gamma TRC.
|
|
Note |
|---|---|
|
Regardless of which options you choose in the Precision menu, in high bit depth GIMP 2.10 all internal processing is done at 32-bit floating point precision, and most editing operations are done using Linear light channel encoding. |
Which Precision options should you choose? In a nutshell:
To take full advantage of GIMP's internal 32-bit floating point processing, choose 32-bit floating point precision and also choose the Linear light channel encoding.
If you are editing on a machine with limited RAM, or if you are editing very large images and layer stacks, consider using 16-bit floating point or integer precision.
If you want to take advantage of high bit depth image editing but you don't want to deal with floating point channel values, then use 16-bit integer precision.
When soft-proofing an image, switch to Perceptual gamma (sRGB) channel encoding to avoid certain problems with soft-proofing a linear gamma image using Little CMS.
On a very low-spec machine with not very much RAM, consider using 8-bit integer precision, in which case also choose the Perceptual gamma (sRGB) channel encoding (at 8-bit precision, if you choose the Linear light channel encoding your image will have horribly posterized shadows).
Choosing the bit depth (8-bits vs 16-bits vs 32-bits):
The bit depth of an image sets limits on how much precision is available when processing your image files. All things being equal, higher bit depths provide more precision.
The bit depth of an image file partially determines how much RAM is required for processing. The higher the bit depth, the more RAM is required to store data during image processing. Other relevant factors include the size of the image layers and the number of layers in the layer stack.
Choosing between integer and floating point precision:
Floating point precision is required for taking full advantage of high bit depth GIMP's internal 32-bit floating point processing. Floating point precision allows for the generation and use of channel values that fall outside the display-referred range from 0.0 ("display black") to 1.0 ("display white"), thus making possible very useful editing possibilities such as unbounded ICC profile conversions and High Dynamic Range scene-referred editing operations.
Unlike floating point precision, integer precision cannot store channel values outside the display range. So choosing an integer precision from the Precision menu means that all floating point channel values produced during processing are clipped to fit within the equivalent floating point range between 0.0 and 1.0 inclusively:
8-bit integer values are clipped to the range 0-255.
16-bit integer values are clipped to the range 0-65535.
32-bit integer values are clipped to the range 0-4294967295.
At any given bit depth, all things being equal integer precision is more precise than floating point precision. So 16-bit integer precision is more precise than 16-bit floating point precision, and 32-bit integer precision is more precise than 32-bit floating point precision. However, in GIMP you don't get more precision by choosing 32-bit integer over 32-bit floating point: GIMP still does all internal processing using 32-bit floating point precision even if you choose 32-bit integer precision in the Precision menu. Remember, the Precision menu choices only determine how the image information is held in RAM.
At any given bit depth, integer and floating point precision use approximately the same amount of RAM for internal calculations during image processing, and also require about the same amount of disk space when saving an image file to disk.
Choosing between Linear light and Perceptual gamma (sRGB) channel encoding:
At 8-bit precision, if you choose the Linear light channel encoding your image will have horribly posterized shadows. So don't use Linear light unless you also choose a higher bit depth.
When soft-proofing, currently the gamut check will not return correct results if the image is at Linear light precision. So change to Perceptual gamma (sRGB) before activating soft-proofing.
Other than the fact that Linear light channel encoding is not suitable for 8-bit editing or for soft-proofing, from a user perspective the channel encoding you choose in the Precision menu won't have much affect on your workflow:
Currently if you choose "Linear light", then linear gamma channel values are displayed in the "pixel" values when using the Color Picker Tool, Sample Points, and Pointer dialogs. If you choose "Perceptual gamma", then perceptually uniform (sRGB) channel values are displayed instead.
Currently the channel encoding that you choose makes a difference in the wrong colors that you might see if you uncheck Image/Color Management/Enable Color Management and your image isn't already in one of the GIMP built-in sRGB color spaces (but with either channel encoding choice, the colors are still wrong).
The only other way (that I know of) in which the channel encoding chosen in the Precision menu might affect your workflow has to do with results of using the "Gamma hack" found in the Advanced Color Options.
For most precision conversions this dialog will only ask how Gamma should be set. However, for conversion from 32-bit float precision to 8-bit integer, the below dialog will be shown that also asks for Dithering.
The Gamma setting is explained above.
When reducing the precision from 32-bit floating point to 8-bit integer, you will lose some details. This can cause color banding, where there is an obvious jump from one color to another where there shouldn't be. Using dithering can be a way to reduce this. Dithering is a way of adding noise to an image to prevent banding and other unwanted patterns. The different dithering methods use different ways to add the noise.
There are three Dithering settings: for normal Layers, Text Layers, and Channels and Masks. For each you can set the type of dithering to use. The different dithering modes are explained in the Dithering Method option of the Dither filter.
In general, you probably won't use dithering for Text layers, since that will cause the text information to be lost, meaning it becomes a normal layer. I would first try conversion without any dithering, and if there are any noticeable artifacts, you can try using dithering on normal layers.