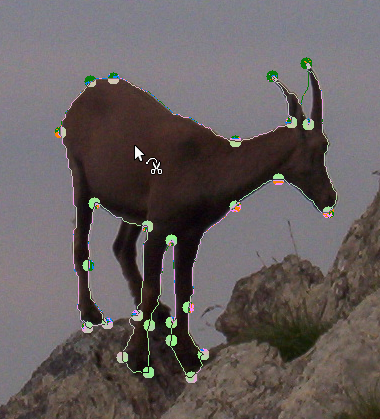
The Scissors Select tool is an interesting piece of equipment: it has some features in common with Free Select, some features in common with the Path tool, and some features all its own. It is useful when you are trying to select a region defined by strong color-changes at the edges. To use the Scissors, you click to create a set of "control nodes", also referred to as anchors or control points, at the edges of the region you are trying to select. The tool produces a continuous curve passing through these control nodes, following any high-contrast edges it can find. If you are lucky, the path that the tool finds will correspond to the contour you are trying to select.
Unfortunately, there seem to be some problems with the edge-following logic for this tool, with the result that the selections it creates tend to be pretty crude in a lot of cases. A good way to clean them up is to switch to Quick Mask mode, and use paint tools to paint in the problematic parts. On the whole, most people find the Path tool to be more useful than the Scissors, because, even though it does not have the intelligent edge-finding capability, the paths it produces persist until you delete them, and can be altered at any time.
Esistono diverse possibilità per attivare lo strumento:
-
From the main menu: → → .
-
By clicking the tool icon
in the Toolbox.
-
Premendo la scorciatoia da tastiera I.
Il comportamento predefinito dei tasti Maiusc, Ctrl, e Alt è descritto in Sezione 2.1.1, «Tasti modificatori» per tutti gli strumenti di selezione.
Esiste comunque un tasto modificatore che ha un comportamento speciale se lo si usa durante la modifica di una selezione, cioè dopo che si è aggiunto il primo nodo:
- Maiusc
-
Come valore predefinito, la caratteristica dei bordi magnetici automatici è abilitata: quando si fa clic e si trascina il puntatore del mouse, lo strumento forbici trova il punto di massimo gradiente (dove il cambiamento del colore è massimo) per piazzare un nuovo nodo di controllo o per spostarne uno esistente.
Mantenendo premuto questo tasto mentre si fa clic e si trascina, disabilita questa caratteristica, e il nodo di controllo viene posto nella posizione del puntatore del mouse.
Backspace rimuove l'ultimo segmento disegnato, Esc cancella tutti i segmenti della selezione.
Each time you left-click with the mouse, you create a new control point, which is connected to the last control point by a curve that tries to follow edges in the image. To finish, click on the first point (the cursor changes to indicate when you are in the right spot) or press the Enter key. You can adjust the curve by dragging the control points, or by clicking on the boundary of the curve to create new control points. When you are satisfied and want to convert the curve to a selection, click anywhere inside the curve or press the Enter key.
As said above when you click with this tool you drop points. The
selection boundary is driven by these control points. During creation you
can move each one by clicking and dragging, except the first and the last
one. The selection is closed when you are clicking the last point over
the first one. When the selection is closed the pointer shape
changes according to its position: inside
 ,
on the boundary
 ,
and outside
 .
You can adjust the selection creating new points by clicking on the
boundary or by moving each control points (merged first and last
point). The selection is validated when you click inside.
Bisogna notare che è possibile ottenere solo una selezione; se si crea una seconda selezione, la prima viene cancellata quando si conferma la seconda.
![[Avvertimento]](images/warning.png)
|
Avvertimento |
|---|---|
|
Assicurarsi di non fare clic all'interno della curva fino a che non si è completate le operazioni di modifica. Una volta che la si è convertita in una selezione, l'annullamento ci riporta nuovamente a zero e sarà necessario ricreare la curva da zero se serve una modifica ad essa. Controllare inoltre di non passare a un differente strumento o, nuovamente, tutti i punti di controllo così minuziosamente creati verranno persi (ma si può comunque trasformare la selezione in un tracciato e lavorare su quello con lo strumento tracciati). |
Per spostare la selezione, vedere Spostamento selezioni.
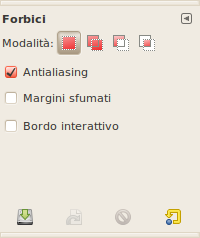
Normally, tool options are displayed in a window attached under the Toolbox as soon as you activate a tool. If they are not, you can access them from the main menu through → → which opens the option window of the selected tool. The available tool options can also be accessed by double clicking the corresponding tool icon in the Toolbox.
- Modalità, Antialias, Feather edges
-
![[Nota]](images/note.png)
Nota Consultare Opzioni strumenti di selezione per un aiuto a comprendere il funzionamento delle opzioni comuni a tutti questi strumenti. Qui vengono spiegate soltanto le opzioni specifiche di questo strumento.
- Mostra contorno interattivo
-
Se quest'opzione è abilitata, quando si trascina un nodo di controllo verrà visualizzato il percorso che assumerà il margine della selezione. Se non è abilitata, mentre il nodo viene trascinato, questo viene visualizzato collegato a quello precedente da una linea diritta e non sarà visualizzato il percorso risultante fino a che non viene rilasciato il pulsante del mouse. Su dei sistemi lenti, se i punti di controllo sono distanti, questo comportamento può dare un po' più di velocità.


