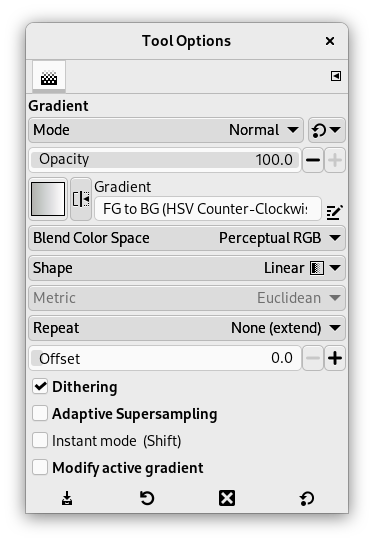
This tool fills the selected area with a gradient from the foreground and background colors by default, but there are many options. To make a gradient, drag the cursor in the direction you want the gradient to go and you release the mouse button when you feel you have the right position and size of your gradient. The softness of the gradient depends on how far you drag the cursor. The shorter the drag distance, the sharper it will be.
If you click and drag outside the selection, only a part of the gradient will appear in the selection.
Existe um número surpreendente de coisas que você pode fazer com essa ferramenta, e as possibilidades podem até parecer um pouco de mais no inicio. As duas opções mais importantes que você tem são o degradê e a forma. Clicar no botão degradê nas opções da ferramenta exibe a janela de seleção de degradê, permitindo que você escolha entre uma variedade de degradês instalados com o GIMP; você também pode criar e salvar degradês customizados. Informações adicionais sobre degradês podem ser encontradas em Seção 6, “Degradês” and Seção 3.5, “Diálogo de degradês”.
Para a forma, existem 11 opções: Linear, Bi-linear, Radial, Quadrado, Cônico (simétrico), Cônico (assimétrico), Acompanha a forma (angular), Acompanha a forma (esférico), Acompanha a forma (com ondas), Espiral (sentido horário), e Espiral (sentido anti-horário); estas estão descritas abaixo. As opções de acompanhar a forma são as mais interessantes: elas fazem com que o degradê siga a forma do contorno da seleção, não importa o quão sinuosa seja a forma. Diferente de outras formas, degradês acompanhando a forma não são afetados pelo tamanho ou direção da linha que você desenhar: tanto para eles como como para todos os outros tipos de degradês, você precisará clicar dentro da seleção e mover o mouse, mas a forma aparece independente de onde você clicar e como mover.
![[Dica]](images/tip.png)
|
Dica |
|---|---|
|
Confira a opção de “Diferença” no menu modo, onde fazer a mesma coisa (mesmo com opacidade total) irá resultar em fantásticas textura de redemoinho, se alterando e ficando mais complexas a cada vez que você repete a operação. |
Existem várias formas para ativar a ferramenta:
-
From the main menu: → → .
-
By clicking the tool icon
in the Toolbox.
-
By pressing the G keyboard shortcut.
Normally, tool options are displayed in a window attached under the Toolbox as soon as you activate a tool. If they are not, you can access them from the main menu through → → which opens the option window of the selected tool. The available tool options can also be accessed by double clicking the corresponding tool icon in the Toolbox.
- Modo, Opacidade
- Veja Opções em comum das ferramentas de pintura para uma descrição das opções da ferramenta que são aplicáveis a todas as ferramentas de pintura.
- Degradê
-
A variety of gradient patterns can be selected from the drop-down list. The tool causes a shading pattern that transitions from foreground to background color or introduces others colors, in the direction the user determines by drawing a line in the image. For the purposes of drawing the gradient, clicking on the reverses the gradient direction with the effect, for instance, of swapping the foreground and background colors.
On the right hand, a button to open the Gradient Editor dialog.
- Blend Color Space
-
-
Perceptual RGB: When this option is chosen, the Blend Color Space is sRGB. This is the default.
-
Linear RGB: When this option is chosen, the Blend Color Space is linearized sRGB (defined by the sRGB primaries and a linear tone reproduction curve). This results in gradients that resemble the physical behavior of light. This option should be used if the color, as measured with a colorimeter, should change linearly with the distance from the color stops within the gradient.
-
CIE Lab: When this option is chosen, the Blend Color Space is CIE L*a*b*. This perceptionally uniform color space is used to model human perception of color blending.
-
- Forma
-
GIMP provides 11 shapes, which can be selected from the drop-down list. Details on each of the shapes are given below.
- Linear
-
Esse degradê começou com a cor de frente no ponto de início da linha de desenho e se altera linearmente até a cor de fundo no ponto de fim.
- Bi-Linear
-
Esta forma segue em ambas as direções a partir do ponto de início, por uma distância determinada pela largura da linha desenhada. Isso é útil, por exemplo, para dar uma aparência de um cilindro.
- Radial
-
Este degradê cria um círculo, com a cor de frente no centro e a cor de fundo fora do círculo. Isso dá a aparência de uma esfera sem uma iluminação direcional.
- Quadrado, Shaped
-
Figura 14.55. Exemplos de degradê quadrado e acompanha a forma

Quadrado

Acompanha a forma (angular)

Acompanha a forma (esférico)

Acompanha a forma (com ondas)
Existem quatro formas que são uma variante do quadrado: Quadrado, Acompanha a forma (angular), Acompanha a forma (esférico), e Acompanha a forma (com ondas). Todos eles colocam a cor de frente como o centro do quadrado, sendo o centro definido pelo começo da linha desenhada, e a metade da diagonal é o comprimento da linha desenhada. As quatro opções produzem alterações na maneira pela qual o degradê é calculado; fazer experimentos é a melhor maneira de ver as diferenças.
- Conical (symmetric), Conical (asymmetric)
-
A forma Cônico (simétrico) dá a sensação de olhar para baixo do topo de um cone, que aparecerá iluminado com a cor de fundo a partir de uma direção determinada pela direção da linha desenhada.
Cônico (assimétrico) é similar ao Cônico (simétrico) exceto que o “cone” parece ter um cume aonde a linha é desenhada.
- Espiral (sentido horário), Spiral (counter-clockwise)
-
Figura 14.57. Exemplos de degradês em espiral

Espiral (sentido horário)

Espiral (sentido anti-horário)
A forma de espiral cria uma espiral em que a repetição é determinada pelo tamanho da linha desenhada.
- Repetir
-
-
None (extend) as default.
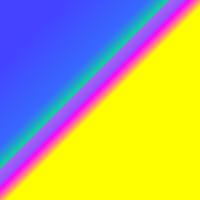
-
None (truncate): areas before and after endpoints are truncated.
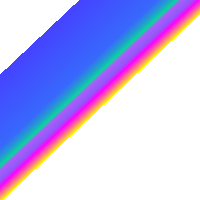
-
Sawtooth wave: the Sawtooth pattern is achieved by beginning with the foreground, transitioning to the background, then starting over with the foreground.
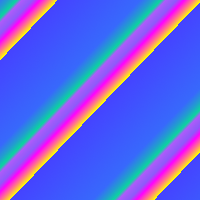
-
Triangular wave: starts with the foreground, transitions to the background, then transitions back to the foreground.
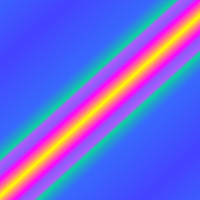
-
- Deslocamento
-
O valor de deslocamento permite aumentar a “declividade” do degradê. Isso determina o quão distante do ponto inicial o degradê começará. A opçãode “Acompanha forma” não é afetadas por essa opção.
Figura 14.58. Ferramenta de “degradê”: exemplo de deslocamento

Parte superior, deslocamento = 0 ; Parte inferior, deslocamento = 50%
- Reticulado
-
Dithering is explained in the Glossary
- Amostragem adaptativa
-
This is a more sophisticated means of smoothing the "jagged" effect of a sharp transition of color along a slanted or curved line. To find out what works best in your case, you will have to test this yourself.
- Instant mode
-
![[Atenção]](images/warning.png)
Atenção The option must be activated (with Shift also) before starting drawing gradient.
When this option is checked, the gradient line disappears as soon as you release the mouse button. You can't edit color stops before applying the gradient fill.
- Modify active gradient
-
When this option is checked, the custom gradient is not created automatically and must be created manually. The option can be activated before starting drawing gradient or if the active gradient is not the custom gradient. Allows changing user-writable gradients directly rather than creating copies of them.
- On-canvas editing
-
All the Gradient Editor dialog features are available directly on canvas. You can create and delete color stops, select and shift them, assign colors to color stops, change blending and coloring for segments between color stops, create color stops from midpoints.
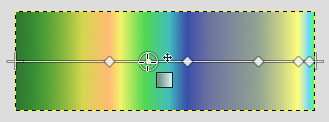
Select a gradient in the gradient dialog. Click and drag on canvas. A line is drawn and the gradient is displayed. You can edit this gradient by moving the mouse pointer on this line. As soon as you try to edit gradient, GIMP creates a custom gradient, which is a copy of the selected gradient. It becomes the active gradient and will be preserved across sessions. Here, we use the Abstract3 gradient.
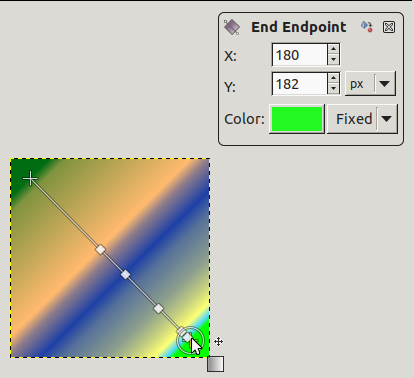
The Abstract3 gradient, with endpoints
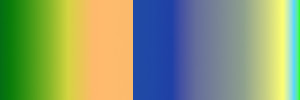
At both ends of the line, you can see a Start endpoint and an End endpoint. Click and drag an endpoint (the mouse pointer is accompanied with a moving cross) to move it where you want on your screen. A small window appears showing data about the selected endpoint: the position of the mouse (coordinate origin is the upper left corner of image or selection), the starting (left) and the ending (right) color of the gradient.
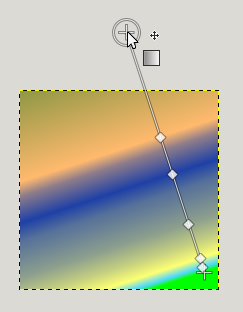
End point moved
![[Nota]](images/note.png)
Nota In you only move endpoints, the custom gradient is not created yet.
On the line, you can see several small squares. These are Stops that divide gradient into segments. You can edit segments separately. Click and drag stops to move them (the active endpoint takes a yellow color). As soon as you move a stop, the custom gradient is created. The small data window shows a button that allow you to remove the active stop.
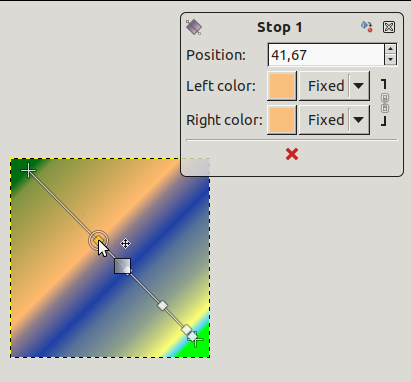
Stop point moved and data window
If you move the mouse pointer on the line, a Midpoint shows up. Then, the small data window has two buttons:
to create a new stop at midpoint, and
to center midpoint.
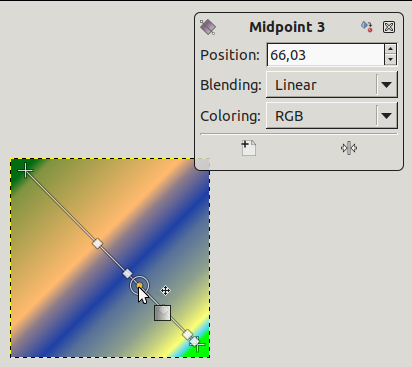
For Stops and Midpoints, Position refers to the gradient line: 0 is start endpoint, 100 is end endpoint.
Blending: you can change the blending mode between two stops, using the drop-down list. The Step option creates a hard-edge transition between the two adjacent color stops at the midpoint.
Changing color: in stop and end data windows, you have color buttons with a drop-down list. The default option is Fixed; this means that color choice will be independent from foreground and background colors. Click on a color button to open a color selector.
- Modificadores de tecla
-
O Ctrl é usado para criar linhas retas que são colocadas a ângulos absolutos de 15 graus.
Alt or Ctrl+Alt to move the whole line.
- The Gradient Editor
