This tool lets you extract the foreground from the active layer or from a selection. After the selection is made, with its marching ants, you can copy-paste or click-and-drag it to another image used as background, and, inverting the selection, you can make changes in background.
Esistono diverse possibilità per attivare lo strumento:
-
From the main menu: → → .
-
By clicking the tool icon
 in the Toolbox.
-
This tool has no shortcut, but you can set one using → , open the Tools group on the left, select Foreground Select and then press the keys you want to use as shortcut.
Let us start with an object that is easy to distinguish from the background and doesn't need to be refined.
![[Avvertimento]](images/warning.png)
|
Avvertimento |
|---|---|
|
Lo strumento di selezione primo piano richiede molta memoria per l'elaborazione, a seconda delle dimensioni dell'immagine. È noto che si blocca o rallenta quando si utilizzano immagini di grandi dimensioni. Un modo per migliorare questa situazione è utilizzare Matting Global invece di Matting Levin. La lenta velocità di elaborazione può essere migliorata aumentando il numero di Livelli sottocampionati, a costo di utilizzare più memoria. Entrambe queste opzioni presentano anche lo svantaggio di essere meno precise. |
-
Il funzionamento è simile a quello dello strumento di selezione a mano libera. Selezionare approssimativamente l'oggetto che si vuole estrarre, con un po' di sfondo intorno. Per ottenere un contorno più preciso, tenere premuto il pulsante del mouse durante lo spostamento. Per utilizzare linee rette per parti della selezione, fare clic e rilasciare il pulsante tra il punto iniziale e quello finale della sezione retta.
As soon you click to start drawing the selection, a small window pops up:
Before the selection is finished, only the button to close the dialog is active, allowing you to cancel and return to the original image (this can also be done by pressing the Esc key).
Per completare la selezione iniziale, è necessario chiuderla. Quando il cursore del mouse passa sopra il punto da cui è iniziata la selezione, questo diventa giallo. Fare clic qui per chiudere la selezione. In alternativa, è possibile anche fare doppio clic per chiudere la selezione.
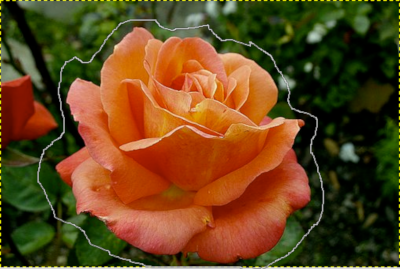
La selezione viene chiusa.
-
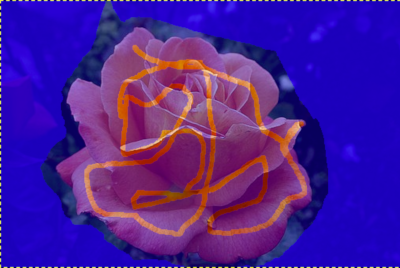
Per creare la maschera dalla selezione, premere Invio oppure fare doppio clic all'interno della selezione:

The mouse pointer now changes into a Paintbrush icon with a circle. The dark blue area (this color can be changed) shows the background. The lighter area covers the zone you have selected as foreground and a small part of background. Outside the selected area, the dark blue area is called the «Unknown pixels area».
The options in the small window on top of the image become active:
-
A Preview mask checkbox that toggles displaying a preview of the foreground extraction status. The same can also be done by pressing the Enter key.
-
Un pulsante : che verrà usato per creare l'estrazione dopo la marcatura del primo piano.
-
-
Now we start the actual foreground extraction process: draw a line through the foreground. The size of the brush can be changed in the Tool Options area. Draw a continuous line over the selected foreground area moving over colors which will be kept for the extraction. The color used to draw the line is not important, but not using the same color as the foreground makes it easier to see. Be careful not to paint background pixels.
With this one-color object, that is easy to distinguish from the background, a few strokes are enough:
-
Toggle the preview button, or press Enter to verify the result.

![[Nota]](images/note.png)
Nota You can draw directly on this Preview mask and see the result immediately.
-
When you are satisfied with the result, click the button, or press Enter to finalize the selection and finish the foreground selection operation. You can cancel the operation by pressing Esc.
Normally, tool options are displayed in a window attached under the Toolbox as soon as you activate a tool. If they are not, you can access them from the main menu through → → which opens the option window of the selected tool. The available tool options can also be accessed by double clicking the corresponding tool icon in the Toolbox.
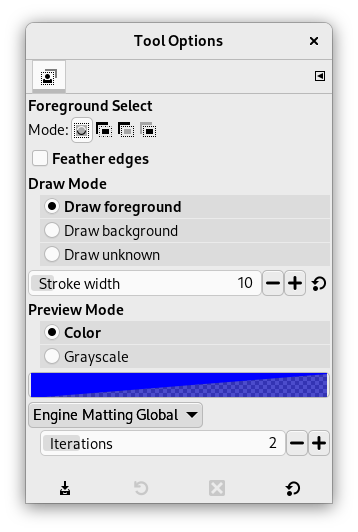
- Modalità, Feather edges
-
Nota Consultare Opzioni strumenti di selezione per un aiuto a comprendere il funzionamento delle opzioni comuni a tutti questi strumenti. Qui vengono spiegate soltanto le opzioni specifiche di questo strumento.
- Modalità disegno
-
Draw foreground: when selecting with a brush, what you draw will be considered part of the foreground, i.e. included in the selection.
Disegna sfondo: quando si seleziona con un pennello, ciò che si disegna verrà considerato parte dello sfondo, ovvero verrà escluso dalla selezione.
Draw unknown: When drawing on the background, outside the initial selection, it marks the drawn pixels as belonging to the foreground.
- Spessore delineatura
-
La dimensione del pennello da usare per la selezione.
- Modalità anteprima
-
-
Colore (predefinito): il colore della maschera di anteprima della selezione; il colore corrente viene mostrato nel campione di colore. Si può cambiare facendoci clic sopra.
-
Grayscale: allows you to see the resulting mask in black and white. This preview is similar to a layer mask. It can be useful in images where foreground and background color are similar and difficult to distinguish.
-
- Motore
-
Questo è il metodo che verrà utilizzato per selezionare il primo piano. L'impostazione predefinita è Matting Levin, che di solito offre i risultati migliori, ma si può provare anche Matting global, soprattutto se l'elaborazione è lenta e si sta lavorando con immagini di grandi dimensioni.
- Livelli (solo Matting Levin)
-
Numero di livelli sottocampionati da utilizzare. Numeri più alti possono migliorare la velocità di elaborazione a scapito di un maggiore utilizzo di memoria. Il valore predefinito è 2 livelli.
- Livelli attivi (solo Matting Levin)
-
Numero di livelli da risolvere. Numeri più alti possono aumentare leggermente la selezione, rallentando però l'elaborazione. Impostare questo numero su un valore superiore a Livelli non ha alcun effetto. Il valore predefinito è 2 livelli attivi.
- Iterazioni (solo Matting Global)
-
Valori più alti possono migliorare il risultato, ma rallentano l'elaborazione. Il valore predefinito è 2 iterazioni.
In a lot of images, distinguishing what is foreground or background can be difficult. Refining the selection allows you to extract these foregrounds. The procedure steps are the same as above, but, while drawing the foreground, you will often toggle Preview, use Zoom (+ key), switch to Draw background to delete unwanted background areas, and switch between Grayscale and Color preview mode.
Figura 14.16. Esempio di «Disegna sfondo»
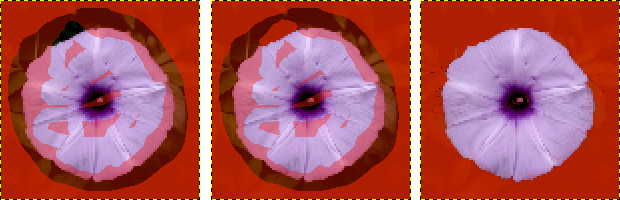
On the left: drawing foreground by mistake went over the background area: a part of the background will be included in the foreground selection!
In the middle: Draw background option is checked: draw on the unwanted background pixels.
On the right: unwanted selected pixels in the background are no longer in the foreground selection.
Figura 14.17. «Draw unknown» Example
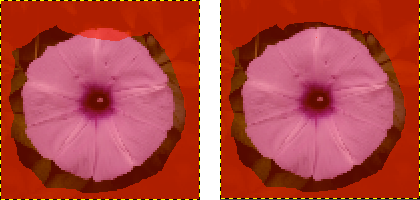
On the left: the selection left a small part of the foreground unselected, in the unknown pixels area.
On the right: with Draw unknown option checked, draw on the unselected pixels to select them. This shows that they are now selected.


