Questo filtro sposta i pixel del livello o della selezione attivi in base ai livelli di grigio di una Mappa di spostamento. I pixel vengono spostati in base alla pendenza del gradiente nella mappa di spostamento. I pixel corrispondenti alle aree piene non vengono spostati; maggiore è la pendenza, maggiore è lo spostamento.
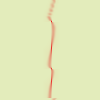
Figura 17.323. Da sinistra a destra: immagine originale, mappa spostamento, immagine spostata
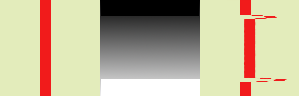
Le aree piene della mappa di spostamento non determinano alcuno spostamento. Le transizioni brusche determinano uno spostamento significativo. Un gradiente lineare determina uno spostamento regolare. La direzione dello spostamento è perpendicolare alla direzione del gradiente (angolo = 90°).
Figura 17.324. Con un gradiente non lineare
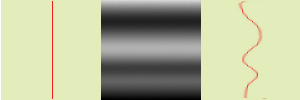
Un gradiente non lineare porta alla formazione di riccioli.
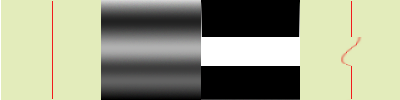
Figura 17.325. Con un gradiente complesso:
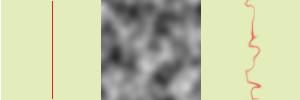
E un gradiente complesso, come quello che può creare il filtro Rumore continuo, produce un effetto vortice.
Questo filtro offre la possibilità di mascherare una parte dell'immagine per proteggerla dall'azione del filtro.
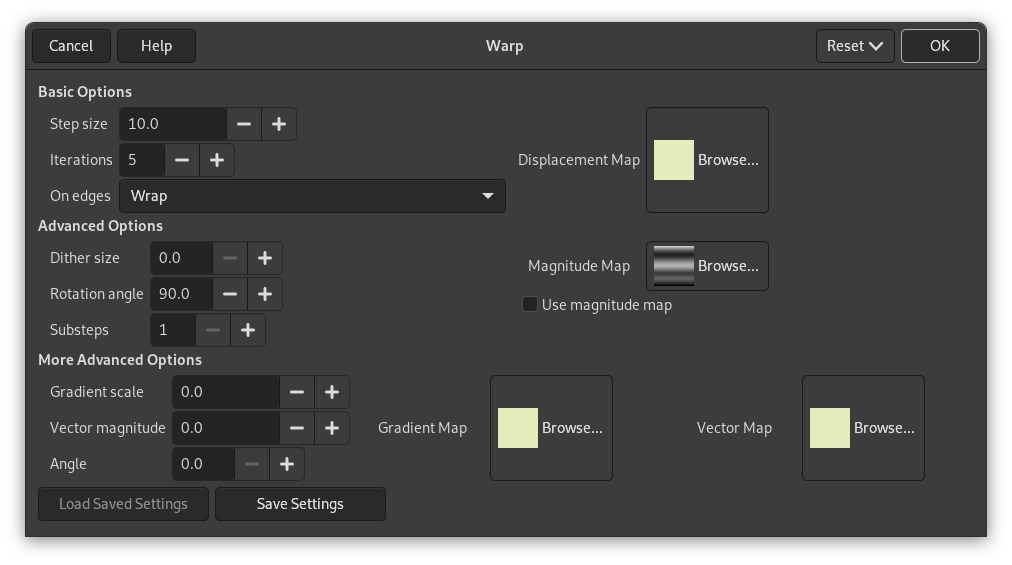
Opzioni di base
- Ampiezza passo
-
Un «Passo» è la distanza di spostamento per ogni iterazione del filtro. È necessario un valore pari a 10 per ottenere uno spostamento di un pixel. Questo valore può essere negativo per invertire la direzione dello spostamento.
- Iterazioni
-
Numero di ripetizioni dell'effetto quando si applica il filtro.
- Sui bordi
-
A causa dello spostamento, una parte dei pixel viene spostata oltre i bordi del livello o della selezione e, sul lato opposto, i pixel si svuotano. Le quattro opzioni seguenti consentono di risolvere questo problema:
- Avvolgi
-
Ciò che esce da un lato entra dal lato opposto (questa è l'impostazione predefinita).
- Spalma
-
Gli spazi vuoti vengono riempiti con una diffusione della linea dell'immagine vicina.
- Nero
-
Gli spazi vuoti vengono riempiti di colore nero.
- Colore primo piano
-
Gli spazi vuoti vengono riempiti con il colore di primo piano dell'area colorata nel Pannello degli strumenti.
- Mappa spostamento
-
Per essere elencata in questa selezione di file, la mappa di spostamento, che dovrebbe essere un'immagine in scala di grigi, deve essere presente sullo schermo quando si richiama questo filtro e deve avere le stesse dimensioni dell'immagine originale.
Opzioni avanzate
- Ampiezza dither
-
Una volta spostati tutti i pixel, questa opzione li distribuisce in modo casuale, conferendo grana all'immagine. Più alto è questo valore (0,00-100,00), più sottile sarà la grana.
- Angolo rotazione
-
Questa opzione imposta l'angolo di spostamento dei pixel in base alla direzione di inclinazione del gradiente. Gli esempi precedenti sono stati creati con un gradiente verticale e un angolo di 90°: quindi, i pixel sono stati spostati orizzontalmente e nulla è uscito dai bordi dell'immagine. Ecco un esempio con un angolo di 10° e 6 iterazioni:
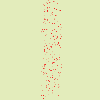
Figura 17.328. Con un angolo di 10° e 6 iterazioni:
Displacement is made according to a 10° angle against vertical. Pixels going out the lower border on every iteration are going in through the upper border (Wrap option checked), giving a dotted line.
- Sottopassi
-
Se si specifica un valore > 1, il vettore di spostamento viene calcolato in diversi sotto-passaggi, consentendo un controllo più preciso del processo di spostamento.
- Mappa magnitudine
-
Oltre alla mappa di spostamento, è possibile aggiungere una mappa della magnitudine. Questa mappa deve essere un'immagine in scala di grigi, con le stesse dimensioni dell'immagine sorgente e che deve essere visualizzata sullo schermo quando si richiama il filtro. Questa mappa conferisce maggiore o minore intensità al filtro su alcune parti dell'immagine, a seconda dei livelli di grigio di questa mappa di magnitudine. Le aree dell'immagine corrispondenti alle parti bianche di questa mappa saranno sottoposte a tutta l'intensità del filtro. Le aree dell'immagine corrispondenti alle parti nere della mappa saranno risparmiate dal filtro. I livelli di grigio intermedi ridurranno l'azione del filtro sulle aree corrispondenti dell'immagine. A tal fine, è necessario selezionare l'opzione Usa mappa magnitudine.
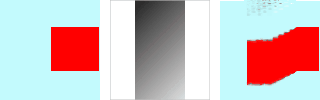
Figura 17.329. Esempio di mappa magnitudine:
Da sinistra a destra: immagine originale, mappa di spostamento, mappa di magnitudine, dopo l'applicazione del filtro «Warp». Si può notare che le aree nere della mappa di magnitudine impediscono al filtro di intervenire.
Opzioni più avanzate
Queste opzioni extra consentono di aggiungere due nuove mappe, una mappa gradiente e/o una mappa vettoriale.
![[Nota]](images/note.png)
|
Nota |
|---|---|
|
Per provare solo queste opzioni, è necessario utilizzare una mappa con un colore pieno per tutte le altre mappe. |
- Scala gradiente
-
Usando una mappa a gradiente (che dovrebbe essere un'immagine in scala di grigi), lo spostamento dei pixel dipende dalla direzione delle transizioni in scala di grigi. L'opzione Scala gradiente consente di impostare l'entità dell'influenza delle variazioni in scala di grigi sullo spostamento dei pixel. A ogni iterazione, il filtro agisce sull'intera immagine, non solo sull'oggetto rosso: questo spiega la sfocatura.
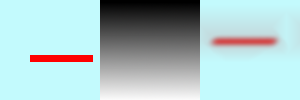
Figura 17.330. Esempio di scala gradiente
Da sinistra a destra: immagine originale, mappa gradiente, filtro applicato.
Nell'esempio sopra, il filtro «Warp» viene applicato con una mappa sfumatura (Scala sfumatura = 10.0). La sfumatura è obliqua, dall'alto a sinistra verso il basso a destra. La parte dell'immagine corrispondente alla sfumatura viene spostata obliquamente, ruotata di 90° (Angolo di rotazione 90° nelle Opzioni avanzate).
- Magnitudine vettore
-
Con questa mappa, lo spostamento dipende dall'angolo impostato nella casella di testo Angolo. 0° indica l'inclinazione verso l'alto. Gli angoli si muovono in senso antiorario. La mappa vettoriale determina di quanti pixel l'immagine verrà spostata a ogni iterazione.
Figura 17.331. Esempio di magnitudine vettore
Da sinistra a destra: immagine originale, mappa spostamento, filtro applicato.
Nell'esempio precedente, il filtro «Warp» viene applicato con un'intensità vettoriale. Il gradiente è verticale, dall'alto verso il basso. L'angolo vettoriale è di 45°. L'immagine viene spostata obliquamente, di 45° verso l'angolo in alto a sinistra. L'immagine risulta sfocata perché ogni iterazione agisce sull'intera immagine e non solo sulla barra rossa.
- Angolo
-
Angolo per mappa vettoriale fissa (vedere sopra).


