| 3.4. Dialog Vzorky | ||
|---|---|---|

|
3. Image-content Related Dialogs |  |
| 3.4. Dialog Vzorky | ||
|---|---|---|
|
|
3. Image-content Related Dialogs | |
In GIMP, a pattern is a small image used to fill areas by placing copies of side by side. See the Patterns section for basic information on patterns and how they can be created and used.
Dialog Vzorky slouží k volbě vzorku, kliknutím na ikonu požadovaného vzorku v dialogu. Vybraný vzorek se stane aktivním pro další práci v Gimpu a zobrazí se v indikační oblasti Panelu nástrojů. S gimpem se dodává několik desítek víceméně náhodně vybraných vzorků, další lze snadno přidávat.
The „Patterns“ dialog is used to select a pattern, by clicking on it in a list or grid view: the selected pattern will then be shown in the Brush/Pattern/Gradient area of the Toolbox. A few dozen more or less randomly chosen patterns are supplied with GIMP, and you can easily add new patterns of your own.
This dialog is a dockable dialog; see the section 2.3 – „Dokování dialogů“ for help on manipulating it.
You can access it:
From the Toolbox, by clicking on the pattern symbol in the Brush/Pattern/Gradient area (if you have checked the „Show active brush, pattern and gradient“ option in the toolbox preferences).
from the main menu: → → ;
from the Tab menu in any dockable dialog by clicking on
![]() and selecting
→ .
and selecting
→ .
From the Tool Options dialog of the Clone tool and the Bucket Fill tool, by clicking on the pattern source button, you get a pop-up with similar functionality that permits you to quickly choose a pattern from the list; if you clic on the Bucket Fill button present on the right bottom of the pop-up, you open the real pattern dialog. Note that, depending on your Preferences, a pattern selected with the pop-up may only apply to the currently active tool, not to other paint tools. See the Tool Option Preferences section for more information.
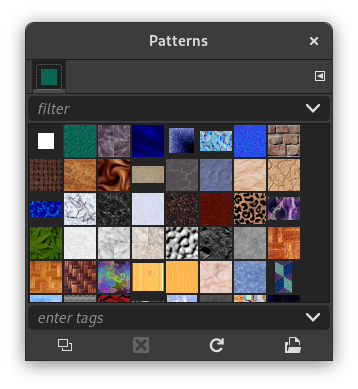
V nabídce karty zle zvolit mezi režimem mřížky ( ) a režimem seznamu ( ). V režimu mřížky jsou ikony vzorků uspořádány v husté pravoúhlé mřížce, které umožňuje prohlížet velké množství vzorků najednou. V režimu seznamu jsou vzorky uspořádány v seznamu, včetně svých názvů.
![[Tip]](images/tip.png)
|
Tip |
|---|---|
|
Independent of the real size of a pattern all patterns are shown the same size in the dialog. So for larger patterns this means that you see only a small portion of the pattern in the dialog at all - no matter whether you view the dialog in the list or the grid view. To see the full pattern you simply click on the pattern and hold the mouse button for a second. |
![[Poznámka]](images/note.png)
|
Poznámka |
|---|---|
|
Podnabídka umožňuje změnit velikost náhledů v dialogu podle potřeb uživatele. |
V horní části dialogu se zobrazuje jméno právě aktivního vzorku a jeho rozměry v pixelech.
Ve střední části jsou zobrazeny ikony (náhledy) všech dostupných vzorků, aktivní vzorek je zvýrazněn orámováním. Kliknutím na kterýkoliv z nich se příslušný vzorek aktivuje a zobrazí se v indikační oblasti Panelu nástrojů. Takto aktivovaný vzorek se pak používá k různým operacím v Gimpu.
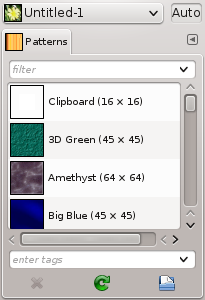
V tomto režimu se místo kompaktní mřížky zobrazuje seznam obsahující kromě ikon (náhledů) vzorků i jejich jména a rozměry. Kliknutím na některou z položek seznamu nastaví odpovídající vzorek jako aktivní vzorek Gimpu, stejně jako v režimu mřížky.
Dvojité kliknutí na jméno vzorku umožňuje jméno změnit. Měnit lze však pouze jména vzorků přidaných uživatelem, nikoliv vzorků dodávaných přímo s Gimpem. Změny jmen vzorků z adresářů, kam uživatel nemá právo zápisu, se neuloží.
Vše ostatní pracuje stejným způsobem, jako v režimu mřížky.
The button bar at the bottom offers the following functionality:
Pressing this button make a copy of the current pattern. It will have the same name as the original but with „copy“ added to it.
Stisknutí tohoto tlačítka odstraní vzorek ze seznamu a smaže odpovídající soubor z disku. Nelze však odstranit vzorky, které jsou dodávány jako součást Gimpu a instalovány společně s ním. Taové vzorky se nacházejí v systémovém adresáři patterns; odstraňovat lze ale pouze vzorky z adresářů, do kterých má uživatel právo zápisu.
Pressing this button causes GIMP to rescan the folders in your pattern search path, adding any newly discovered patterns to the list. This button is useful if you add new patterns to a folder, and want to make them available without having to restart GIMP.
If you click on this button, the current pattern is opened in a
new image window. So, you can edit it. But if you try to save it
with the .pat, even with a
new name, you will bang into a „Denied permission “
problem because this image file is „root“. But this
is possible under Windows, less protected.
You can get the patterns context menu by right clicking on a pattern. Most of the operations on patterns are also available through buttons at the bottom of the patterns dialog. Those operations are documented there.
See Patterns Dialog.
Copy Pattern Location allows you to copy the path of the selected pattern to the clipboard.
Show in File Manager opens the location of the pattern in the default File Manager on your system.
You can use tags to reorganize the patterns display. See 3.7 – „Tagging“.
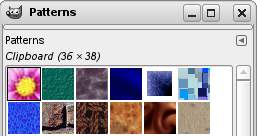
When you use the Copy or Cut command, a copy appears as a new pattern as the first entry in the Patterns dialog. This pattern will persist until you use the Copy (or Cut) command again. It will disappear when you close GIMP.
|
|
Poznámka |
|---|---|
|
You can save this clipboard pattern with → → as soon as it appears in the Patterns dialog. See 3.10.9 – „Paste as New Pattern“. |