Figura 2
Using high bit depth GIMP’s Exposure operation to lighten the ground by one stop without blowing out portions of the sky.
-
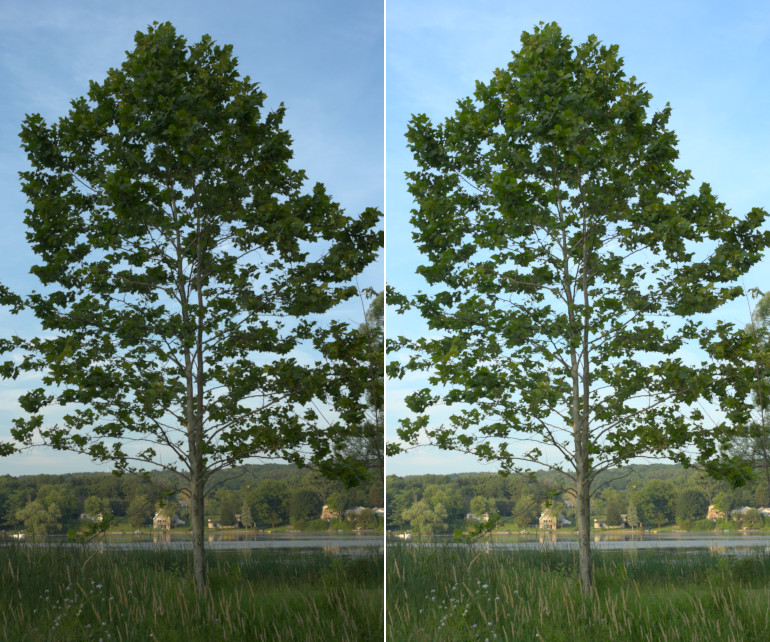
Izquierda: la imagen original, un archivo sin procesar de cámara interpolada que fue deliberadamente subexpuesta en la cámara para evitar eliminar el cielo. Puede que no parezca ser el caso, pero esta imagen ya está muy cerca de tener valores de canal RGB fuera de la gama en el cielo y un simple auto expansión del contraste no aclarará la imagen en absoluto.
-
Right: The same image after using high bit depth GIMP’s Exposure operation at 32-bit floating point linear precision to add one stop of positive exposure compensation. An inverse grayscale mask was used to keep the highlights from blowing out.
Este ejemplo paso a paso proporciona una imagen de muestra y se divide en cinco pasos, comenzando con la descarga de la imagen. Los pasos 3, 4 y 5 describen el procedimiento.
-
Descargue tree.png, que es una imagen sRGB de enteros de 16 bits. GIMP de alta profundidad de bits realmente es un editor solo de imágenes sRGB, por lo que es mejor que no intente editar en otros espacios de trabajo RGB.
-
Open tree.png with GIMP and assign the GIMP built-in sRGB profile (the image colors won’t change a bit). Then convert the image to 32-bit floating point linear precision: Select → → , and in the Encoding Conversion dialog, select Linear light (this ensures that the Normal blend mode produces radiometrically correct results).
-
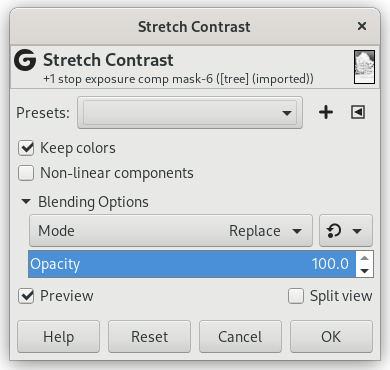
Make a copy of the “tree.png” layer via → or → , and label it “+1 stop exposure comp”. Then use → to add one stop of positive exposure compensation. Figure 3 below shows the proper settings for the Exposure operation dialog, and Figure 4 shows the result:
Figura 3
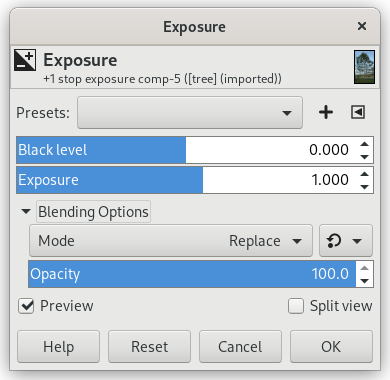
Using the Exposure operation to add one stop of positive exposure compensation.
When using the Exposure operation to add one stop of positive exposure compensation, make sure the image really is at floating point precision, because integer precision will clip the highlights.
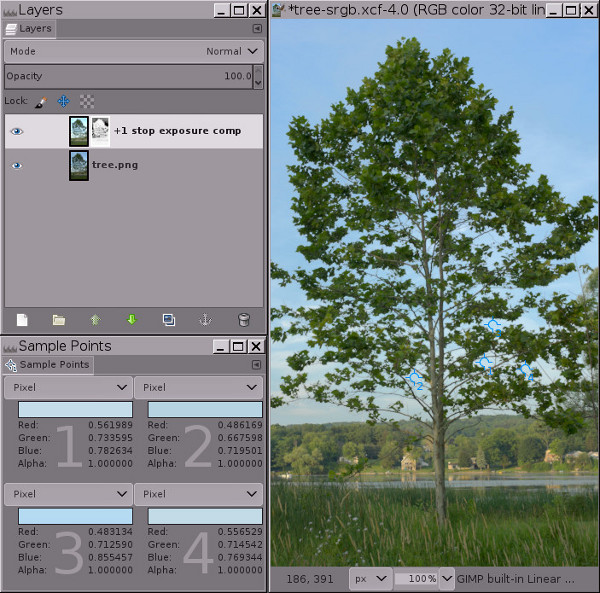
Figura 4
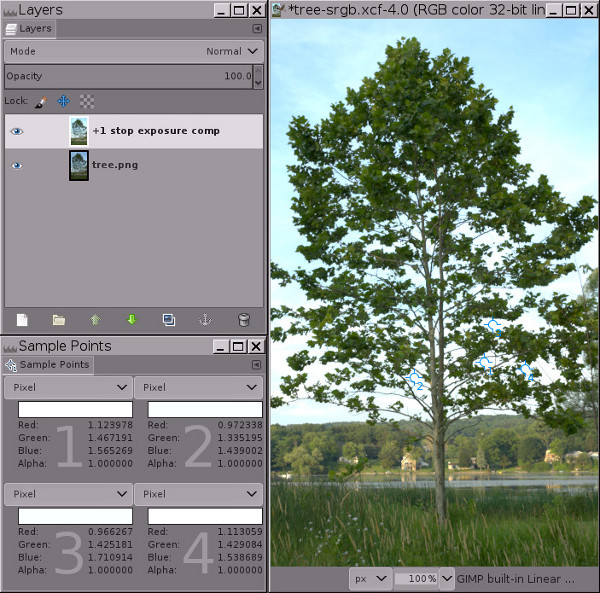
At floating point precision, GIMP’s Exposure operation is unbounded. This means you can use the Exposure operation to add positive exposure compensation without blowing out the highlights.
Observe los valores del canal RGB para los cuatro puntos de muestra: la información del canal que se habría recortado al usar precisión entera se codifica utilizando valores de canal que son mayores que 1.0 en coma flotante.
The image in Figure 4 clearly has “blown” highlights in the sky. But the highlights aren’t really blown (that is, clipped to 1.0 in one or more channels). Instead the highlight information is still there, but the RGB channel values fall outside the RGB display channel value range of 0.0f to 1.0f. The sample points dialog in Figure 4 above shows four sample points that have RGB channel values that are greater than 1.0. As shown in Figure 5 below, adding a mask allows you to recover these highlights by bringing them back down into the display range.
Si hubiera utilizado precisión de enteros en lugar de coma flotante, los reflejos realmente se perderían: los puntos de muestra tendrían un valor máximo de canal de 255, 65535 o 4294967295, según la profundidad de bits. Y la máscara solo «recuperaría» una extensión sólida de gris, carente por completo de detalles (pruébelo usted mismo y vea qué sucede).
-
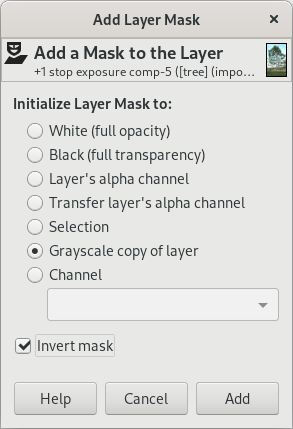
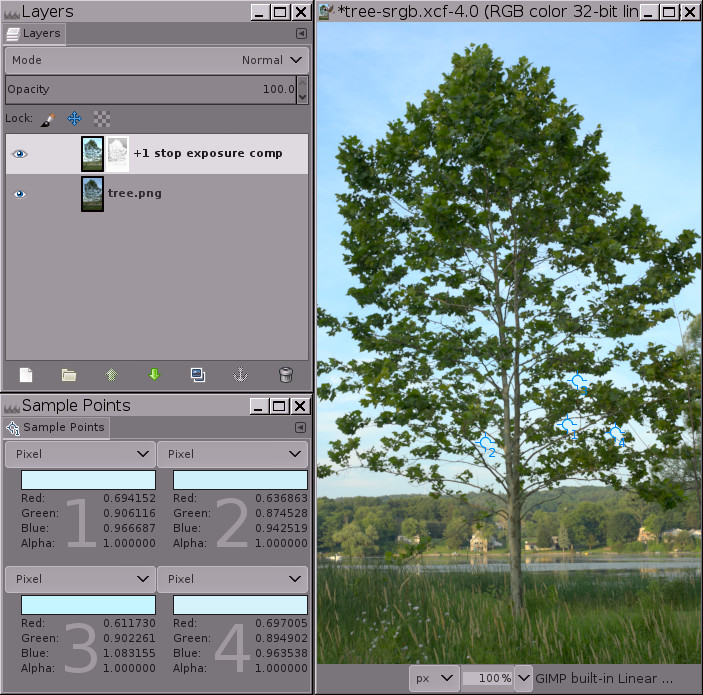
Add an inverse grayscale layer mask: Right-click on the layer and select → → , and when the Add Layer Mask dialog pops up, choose Grayscale copy of layer and check the Invert mask box.
Como se muestra en la Figura 5 a continuación, en este punto los reflejos volverán al rango de visualización, lo que significa que todos los valores de los canales RGB están entre 0.0f y 1.0f. Pero la imagen probablemente se verá un poco extraña (algo nublada y plana) y dependiendo de la imagen, los reflejos más brillantes podrían tener manchas oscuras, ¡no se preocupe! esto es temporal.
Figura 5
Resultado de añadir una máscara de capa de escala de grises inversa para devolver los reflejos al rango de visualización.
Agregar una máscara de capa de escala de grises inversa devuelve los reflejos al rango de visualización, pero llegados a este punto la mayoría de imágenes se verán planas y nubladas y algunas imágenes tendrán manchas oscuras en los reflejos. El siguiente paso, «Auto expansión del contraste», realizado en la máscara, se encargará de este problema.
-
Click on the layer mask to select it for editing, and then select → → :
Se debe marcar «Mantener colores» (aunque en realidad no importa en imágenes en escala de grises tales como las máscaras de capa).
Figura 6 a continuación se muestra el resultado final:
Doing → → on the layer mask removes the “cloudy” appearance, leaving a nicely brightened image with intact highlights.
→ → on the mask is necessary because just like the image layer has out of gamut RGB channel values, the inverted grayscale mask contains out of gamut grayscale values. → → brings all the mask grayscale values back into the display range, allowing the mask to proportionately compensate for the layer’s otherwise out-of-gamut RGB channel values, masking more in the layer highlights and less/not at all in the image’s shadows and midtones.
Notice that one of the sample points still has a blue RGB channel value that is slightly out of gamut. The easiest way to deal with this is to use → and drag the middle slider triangle to make a Gamma adjustment of 0.45 on the mask, not on the actual image layer. You can make this Gamma adjustment either on the entire mask (works well, less effort). Or else you can make the adjustment just on the mask shadows (which correspond to the layer highlights), in which case you’d load the mask as a selection, invert the selection, and make the Gamma adjustment. Or if the remaining out of gamut channel values are only very slightly out of gamut, make a “New from Visible” layer and then → → the result to bring the remaining channel values back into gamut.
That’s the whole procedure for using the Exposure operation to add a stop of positive exposure compensation to the shadows without blowing out the highlights. Now you can either fine-tune the mask, or else just make a “New from Visible” layer and continue editing your nicely brightened image. Depending on the image and also on your artistic intentions for the image, the mask might not need fine-tuning. But very often you’ll want to modify the resulting tonal distribution by doing a gamma correction, or perhaps a Curves operation on the mask, or else by painting directly on the mask. And sometimes you’ll want to blur the mask to restore micro contrast.


