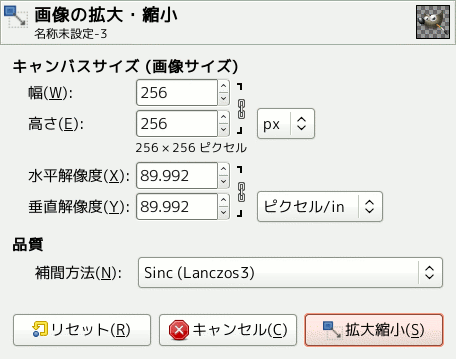
コマンドは画像の縦と横のそれぞれの画素数を変更することで画像の大きさを物理的に増加もしくは減少させます。 拡大・縮小は画像の内容を変更して行われますのでキャンバスの大きさも変わります。
この操作は画像を全体的に変更します。 レイヤーの幅や高さは 1 ピクセルたりとも伸縮できないため、 大きさの異なるレイヤーが画像に含まれているときは画像を小さくしても一部のレイヤーが縮小できません。 その場合には操作を実行する前に警告が出ます。
特定のレイヤーだけを拡大・縮小するには レイヤーの拡大縮小... コマンドをご利用ください。
![[注記]](images/note.png)
|
注記 |
|---|---|
|
If scaling would produce an image larger than the 「Maximum new image size」 set in the System Resources page of the Preferences dialog (which has a default of 128 MiB), you are warned and asked to confirm the operation before it is performed. You may not experience any problems if you confirm the operation, but you should be aware that very large images consume a lot of resources and extremely large images may take more resources than you have, causing GIMP to crash or not perform well. |
- 画像サイズ (キャンバスサイズ)
-
画像の現れる場所を 4 つの段階に分けると、 画像ファイルの中にあったものが、 読み込まれたあとは RAM に収まり、 表示されれば画面上に現れ、 印刷されれば紙面に描かれます。 画像のありかはこのいずれかになることを念頭に置いて話をすすめます。 画像を拡大・縮小することは画像に含まれる画素数 (つまり情報量) が変化することですから、 画像を収めるための RAM やファイルの容量に直接の影響があります。
ただし印刷された画像の大きさは画像の解像度にも依存します。 解像度は紙上で単位距離あたりの画素数 (ppi ならピクセル毎インチ) を本質的に決定します。 画像をいっさい拡大・縮小せず画素数もいじらぬまま印刷物の画像の大きさを変更する必要があるときは 画像印刷解像度の設定 ダイアログをお使いください。 画面上の寸法は画素数のみならず画面の解像度や表示倍率、 さらには ピクセル等倍で表示 オプションの扱いによっても変わります。
If you enlarge an image beyond its original size, GIMP calculates the missing pixels by interpolation, but it does not add any new detail. The more you enlarge an image, the more blurred it becomes. The appearance of an enlarged image depends upon the interpolation method you choose. You may improve the appearance by using the Sharpen (Unsharp Mask) filter after you have scaled an image, but it is best to use high resolution when you scan, take digital photographs or produce digital images by other means. Raster images inherently do not scale up well.
You may need to reduce your image if you intend to use it on a web page. You have to consider that most internet users have relatively small screens which cannot completely display a large image, for example on mobile devices.
画素を加減する処理を「再標本化」 (resampling) といいます。
- Width, Height
-
When you click on the command, the dialog displays the dimensions of the original image in pixels. You can set the Width and the Height you want to give to your image by adding or removing pixels. If the
chain icon next to the Width and Height boxes is unbroken, the Width and Height will stay in the same proportion to each other. If you break the chain by clicking on it, you can set them independently, but this will distort the image.
もちろん寸法の設定に使える単位はピクセルに限りません。 記入欄の右隣の引き出しメニューで他の単位に換えて指定できます。 また百分率を単位に選べば元画像の大きさとの相対比率で大きさを設定できます。 インチやミリメートルのような実寸単位も利用できます。 しかしこのとき 水平解像度 と 垂直解像度 に適切な値を設定しなければなりません。 この解像度をもとに実寸から画像の画素数による寸法への変形が行なわれるためです。
- X resolution, Y resolution
-
画像印刷の解像度が 水平解像度 と 垂直解像度 で設定できます。 寸法は引き出しメニューで他の単位にも切り替えられます。
- 品質
-
To change the image size, either some pixels have to be removed or new pixels must be added. The process you use determines the quality of the result. The Interpolation drop-down list provides a selection of available methods of interpolating the color of pixels in a scaled image:
Interpolation methods are described in 補間アルゴリズム.
![[注記]](images/note.png)
|
注記 |
|---|---|
|
レイヤーや選択範囲やパスの大きさも変えられる 拡大・縮小ツール も参照してください。 |


